

Introduction: Minivan Center Console


I decided to build a replacement centre console for our minivan.
At first glance this might seem a bit strange, as the van already has a perfectly serviceable console between the two front seats. It has four cup-holders, which we like. It also has a small storage tray covered by a lid -- which we also like, but it is too small. But for the rest, it's just a big tray.
The console had this mechanism under it, so that you can fold the console down, in case you just prefer a "pass through" area. However, that mechanism occupies almost half of the space under the console. (The console is shown here detached from the seat and laying on it's side, which shows the mechanism.) Therefore we also cannot really make efficient use of the space under the console.
Here is a photo of the finished project as well.
Step 1: Video Build
If you would prefer, you can watch a video of this project. Otherwise, read on!
Step 2: A Box


I designed this rather ordinary-looking box to fit in that space. You have to work with the space that is available, so a box is pretty much the most optimum design. For my van, I settled on a box that was about 11 inches wide by 10-1/2 inches long. The height is approximately equal to the height of the seat (plus a bit of adjusting to make sure there was room for a kleenex box.)
On the front of the console box, there are two compartments. One was sized to hold a box of kleenex. That compartment needs to open, so that you can replace the kleenex when it is empty. For that, I made a simple front plate out of thin plywood. It has four small slots, which slip over some panhead screws to hold it firmly in place.
The other compartment can hold some CDs, or Books, or maps or whatever else you feel like.
The rear of the box is currently just an open compartment. I considered putting a door on it, but we have not found that necessary. Again, you can tuck things in here for storage. Or, since it is open, you can have long items from the passenger compartment (ie: feet) that protrude into the space.
The bottom of the console box is approximately divided in half. The front half is about 4" deep, just deep enough to accommodate the previously mentioned kleenex box. The back half is the rest of the space.
The top of the box is also sectioned off. It is about 4" deep -- I sized it deep enough that I was pretty sure that a cup or waterbottle would stay securely in place.
We still wanted it to have four cup-holders. So after figuring out the space needed for that, and figuring the optimum placement, I was left with two other compartments. One was large enough for general purpose storage -- books, change, french fries, Legos...
But that still left some room. After some thought I designed in two small oval shaped openins in the top. This could nicely hold our sunglass cases, and also provided a good place to drop in your cell phone.
Step 3: Optional CNC Step


We lived with a rough version of this for several months, and in the end decided that we really did not want to change anything about the box itself. It did need some sanding and a nice paint job, but otherwise it was functional.
The top though was a bit rough -- I had cut out some openings with a jigsaw in some spare HDPE that I had (visible in red in the photos above). It was ok, but I really wanted a more refined version, so I pulled out my small CNC machine and set about cutting out a top for our console.
(This is entirely optional. I did this because I had one. You could also do this with a jig saw or scrollsaw)
As a point of interest -- it took me FIVE tries to get this done on the CNC machine. First I did a shallow pass on a piece of plywood to see if the pattern was working. That aborted as the carriage hit one of the clamps. (I need a more low-profile way to clamp things down) So I ran it again and it was fine. Then I ran a test in some scrap HDPE as I had used that on my earlier test and I wondered about using it again. It worked, and gave a REALLY clean cut and nice round openings, but it was very slow. I also decided that 1/2" HDPE was just too thick. So I moved on to 3/16" plywood. First time through the carriage again hit some wood and stopped -- my mistake; a piece of wood had fallen behind the CNC machine. And then finally my fifth try produced a clean useable top for my console.
I have one of the first generation XCarve units from Inventables, and the router/spindle motor is really underpowered for CNC work in wood.
Step 4: Paint the Box


I painted the insede of my console white for high visibility. I used kitchen + bath paint there for durability and washability. I painted the outside a silver-grey to match the interior of my van.
I used two coats, with sanding in between, because water-based paint raises the grain just like any water-based finish does. I do wish that I had used some nicer plywood for the box, as it was a bit rough in places, but most of the rough parts are hidden in the final product. After painting I put it back together. I could have glued on the top, but I decided to just use screws. It is plenty strong, and this way I could take it apart if ever needed.
Step 5: Installed

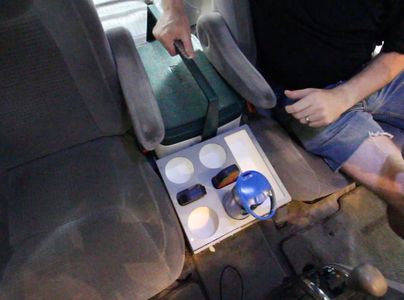


(I apologize for the dark photos from inside the van. It is a small and confined place, and not well lit!)
Here it is installed in our van. It is wedged pretty tight between the seats. I also cooked up a sort of wooden hook on the one side, which hooks into the spot where the factory console had been bolted to the side of the seat. This helps keep it solidly in place.
So we now have more storage, in a more compact arrangement. So we have room between the seats for groceries or backpacks ... And on long trips we can tuck in a good sized cooler ... or just have more leg room for the people in the middle row.
(Hey, the middle person doesn't get a window, so at least they can have extra leg room!)

Participated in the
#Vanlife Contest


