

Introduction: Mobile Desk


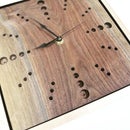

I have a large abundance of alder in my shop and decided I would make it out of that. Alder is a nice looking light weight wood, which is what you want in a mobile desk. I figured one way to make it look cooler would be to glue it up like an edge grain cutting board and it just so happened I had two slightly different shades of alder that I could alternate in a stripe pattern. The dimensions of the desk are 22.5″ L 11.5″W and 3/4″ thick. There are seven rows of holes across the board and five holes on the first two rows down and six holes on the next five rows. I fit the cutout for the mouse pad to fit the one I had and the slot for the I pad is 5.5″ x .5″ deep.
Step 1: Material List
14 strips of 3/4" x 3/4" x 22.5" L (Wood of your choice)
You could also just get a pre-made panel measuring 22.5" x 11.5"
One Mouse Pad
Wood Glue
Step 2: Cutting and Planing


I started cutting the alder into 1″ wide strips on the table saw and then glued them into two boards turning each piece onto it’s side like an edge grain cutting board. The reason for gluing into two boards is because I needed a way to cut the provision for the mouse pad to be inset into the board. After the glue had dried I pulled the boards out of the clamps and ran them through the planer a couple of times to even up the boards and clean them up. Then it was time to cut out for the mouse pad, for this I used my dado stack and miter gauge on my table saw. I cut the groove a little deeper than the thickness of the mouse pad because I knew I would running the boards back through the planer for final thickness.
Step 3: Gluing Up the Two Blanks


After making the cutout with the dado stack, I glued the two boards together and ran the through the planer to get to my final thickness of 3/4″. I was careful to check the top and make sure to not remove too much material so the mouse pad would sit flush.
Step 4: Drilling the Holes


The nest step is to draw out a grid on the left side of the mouse pad for the holes. I measured the length and width and divided by the number of holes to get the number in which to mark the holes out evenly. I then used a 1″ forstner bit to drill out the holes. I set the drill press to mostly drill through the board only letting the tip of the bit go through the bottom. I then flipped the board over and finished drilling the holes from the bottom side. This step eliminates nasty tear out the normally occur when drilling holes like this.
Step 5: IPad Slot


The nest step is to cut the slot for the iPad/iPhone to stand in. I marked out my place for the slot on the top side behind mouse pad. I set up an edge guide and making multiple passes I cut the slot 5.5″ wide and .5″ deep. I also cut a small slot all the way through the board in the middle for the charging cable to be able to fit through.
Step 6: Sanding and Finishing


I then drew a small radius on the corners and sanded them off at the sander and then used my orbital sander to finish sand the whole board. I used spray on poly for the first time on the project and was pleased with the results. I knew I needed some type of spray finish because of all the holes. I made sure to tape off where the mouse pad goes to prevent getting finish on that spot.
Step 7: Gluing the Mouse Pad


The last step is to install the mouse pad, I used contact cement for this. I first had to cut a square edge on the mouse pad which I did using a sharp razor blade and a square. I then applied the contact cement to both the back side of the pad and the board, I did two coats letting the first one dry before applying the second coat. Once the contact cement was dry, I laid some small strips of wood on the board to prevent the pad from sticking before I could get it into place. Be careful to get the pad where you want it because once the both surfaces with contact cement touch one another they are STUCK!
Step 8: Watch the Video!
Step 9: Admire Your Work!


