

Introduction: Non-Functional Circuit Broach


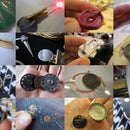

This is a decorative piece made from functional elements that form a non-functional circuit. The beauty of it lies in its non-functionality. If electricity were to flow, LEDs to blink, motors to vibrate or resistors to resist, then it would just be another circuit board.
Step 1: Materals and Tools

MATERIALS:
- Perfboard
- Solder
- Circuit board components: resistors, diodes, transistors, capacitors, voltage regulators, potentiometers, headers, LEDs, vibration motors, wire, cable, ribbon cable&
- Safety pin or reuse the back of an old broach
TOOLS:
- Soldering iron
- Helping hands
- File
- Cutting knife or small saw
- Wire cutters or nail clippers
- Wire strippers
Step 2: Soldering


Decide on your layout and pattern ahead of time or make it up as you go. Push a few components through the holes for the perfboard and bend their legs slightly to keep them from falling out. Then solder them into place. And repeat this action until you have filled all the holes or are happy with your design.
Here is an Instructable that will show you how to solder >>
https://www.instructables.com/id/How-to-solder/
Step 3: Fasten Pin


The final step is to attach some kind of fastener to the back of your non-functional broach so that it can be worn. I used the back pins from old pins and they were amazingly easy to solder. First I decided how to place it on the back of the broach, then I held the pin with the helping hands and applied solder to it before soldering it to the solder of the back of the components.


