

Introduction: Preparing the Waterjet for Cutting


BE CAREFUL WHEN MOVING THE NOZZLE; IT IS FRAGILE.
Prepare the machine

- Push the green power button on the side of the cabinet.
- Do not turn on the pump with the rotary switch yet.
- Check the scale next to the garnet hopper.
- If it is low, see Shop Staff.
- Close the exhaust valve on the garnet tank.
- The handle should be perpendicular to the pipe.
- Lift the garnet hopper handle (under the lid) and hold it.
- Open the air valve on the garnet tank.
- The handle should be parallel to the pipe.
- The garnet hopper handle should stay up, and sealed.
- Replace the lid.

Moving the nozzle
Note: The nozzle is fragile and expensive. Check the area before moving the nozzle, and make sure there are no obstacles.
- Raise the nozzle before moving it.
There are two methods to move the nozzle:
- Keyboard keys
- The arrow keys move the nozzle in X & Y (hold shift for rapid moves).
- Page Up/Down move the nozzle in Z (use 7 or 1 on the keypad for rapid moves)
- Onscreen buttons
- There are buttons for X, Y and Z onscreen.
- Note: Be careful using the buttons; it is possible for the machine to lag behind the button clicks and keep moving after you want it to stop. This can be a serious problem for -Z (down) movement.
Step 1: Workholding
ASK SHOP STAFF FOR HELP WITH WORKHOLDING IF NEEDED.
Load the material
- The slats in the tank can be sharp and rusty; wear cut resistant gloves.
Place the material flat on the slats. If there is any danger of contacting the nozzle with your material, move the head far out of the way.
All material must be mechanically secured.

Workholding - small pieces
Use the curved clamps to hold the material to the table.
- Use at least 3 clamps.
- Thin material can be backed with 3/4" plywood to reduce warping.

Workholding - large pieces and full sheets
- Use the curved clamps to hold the sheet to the table.
- Use at least two clamps on the bottom and left edges.
- If the workpiece is large enough, clamp the top and/or right edge as well.
See Shop Staff if you need assistance.
Step 2: Set the Z Offset for the Nozzle
The nozzle needs to be just above the material you are cutting. If the nozzle is too low and comes in contact with the material, water will flow backwards into the garnet tube and the machine will stop cutting. It’s OK to set the nozzle a bit higher than normal if you like. The cut quality may be slightly lower, but it lowers the chance of clogging the garnet tube.

- Move the nozzle over your material.
- Place the Z Height gauge under the tip of the nozzle.
- Slowly lower the nozzle until the gauge just slides under it.
- Click the Zero Z Height button on the left.
- Do not click the Go To 0 button on the right.
- Confirm that the display reads 0.
Step 3: Confirm the Toolpath
BE WARY OF COLLISIONS.
Set Path Start
Path Start is where the controller will start the first move in your geometry. When you created the toolpath you selected the starting point.
The next step will tell the controller where that point exists in physical space.

Omax calls this Path Start, but other machines call it Home, User Home, User Zero or G54.
Do not confuse Path Start and User Home.
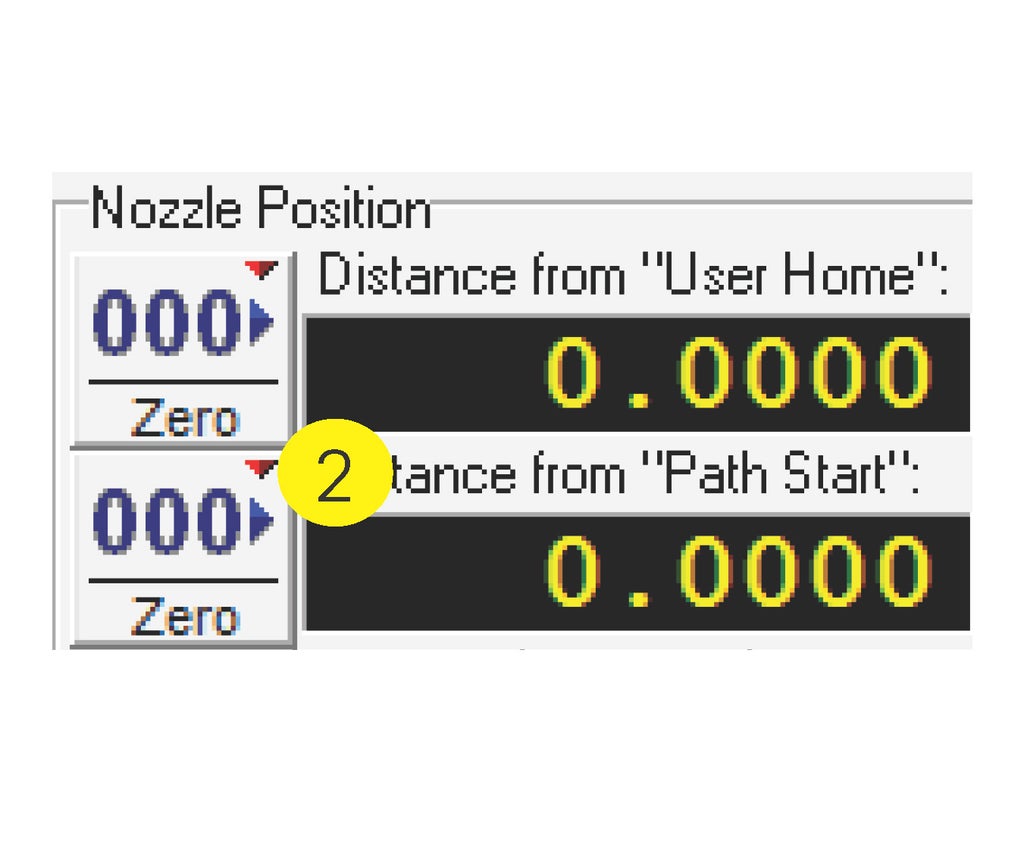
- Move the nozzle to your start point (Path Start) on the material.
- Click the Zero button next to Distance from “Path Start”.
- Although the two “Zero” buttons look the same, they have very different reactions.
- Do not click the upper button.
Check for collisions
If you have an area where you may contact a clamp, or if you aren’t sure if your material is large enough, you can send the nozzle to a specific place on the geometry.

- Raise your Z to a safe height.
- Right-click Begin Machining.
- Left click Go To Spot On Path.
- Click the spot in your geometry where you want the nozzle to go.
- The nozzle will travel there in a straight line.
- Hover your finger over the Pause button on the controller.
- After the nozzle has moved, click Close in the dialog box.
Repeat these steps for any point that may pose a danger of collision.
Return to Path Start
Note: If you fail to return to Path Start before you begin cutting, the machine will start cutting from its current location (your current position will become Path Start).
Raise the head to a safe Z.
Use the keyboard to move the nozzle back to your Path Start position.


