

Introduction: Pull Tab Wallet


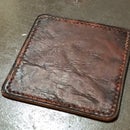
This is the wallet I use everyday!
History
About 2 years ago I was sick of traditional card holders with a limited amount of pockets. I wanted a smaller/slimmer wallet but also a wallet that did not restrict the amount of cards I could hold. After much browsing I came across Distil Union's Micro Wallet and I loved the concept. The only thing I did not like was how the elastic band would be on the outside and double as a cash pocket. So for the longest time I did not have a cash pocket, until I came across the Anson Calder Card Wallet. I really liked the design of having a diagonal slit for the cash pocket. Taking the two concepts I made the wallet you see now. This is the 5th time I have made the pull tab wallet. Each time I make this wallet I try something different so I can learn from each project.
Notes
So I have made this wallet so many times that I know it pretty well but I realized as I was writing the steps, that steps 6 and 18 are especially confusing so please don't hesitate to ask questions if anything is confusing! Better to ask questions than have 8 hours of work go down the drain...
Step 1: Materials I Used
- Leather (Horween)
- Pen
- Leather Marking Pen (because it's non permanent)
- Skiver
- Knife
- Metal Ruler
- 3in wide elastic bands
- 1in ribbons
- Something to help you draw right angles
- Lighter
- Edge Beveler
- Leather Glue (Seiwa water based glue)
- Contact Cement
- Awl
- Wing Divider
- Pricking Iron (3 mm)
- Waxed Thread (0.6 tiger thread)
- Stitching Needles
- Edge Finish (Edge Kote)
- Something to apply the edge finish
- Burnisher attached to Dremel
- Sandpaper
- Edge Creaser
- Assorted Hole Punches
- Tape
Step 2: Figure Out Your Dimensions


- The length should be however long you need to wrap around your cards like a taco
- The width will be the width of your cards, plus a little bit just in case
- Figure out whoch side of the leather you want to be the front and back side of the wallet, I labeled it on the flesh side(fuzzy side) so I don't forget
Step 3: Optional: Make Leather Thinner


- I use a leather planer to make my work piece thinner
- Then I remove some of the fuzz that builds up at the edge
Step 4: Cut to Width

- Brace your knife against the straight edge for a straight cut
- Make sure the blade is perpendicular to your work piece
- I recommend a metal straight edge because the knife will dig into plastic ones
Step 5: Measure, Mark, Cut, Singe and Trim Elastic Band


- I used a 3in wide elastic band
- Wrap elastic band around however many cards you usually carry
- Mark the length it takes to go around your cards 360
- Cut the band a bit shorter than where you marked, this way your cards will fit snug plus the band expands a bit over time
- Make sure to put enough downward force to cut through the elastic band, otherwise it will fray
- I like to singe the edge and the trim the edge so it's straight
Step 6: Figure Out How Much of the Card You Want Exposed


- I like to have 1.5in of the cards exposed when I pull the tab
- Which ever side you chose to be the front side of the wallet
- Mark the flesh side with your desired amount extended
- Figure out where you want to position the elastic band relative to the leather and mark the elastic band
Step 7: Mark the Center and Glue


- Line the start of the ribbon with the mark you just made on the flesh side
- Cut the ribbon past the other side of the leather, I like to have excess so I have options later
- Mark the center of the ribbon
- Mark the center of the line you drew on the elastic
- Line up the center marks you just drew and glue
- Try to have the ribbon extend past the line by a little bit so you don't have to trim the excess
Step 8: Punch Holes and Stitch


- I saddled stitched this for extra reinforcement
- I will not get into how to saddle stitch because there are amazing tutorials on youtube and I will probably confuse you if I tried to teach you here
Step 9: Optional: Round Corners


- I use a card and a stencil to round off the corners
Step 10: Mark Your Stitch Line


- For this project, stitching is optional because it's purely for aesthetics
- Figure out how far you want the stitching to be from the edge, and set your wing divider to that length
- I chose 4mm because I knew I was going to trim the edges after
- Mark your line with the wing divider
- I prefer to mark both ends with a wing divider and connect the line with a scratch awl
- Again I used a card for round corners
Step 11: Punch


- There are a couple tools you can use to punch your stitch holes, I use pricking irons
- There are also different techniques, some people prefer to punch all the way through, other just mark the leather and go through with an awl later
- Line up the pricking iron onto the stitch line you marked
- Make sure the pricking iron is perpendicular
- Tap pricking iron with a mallet
- Put the last two spikes of the pricking iron into the holes you just made so the spacing for the new holes you make will be the same
- Rounded corners are a bit hard, I just eyeballed the spacing
- As you make your way around and almost reach the end, keep in mind spacing, you may have to adjust the spacing a bit so you don't end up with 2 holes super close to each other
Step 12: Pick Thread Color


- Pick a thread color that compliments the color of the leather
- You want about 4 times the length you plan on stitching
Step 13: Saddle Stitch


- Again I will not go into detail on how to saddle stitch, but the result that I am going for is the slant you see in each stitch
- Just take your time and make sure each stitch looks the same
- You don't have to pull too tightly, just enough so there isn't slack
- End your stitch on the flesh side and singe the thread
Step 14: Doing the Edge


- My process starts with beveling the edge
- Sanding the edge at an angle
- Applying Edge Kote
- Burnishing with burnisher attached to Dremel
- Repeat until you are satisfied with how the edge looks
Step 15: Optional: Edge Creasing


- This is my first time doing this step, but
- From what I've seen people do, they heat up the creaser and crease along the edge
Step 16: Punch Hole for Ribbon


- Measure an inch from the edge of the back side of the wallet and mark the flesh side
- The ribbon I used was 1in wide so thats how big the slit was
Step 17: Make Cash Pocket


- The cash pocket is on the front side of the wallet
- I eyeball how much of my bills I want showing
- Enough for easy access but not so much that bills fall out
- I punched small holes and the end of the slit to give the pocket a little more room
Step 18: Start Gluing


- Wrap the elastic band around your cards with the adhered ribbon on the inside
- Tape together the edges
- Pass the ribbon through to the other end wrapping around all the cards
- TEST! Make sure that if you pull the tab, the cards should slide up
- Do a dry fit BEFORE gluing
- Apply glue to the area above the slit you cut out for your cash pocket (I forgot to take a picture of this)
- Apply glue to the area I marked in white, this will form the inside of your cash pocket (I actually forgot to do this and ended up having to fix it later)
- Apply pressure until glue sets
Step 19: Punch Hole Into Elastic Band


- As you will notice, there is no opening for the ribbon to come out of, we will fix that
- Fold over the back side and mark onto the elastic band where the opening should be
- BE VERY CAREFUL FOR THIS STEP
- Put scrap pieces of leather behind the elastic band
- LIGHTLY punch out the opening for the elastic band, you do not want to punch an opening all the way through to the front of your wallet (I know this because thats what happened to me *insert sad face*)
Step 20: More Gluing


- I remembered to take a picture this time :D
- Put your cards in so the shape is right
- Apply glue
- Feed ribbon through the opening in the leather
- Apply pressure until glue sets
Step 21: Finishing the Tab


- How you want to finish the tab is personal preference, you could fold the ribbon over itself and glue it
- I like to have a .5in leather tab
- So I skive a piece of leather down till its pretty thin
- Cut off any excess
- Glue onto the ribbon
Step 22: Congratz You Finished!


- Admire your work
- Take pictures, send it to all your friends
- Think about what to make next

Second Prize in the
Leather Challenge


