

Introduction: Quadruped With Camera


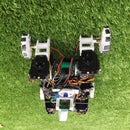
This is my first quadruped robot with a premade frame, but custom software. The robot use a raspberrypi as it brain and had the ability to live stream video. This tutorial is specificaly for people who want to know how to control and live stream their robot over wifi using a Nodejs server.
Step 1: Materials
_The Frame
2x Aluminum Multi-Purpose Servo Bracket Two Pack(2x12 = $24)
2x Aluminum Long "C" Servo Bracket with Ball Bearings Two Pack (2x13 = $26)
2x Aluminum "L" Connector Bracket Two Pack (2x6 = $12)
buy at http://www.lynxmotion.com/c-87-standard-hitec-brac..
1x Quadruped Body Kit 2 ($20)
buy at http://www.lynxmotion.com/c-88-chassis-acc.aspx
_Printed Parts
4x Lower Leg
4x Inner Tread Cover
4x Outer Tread Cover
4x Main Motor Hub
8x Side Motor Hub
_Electronics
1x Raspberry pi 2 ($40)
1x camera module ($8)
1x usb wifi adapter ($5)
1x Mini Maestro 18-Channel USB Servo Controller ($40)
1x raspberry pi motor hat ($22)
4x Hobby DC motor ($5)
12x HS-645MG Servo Motor (30 each x 12 = $360)
1x BAT-05 6V / 2800 mAH Ni-MH Rechargeable Battery ($27)
1x 6V - 12V NiMH / NiCd Smart Charger ($22)
buy at http://www.robotshop.com/
Frame = $62
Electronics = $530
Total + tax + shipping = $650
Note: The most costly part of this project is the servos. If you want to cut back you can use the HS-422 servo($10 each) servo partially or fully, but you might need to get a lighter battery if you intended to use a full HS-422 build.
Step 2: Building the Frame
Making the frame is pretty self explanatory. The site have it own instruction on constructing the leg. Just follow the instruction on this site http://www.lynxmotion.com/images/html/build82a.htm. If you bough all the correct part, you should be able to build 4 3dof leg. Afterward, make the body and attached the 4 leg on it.
Step 3: Preparing the Raspberry Pi
First, hook up your raspberry pi to a monitor/tv that had an HDMI port. The pi will boot up and ask you for password and username. The default username is "pi" and default password is "raspberry". Once you log in , type raspi-config and set the files-ystem to used all of the sd card space. Then go to advanced option and enabled the camera and ssh. Now we need the raspberry pi to make a connection with the wifi. Follow these step:
- sudo nano /etc/network/interfaces
you will see the text layout as follow
- auto lo
- iface lo inet loopback iface eth0 inet dhcp
- allow-hotplug wlan0
- iface wlan0 inet manual
- wpa-roam /etc/wpa_supplicant/wpa_supplicant.conf
- iface default inet dhcp
change it to
- auto lo
- iface lo inet loopback iface eth0 inet dhcp
- allow-hotplug wlan0
- iface wlan0 inet manual
- iface default inet dhcp
- ssid="your network name"
- psk="network passowrd"
Step 4:
Once you had wifi connection on your raspberrypi, type in the following command:
- sudo apt-get update
- sudo apt-get nodejs
- npm install socket.io
- npm install express
- npm install pololu-maestro
- npm install i2c
The command should install nodejs and the necessary libraries for this project.It should create a folder call node_modules. And we need to move into this modules an install one more libraries.
- sudo git clone https://github.com/omcaree/node-pololumaestro.gi
This should install the library for using nodejs to communicate with the servo controller. Next we need to install the software for camera streaming. Use these command for installing the camera :
- curl http://www.linux-projects.org/listing/uv4l_repo/l... | sudo apt-key add -
- sudo nano /etc/apt/sources.list
- deb http://www.linux-projects.org/listing/uv4l_repo/r... wheezy main (paste this line into the file)
- sudo apt-get update
- sudo apt-get install uv4l uv4l-raspicam
- sudo apt-get install uv4l-webrtc
Now install the camera into you raspberrypi and run this command.
- uv4l --driver raspicam --auto-video_nr --width 640 --height 480 --encoding h264 --framerate 20 --vflip yes --hflip yes
- Then put this address in your browser : http://raspberrypi:8080/stream. You should see a stream with less than .5 s latency
Now that we had all the necessary tools on the raspberrypi. It time to make a webserver and control it through wifi.

Participated in the
Robotics Contest

Participated in the
Tech Contest


