

Introduction: Rooting Figs (and Other Hardwood Cuttings)


As I mentioned in my grafting instructable, certain plants cannot be reliably grown from seeds because the seeds do not retain the characteristics of the parent plant. The effective method to replicate the plant is to propagate from the original plant tissue itself, and that’s where grafting and rooting comes in. This instructable will discuss propagating figs through rooting, and I have applied the same technique to mulberries and pomegranates, with reasonably good results.
Step 1: Tools and Supplies Needed

Rooting hormone: this is usually sold in power or liquid form, and opinions vary here – some people don’t like to use rooting hormones, while some people like to use honey. I have used the power form and am trying two liquids this year. Once I can see changes in results, I’ll update the instructable to describe what I learned from my choices.
Growing medium: we need to find a medium that both holds moisture, and drains water well, so that the cuttings are neither too dry nor too wet. People tend to have their favorites, and use Vermiculite, Perlite, well-drained potting soil, or seed starting mix. I like to mix compost and seed starting mix, and sometimes I have even added used coffee grounds to the mix.
A small greenhouse: this helps control humidity and temperature. Alternatively, one can put cuttings inside the garage on a heat pad. The goal here is to provide the optimum growing environment, about 70 degrees for most of the day, and 60% to 70% humidity. Moreover, we want to keep the cuttings out of direct sunlight, so that they don’t dry away.
Paint and/or parafilm and/or grafting seal: these help seal the cuttings against excess evaporation, which may dry out the cuttings.
Pots / Used milk cartons / Clear cups: these would serve as containers for the cuttings. I like tall containers so that I can bury the cuttings as deep as possible. Using clear cups has an added advantage that you will be able to see root development.
Garden pruners or snips: these will be used to cut the branches to be rooted.
Utility knife or box cutters: these will be needed to nick the bark of the cuttings.
Blue painters tape and a pen for writing down names of varieties
Step 2: Collecting Hardwood Cuttings
Living in Zone 9, I start the process in January through March. This can probably start later as well, when the tree starts to come out of dormancy. I take cuttings from varieties I like to propagate, and each cutting is half an inch in diameter, about six to nine inches long.
I like to gather cuttings with lots of “nodes,” where the branches would create new leaves or fruit. The goal is to bury as many nodes as possible, because roots would be forming there. You’ll notice that younger branches (from the previous year) have adjacent nodes that are closer than those in older branches, so I prefer younger branches to older ones.
If I get too busy and need to store the cuttings overnight, I dip the bottoms of the cuttings in water to keep them from drying out. Just as I mentioned in the grafting Instructable, letting the cuttings dry out is a bad things – they’ll just die.
To increase the chances of success, take multiple cuttings of each variety, since not every cutting will succeed. If collecting multiple varieties, record the names of the variety on the branch so that you know what you’re propagating and planting. The blue painter’s tape works well here.
Step 3: Preparing Containers


To improve my odds, I like to find tall containers and bury the cuttings as deep as possible. Used milk cartons work really well, because, once the plant is established, the entire carton is buried in a bigger pot or the ground, and the young roots aren’t disturbed.
Pierce the milk cartons (or other containers) at the bottom so that water doesn’t settle there. The soil needs to be moist but the cuttings should not be drenched in water; this would cause fungus and algae to develop and the cuttings would eventually die.
Other containers that have worked for me are tall plastic cups, as shown in some of these images.
I fill the containers with my soil mix and get them ready for the cuttings.
Step 4: Preparing and Planting Cuttings


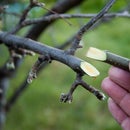
First we need to identify the top of the branch, since the branch needs to be buried in the container with the top up. I remove any leaves or figs that may be attached to the branch, since new ones will be formed when the branches come out of dormancy. Note that there isn’t a strong correlation between new leaves being formed with root development; seeing the former doesn’t guarantee the latter is happening.
I knick the bark at the bottom of the cutting, and usually shave an inch of the bark off the bottom. I’m trying to remove the protection and expose layers of the plant that would create roots. I dip the bottom end into some water to make it moist.
At this step I dip the bottom part of the branch into rooting hormone (powder or liquid), and I bury each branch as deep as possible into its container, so that I can get as many nodes into the rooting medium as possible - that’s why I like tall containers.
To keep the cuttings from drying out, I have recently been experimenting applying paint or parafilm on the exposed part of each cutting, to keep them from drying out. As an experiment, I have recently planted three branches in some containers, one covered with paint, one with parafilm, and leaving the third one uncovered. Over time, it will become clear whether paint works better than parafilm, or whether these are needed at all.
I put a label on each container, indicating the variety that I have just planted, and water generously, making sure excess water drains out of each container.
I move the containers into my small greenhouse.
Step 5: Following Up


It's been about six weeks since I started with the cuttings. While it's still relatively cold in the evenings, the wood is coming out of dormancy and tiny leaves are starting to appear on the fig, mulberry and pomegranate cuttings.
Step 6: Ongoing Examination and Care

I watch the greenhouse every day or every other day, to make sure there is still moisture. I water when the soil seems dry, making sure excess water drains out of each container. If I see any fungus developing, that’s a sure sign that it’s too humid and I let the greenhouse air out a bit.
I look for leaf development, but that’s not a sure sign of root development. A better idea is to use clear cups, which will let you see root development, but I haven’t done that yet.
Step 7: Potting
After I’m comfortable with the development in the greenhouse (may take a few months), I move the cuttings to their own pots, either 1 gallon or 5 gallon. The best thing is to grown the cuttings in milk cartons, and then to bury the entire milk carton in the pot, to avoid damaging the roots. Removing the cuttings from plastic containers and planting them into pots can cause root damage, sine the roots are very fragile at this point.
I generally have 50% soil and 50% compost in the pots, and keep them in there for a year before planting into the ground. I keep the pots in a shaded area so that the young cuttings do not dry out.
Step 8: Other Rooting Methods
This isn’t the only way to root figs, or other hardwoods. Another popular method is to root them in a
Ziploc bag. The instructions are simple: roll cuttings in a moist paper towel, place them in a Ziploc bag, and place the bag indoors, in a warm place, such as the top of a refrigerator. Check periodically for root growth and make sure the paper towel stays moist.
Another popular method is to keep the cuttings in water until small roots start to appear, and then plant them in a soil mix
Yet another way to propagate fig trees is to “layer” branches by stripping the bark of a branch, and burying it in soil, while still connected to the host tree. Over time, the branch will grow roots, and can be disconnected from the host tree and maintained as a separate plant.

Participated in the
Workshop Contest


