

Introduction: Rustic Headboard With His and Her Lights


I made this headboard as a present for my wife. She really liked the idea of the lights on the headboard. What is amazing about Instructables and projects like this, is that many times you don’t need any special tools or skills. I don’t work with wood that much, so this was a little bit of a reach for me. I found it it be rewarding and ended up with a nice project. It cost me about $160 in materials.
Materials:
1. Six, 6 ft x 8" x 1" milled pine from Home Depot (headboard slats) ($40)
2. Three, 6 ft x 3" x 2" pine (struts), two cut to 60 inches tall and one cut to 3 ft tall($20)
3. One box of wood screws 1 3/4" ($3)
4. 2 decorative sconces (from Amazon) ($55)
5. 2 electric light cans with plates that fit your lights (mine were about 3 inches)
5. Miniwax stain dark walnut, and matte finish polyurethane($10)
6. Dimmer switch plugs (optional) ($15 a piece)
7. Edison light bulbs ($10)
8. 2 x electric lamp cords with plugs approx. 6 ft long ($10)
Tools:
1. Hammers of various shapes (Ball peen, etc.) for distressing
2. Scrap nuts, bolts, screws, iron
3. An old sock
4. Paintbrush (and paint thinner if you want to wash out the stain)
5. Drill with screw driver bit
6. Drill bits
7. Angle grinder with course sand paper
8. Skills saw or hand saw
Step 1: Distressing the Wood


Only the headboard pine boards need to be distressed (and only one side). This is the fun part. I did several things that gave a great distressed look. First, I filled an old white sock with nuts, bolts screws and random pieces of metal and banged up the boards. I then used a ball peen hammer and a couple of other hammers to pound on them. Then I drilled some screws into a scrap piece off wood. These simulate wormholes very nicely. The last part of distressing was to take an angle grinder with some course sand paper and knock off the sharp corners and edges. I wasn't neat about it. I gouged the wood here and there and tried to make it look as random as possible.
Step 2: Staining the Wood


First I gave a light sanding to smooth out any splinters. I didn't do too much so as to take away from the distressed look. Using a paint brush, I painted the stain on all the boards. I did about 2 coats to get the color I wanted. I sealed this with one coat of a matte finish polyurethane. Once the boards were dry, I laid them out on the ground to see which boards I wanted at the top etc. I chose the boards I liked best for the middle. The bottom board will end up behind the mattress anyway, so put the board i liked the least there. I stained the struts and the connecting board, so they wouldn't show through the slats of my headboard.
Step 3: Assembling the Head Board


I flipped the boards over, making sure to keep the orientation of the boards the same. I put screws in with my battery drill into the struts and middle connector board (3 ft) to hold it all together. I had to check the boards frequently while screwing the headboard together to make sure everything was tight and that my struts were perfectly vertical. I made sure to put at least 2 screws in every headboard slat. The whole structure was measured so the struts could be lined up with a Queen sized bed frame (I didn't record the measurements but if you make this, just measure the bed frame to make sure the struts are the proper distance apart). The 6 ft boards are long enough for a King sized bed.
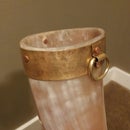
Step 4: Installing the Lights


I measured the distance where I wanted the lights to make sure they were equal on each side (abut 4 inches down and about 1 ft 6 inches in from the sides). I mounted the cans first to see where I need to drill the hole for the electric lamp cord (Pic 2). I drilled a hole that was big enough for the cord and then threaded the electric cord through the back first before installing the mounting plate for the sconce. I connected the wiring to the sconce wires with the wire nuts provided and then mounted the sconce to the plate. I bought these sconces on Amazon for about $25 a piece. In picture five, you can see the final result.
Step 5: Finshed Headboard!


I tested the lights and Voila! We connected dimmer switches to each side, which is the really cool part. They can be dimmed for mood lighting or reading. I highly recommend the dimmer switch. It's our favorite part of the bed!! This was a really fun project and I think anyone can do it!! The headboard is a little big for our current bed horizontally. But I really made this for when we get a king sized bed. Hopefully, this year!! I entered this in the Woodworking Contest, so please vote for me if you like this project!!

Participated in the
Woodworking Contest


