

Introduction: Sharpening Jig for Woodturning Gouges


I'm really happy with the grind that my vary-grind jig from OneWay gives my gouges. But, the exception is my spindle gouge. I want an ellsworth grind on that particular tool, but I don't want to buy the ellsworth jig....so, why not make one?
Step 1: SUPPLIES

There is a shopping list above for you if you would like to give this project a go. I used a Black Steel Nipple that is 1" by 4" long. You can also use schedule 80 PVC of that same dimension and it would be cheaper than steel, but Home Depot does not carry that so Black Steel it is! The only other thing I didn't list in the list above is CA glue (cyanoacrylate or superglue). I used a little bit to hold the nut in place so that it wouldn't come loose from vibrations.
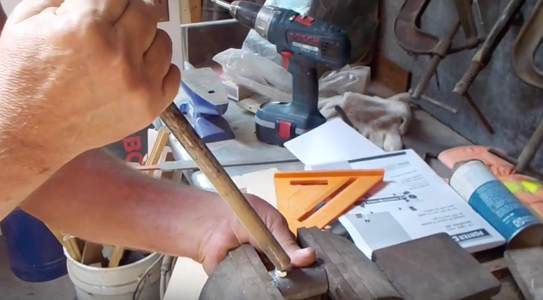
Step 2: Cutting the Black Steel


I cut my steel nipple at the threads. This will give me a 2" long piece of steel pipe. I suppose you could just use a piece of steel pipe, but this was cheaper. I cut through it with my sawzall and a metal cutting blade while it was clamped into my vice. Also make sure that you file down all the burrs so you don't cut yourself.
Step 3: Drilling and Tapping Holes


I chucked up the pipe in the drill press vice and drilled through the one wall of the pipe about 1/4"-3/8" in from the end. I then flipped the pipe over and drilled another 1/4"-3/8" in from the opposite end on the opposite side. After that, I tapped the holes with a 1/4" 20TPI tap. I actually started the thread cutting with the tap held in the drill press chuck and just turned the whole chuck. This gave me a straight starting point. Once I had cut into it a little bit, I removed the tap from the chuck and put it back into the original handle for it and finished tapping the hole like that. I tapped out both of the holes.
Step 4: The Arm


The 1/4" 20TPI threaded rod receives a nut that threads on one end with about 1/8"-1/4" of threads sticking out beyond the nut. That little bit of threaded rod goes into one of those holes that we drilled and tapped in the previous step. Make sure that when you thread that into the hole, there is no threaded rod that comes above the inside surface of the pipe. It needs to be flush. You'll probably need to adjust your nut to achieve a flush surface. Once you have that flush, even surface, dab a little CA glue on the edge of the nut and tighten it down against the surface of the pipe. That nut acts as a jam nut. The CA keeps it from coming loose. Now the arm has to be bent at a 45 degree angle. That is 45 degrees between the arm and the shaft of your chisel once it is in the jig. So to achieve a nice bend where I want it to bend (which is at the jam nut) I slipped a pipe over the threaded rod and used the leverage from the pipe to bend it. I stopped here and there and compared the angle to the 45 on a speed square. This does not have to be exactly 45 but try to get it as close as possible. Once it is bent, I measured 7" from the jam nut, made a mark, and cut it at the mark with a hack saw.
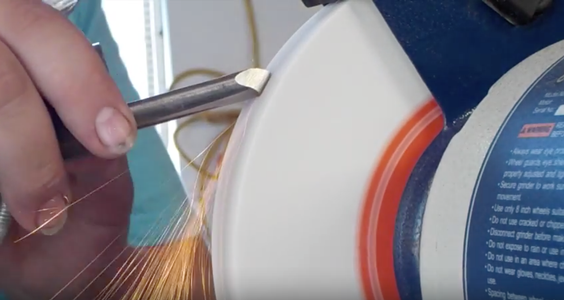
Step 5: The Thumb Screw


The thumb screw must be altered a little bit to fit into the flute of a gouge. So I took it over to the bench grinder and tapered the end a little to fit nicely into my spindle gouge's flute.
Step 6: A Separate Jig to Go Along With This Jig


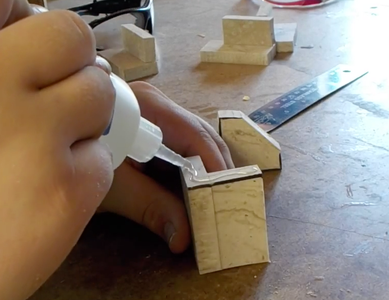


This is optional and you can certainly just use a ruler for this but, I made a jig to set the tip of my gouge exactly 2 inches from the end of the jig. I cut up some Corian material at the bandsaw. Not much here, just 3 pieces-2 measuring 2 inches long and another piece to glue onto the end of the 2 inch pieces. I used a medium CA glue to bond the pieces together. I held them firmly together and sprayed some accelerator on them to dry the glue instantly, and there you have it! I should also mention that you can just drill a hole 2" into a block and use that, which I have used up until now.
Step 7: Using the Jig!


To use this jig, just set the tip of you gouge 2 inches from your jig and lock the gouge in place with a thumb screw. I have the Wolverine Grinding Jig from OneWay and that's what I use to go along with jigs like this. There's not really any way to use a jig like this one, or the varigrind, or the ellsworth, unless you have some kind of a separate jig for sharpening chisels like the Wolverine Jig. I set my wolverine jig to the point where the bevel on my tool meets the wheel perfectly. I fired up the grinder and touched the tip of the tool onto the wheel and rolled it to the ends of the bevel and back around to the tip. That's it! Now I would do one thing differently if I ever made a jig like this again. I would use a 1" square tube because since the pipe is round and the thumb screw only holds the gouge in one place, there is some room for the gouge to wiggle around . If I had used a square tube, and drilled and tapped the holes on the corners, the gouge would fall into the corner and lock down without any room to move around. Besides that I'm quite happy with this project. I don't believe that you need a perfect angle on your tools. If the bevel is somewhere between 60 and 90 degrees and has a smooth edge, and the jig gives you that same grind every time, you are probably okay. I should say as well that making an ellsworth jig was not my own original idea. Credit is owed where credit is due. I would like to thank Cap'n Eddie Castelin over at Big Guy productions for posting his awesome video on how to make a 2 dollar sharpening jig. Check it out here: 2 dollar sharpening jig.avi Thank you for reading this tutorial! Pleas

Participated in the
Metal Contest


