

Introduction: Soprano Ukulele Build


About a year ago I got into playing guitar, I’m not that good but at the time I wanted to build my own guitar. I researched it and found out that it is very expensive to just get the wood to build it, so that plan went on the back burner. Fast forward to about a month ago when it came into my mind why not make a smaller guitar… A ukulele! It’s smaller more feasible and I am cheap so I decided to make it out of pallets. I am surprised at how long it took to make but I am glad I did it.
Step 1: Step 1 Research


Do lots of research this is one of the most important steps in the process. Search all over for plans and designs. This step should not be over looked. Ready up on woods that are commonly used in ukulele building. In this instructable I will be going over how to build a soprano ukulele. I would also recommend writing down what you have left to do to keep you on track.
Step 2: Step 2 Tools and Material


First you need to gather materials and tools. The tools you need can all depend on your budget and how willing you are to use hand tools vs electrical tools.
The tools (some are optional)
· Hand plane and/ or electrical planer
· Jointer (optional)
· Miter saw and/or table saw
· Copping saw and /or band saw and/or jig saw
· Wood Glue and super glue
· Ruler/caliper/tape measure
· Sandpaper (multiple grits)
· Clamps and clothes pins
· Screws/ nails (optional
· Drill/ hammer
· Printer (optional)
· Blow Torch and a metal pipe (optional)
· Chisel
· Rasp
· Dowel and wax paper (optional)
· String or wire (optional but recommended)
· Dremel (optional)
Materials
· Wood of your choice for the ukulele (I would recommend a hardwood)
· 2x6
· Nut and Saddle (I bought this but you can make your own
· Strings
· Some scrap wood (never hurts to have some laying around
· Tensioner
· Kerfing (you can make it yourself but I bought mine.
Step 3: Step 3 Are We Building a Plane or Ukulele


To begin select your wood and begin planning. Side note if you are using pallet would make sure to remove all nails and staples before working with it, I missed a staple and made two small notches in the planer blade. Back on topic the parts you are planning will become the top, back and sides of the ukulele. For the sides you should thin it to between 1/8” – 3/16”. For the sides I would recommend when you get close to the correct thickness take a pencil and draw on the high spots on the wood. Then with a sander sand until the pencil marks are gone. Do this until you get to the correct thickness and refer to the photos for help. For the top and back I would recommend taking it to about 3/16”. For the front and back you should have two boards for each and I would recommend making a few extra just in case something goes wrong. P.s. planning makes a lot of wood shavings
Step 4: Step 4 Mating the Front and Back (get Your Head Out of the Gutter)


By this point the planks for the front and back should be approximately 3/16”. Now cut them so they are about a foot long by at least 5 inches wide. I didn’t realize how small soprano ukuleles were until I got to this step and saw how many I had, but I was glad I had extra. Next you will have to decide which two planks you want to be your front and back. Put them side by side like the picture and hold them up to the lights try and see look for small gaps where you can see light. If there is any gap take a larger sheet of sandpaper and lay it on a flat surface, then take the planks and sand them down a little. Check for light, and if there is repeat this step. Next glue the boards together you can do this however you want. I found it very easy to set down a sheet of wax paper so nothing sticks to the table and lay a dowel down on the wax paper. Tape the planks together where they are going to mate and lay them over the dowel. Drive in nails along the edges that are touching the table but do not drive them into the planks. Apply glue to the joint remove the dowel and press down on the boards so they are flat on the table. Next put weight on them so they do not spring up. Wait for the recommended time period for the glue to dry before removing the nails. If you can’t follow this step I would recommend looking at the photos.
Step 5: Step 5 I Like Curves


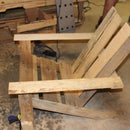
This step requires you to have a few things, one being a printed out template of a ukulele that is correct in proportion, a 2x6 and some nails and glue. The 2x6 is used to make a form so you can shape the sides. To make the form take a 2x6 and cut it into at least four sections a few inches longer than your template. Now cut out your template and lay half of it on the edge of one of the 2x6 planks like the photo. Trace around the image so you have the outline on the wood. Now with your saw of preference cut the outline out and stay on the inside of the line so you can remove the rest of the material with a rasp. Trace the outline onto another 2x6 plank and cut it out. Repeat this step until all the planks are cut out. Clamp the templates together and rasp them all together at the same tine so they are all the same. Take two of the 2x6 pieces screw, nail or glue them together. At this point you should have two halves of the form and can get onto the fun stuff.
Let me say this now there are different ways of bending the sides. Do some research and decide what way you want to do it, this is the way I did it. First cut the sides to length, to do this take a wire and lay it around half of your mold straighten out the wire and measure how long it is. Add three or four inches to give yourself some room to work with. Measure out the length that the sides should be and cut them there. Submerge the sides you have (it’s nice to have a few extra just in case one breaks) in water overnight. Set up a pipe and clamp it to a solid surface so the pipe is hanging over the side. Before I go further be smart when working with fire, do it outside and have water ready, and wear leather gloves. Heat up the pipe with a blow torch. Once the pipe is hot begin curving the sides with the pipe, you may have to get the sides wet again and reheat the pipe. Continuously use the form to check your progress of where and how much more you need to bend it. Once it fit the form nicely clamp the side in and let it dry for at least a day (you can never use to many clamps). After a day has passed you can trim the excess (the few inches you add to the length) siding off so it is flush in the form.
Step 6: Step 6 Forming the Neck


To form the neck, first get two 2x4 and glued them together. Once the glue has dried trim off the excess and make it so it is 2”x 2”x16”. Before I go further in depth with this let me say there is multiple ways to attach the neck to the body. The way I did it was by cutting two slots in the side of the neck and gluing the sides to the neck. You can do this step however you want, like I said do your research.
If you are following the way I did it cut two slits a little over half an inch deep half an inch from the end (look at the pictures if you are confused). Next cut the other end 11 degrees this will be the angle which the headstock. The length and neck and headstock will partly determine your scale length so cut carefully. Next get rasping or dremeling to the shape that you would like the neck to be at. Finally cut the headstock at 11 degrees. Drill holes in your headstock where you would like the tuners to be. Lay them out mark them and then drill. Don’t be like me and just start drilling. Two headstocks later I finally had them not touching each other. Finally glue it to the neck making sure it is in line with the neck
Step 7: Step 7 Connecting the Sides and Neck Together


Before we connect the neck to the sides cut a block half an inch thick by 2” wide by 2-1/8” long. This block will connect the other end of the sides. Carve the block so it is approximately the shape of the bottom of the ukulele. Make sure before you glue it in that the sides match up nicely and there are no bumps, glue it and clamp it in place.
Once the bottom block has dried it’s time to insert the neck. Since the edges don’t touch when the neck is installed you will have to remove about a half an inch on each edge to make up for this. Next glue the sides into the neck and add a little wooden shim to secure it nicely. That’s it, let it dry.
Step 8: Step 8 Adding Kerfing


This step is by far the easiest. You can either make your own kerfing or buy it from a store, I bought mine. Before you begin gluing on the kerfing you first need to get the sides to the correct dimensions. The sides should be about 2 inches tall, or whatever your designs specify. To get it to the correct thickness I laid a large sheet of sand paper and started sanding down the sides till they were almost even with the bottom block, and the neck block. Once it is sanded get your kerfing and lay it out on the inside of the ukulele so you have the length. Break off the extra kerfing. Get the glue and clothespins ready. Apply the glue to the kerfing and spread it around with your finger or a brush. Start at the top or bottom of the ukulele and lay the kerfing on the edge and begin using the close pins to clamp it to the side. Make sure the kerfing is higher than the sides of the ukulele so the top will attach nicely. Attach the kerfing to all the inner sides of the body. Once the glue dries use the sand paper again, and sand down so the kerfing is even with the sides.
Step 9: Step 9 Every Body Needs Some Support


First trace the outline of the ukulele onto the front and back plates that you previously made. On the side that will be the front find the centerline, and locate where the sound hole is supposed to be located. Drill your sound hole out to the specified diameter. To make the braces roughly cut the wood so it is in rods about a 1/4” x 1/4". Lay the rods approximately where they are supposed to go and mark the length of it. Round over one side with a file, rasp or dremel. With a side rounded over cut the piece to where you previously marked it. Take a chisel and slightly taper the ends. Repeat this for the rest of the required brace. With all the brace cut glue them in and clamp them down. You are also going to need to glue in a thinner section to where the bridge is going to be located to strengthen it. Once the glue has dried lay the ukulele body over the front and back, chisel away the braces and kerfing where they overlap so the sides sit nicely on the front and back. Next apply glue to the kerfing, lay the front or back on (whichever you do first) and weigh it down. Once the glue has dried glue on the other side. Once the front and back are attached trim them down so they are flush with the sides.
Step 10: Step 10 Don’t Fret It


Making the fret board isn’t that heard. Determine the scale length for your ukulele, I made mine 13.75” and plug it into an online fret scale calculator. Cut a board to about 3 millimeters thick (sorry for switching units) and as wide as your neck is. Begin at one end and measure down to where the fret is supposed to go. Clamp a block or something to the fret board to saw against and begin sawing. Make sure the saw is slightly thinner than the fret wire. Don’t cut all the way through the fret board. With one fret done measure from the end of the board again to the second fret and repeat the process. Repeat this for as many frets as you would like. Next take your fret wire and force it into the slot you just cut and trim off the extra. To force it in, I used a wooden dowel in the drill press. When the wire was in I used some super glue to hold them in place. On my ukulele I needed to add about a 1/8” board on the neck to raise the height of the frets to where I wanted them to be. After you have the fret board to the height you like glue it on. Finally glue on the nut at the end of the fret board.
Step 11: Step 11 a Bridge to Far


This should be the last thing you will need to make unless you buy it. Begin by taking a board that’s a little over 3/8” thick and cut a notch in it about 1/4" deep about 1/4” in. Slightly slide the fence over to make this grove wider. Move the fence over about 1/4"and make another slit in the board. This new slit should be approximately as wide as your saddle is. If your saddle is wider move the fence slightly over and make the notch wider. It’s okay if you make this to wide, you can always add a little shim to keep the bridge snug like I did. Cut any extra wood you would like to after this notch. Cut the bridge to the length you would like. Next drill holes for the strings to attach to on the bridge. Finally measure from the nut to the middle of the saddle and glue the bridge on where the length is your scale length. Once the glue dries you can stain it, seal it, paint it or do whatever you want to it
Step 12: Step 12 Don’t Get All Strung Up

Install the tuners and string up your ukulele. I wish I had a picture of mine with strings on it but I still need to pick them up.
Step 13: Step 13 Take Aways

This was truly a learning experience for me it taught me the basics of building string instruments. I learned that writing lists of what needs to be done is very helpful. I also learned that when you rush things they don’t come out as nice so take your time when you build it, make sure all the dimensions are correct. I hope you enjoyed reading this and I encourage you to try and make your own. Thanks for reading.

Participated in the
Wood Contest 2016


