

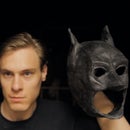
Introduction: The Dark Knight Batsuit and Bane Mask and Costume


I started out by making the cowl. After that, I figured the suit would follow easily enough. However, the suit from The Dark Knight is quite a unique Batsuit design, and so it's difficult to make a costume of it, especially from scratch. But as always, I took on the challenge. I followed my usual goals, with a dedication to detail, a stickler for accuracy, and working quickly with a low budget.
This Instructable will show how I made the Batsuit, and also Bane's mask and costume pieces. It's more of a behind-the-scenes than a tutorial to follow step-by-step, but should provide interesting insight, and maybe help others who are looking to make a similar costume. Some of the construction processes and costume details are difficult to describe, and are more easy to understand in the pictures.
Here's a video you can follow, or watch as an introduction to the overall process. The Instructable is more detailed and has more advanced tips and recommendations.
This is the video we made with the costumes:
Step 1: Materials and Cost
Material and cost breakdown for the different costume elements:
Batman
$20 Gloves
$16 Utility Belt
$12 Mesh
$10 Foamie Sheets
$8 Boots
$4 Bag
$3 Cape
$1 Egg Trays
$1 Tupperware Containers
Total: $75
Bane
$6 Shirts
$5 Lego Tubes
$4 Tubes
$4 Bag
$3 Belts
$2 Teddy Bear
$1 Foamie Sheet
$1 Metal Rings
Total: $26
Miscellaneous/Various
$7 Clear Spray
$5 Plaster
$4 Paint
$3 Glue Sticks
$2 Spray Paint
Total: $21
Total cost of materials bought for the costumes was around $122. Overall, $75 for the Batsuit seems like too much to me, but isn't bad, especially considering that about $50 of that came from pre-made gloves, belt, and mesh. I'll talk more about those pieces later, but they were definitely worth the cost.
Foamie sheets (or Fun Foam sheets) were my choice for most of the armor for the Batsuit. It provided several advantages; it's flexible, yet retains it's shape, meaning it wouldn't break or crease during movement. It would be lightweight and safe. And the pliable surface would be an advantage to adding texture or shaping armor pieces. I did have concerns about cost, as foamie sheets usually range from 50 cents to a dollar each, but I was lucky enough to discover a 5-pack of black sheets at the local dollar store. Other items were found at the usual thrift stores and craft stores.
Step 2: Boots


Making the boots from scratch provided a difficult challenge; finding a good pair of smooth black leather shoes as a base. I found some at the thrift store that were about the right shape and size, but they were more of a "fuzzy" texture rather than smooth leather. But I figured covering them with latex should help.
I cut up the boots along the lines to make details as I saw in the reference pictures I had gathered. This involved making some additional pieces out of foamie sheets. I also noticed that parts of the boots had a sort of diamond-pattern texture to it. I had seen that if you put foamie sheets in the oven and heat them up, they become more pliable, and you can "shape" them a bit. Basically, heat softens the foam. So I took a metal mesh paper holder (that was sitting on the refrigerator) and put it in the oven to get it hot. I then pressed it against the foamie sheets, using a mallet to press the texture in.
I then hot-glued the boot pieces together, and used some scrap leather pieces and the foamie sheets to build up the shin pieces. I added a stretchy black fabric at the rear to make them form-fitting and flexible. Again, I was using foamie sheets which are somewhat flexible, but can tear, so I didn't want to be putting too much pressure on them when squeezing my foot into the boot. I ended up adding a zipper on the side, which made the boots much easier to slip into.
These boots were the first costume pieces I made, and after seeing them as they were, I was disappointed. They didn't look too smooth, and I didn't like the "fuzzy" texture of the boots I had found. After making other pieces which turned out much better, I knew these boots wouldn't sit well with me, so I went to the thrift store again and found a better pair of boots. This was the first of several costume pieces I would have to completely remake.
Step 3: Chest Armor


The pectoral armor is a unique shape, but I took it step-by-step; started with the bat symbol, and then added foamie sheets and built up from there. The process isn't easy to describe, and is best shown in the pictures.
The lower half of the pectoral pieces have a different texture, so I cut up an old handbag I got from the thrift store. I added this texture onto some foam sheets, and glued them on. This is the same texture I would add onto other armor pieces with a similar look, like the abdominal, neck, and bicep pieces. Upon completing the pectoral armor, I saw that it was too small, and yes, I had to completely remake the whole thing over again.
For the abdominal pieces, I traced outlines of the pieces from an image of the suit, cut them out, and then traced outlines on foamie sheets, and cut those out. Again, i added texture from the cut-up handbag for some pieces. I added some extra detail to the lower abdominal pieces by adding a smaller foam pieces underneath to give it a raised details.
I added more detail to the (foamie) straps that connect the armor pieces underneath using an X-acto knife and a wrench. This added lined and ridged texture to the pieces, another good advantage of using pliable foamie sheets.![]()
Step 4: Neck Pieces


More pieces that were partially traced from images, outlined, and cut out of foamie sheets. The neck piece needed to be tight, but also needed to be removable, so I opted for Velcro on a split in the back. I glued it all together sealed, then cut it down the middle, added detail pieces, and Velcro. I added some mesh (more on that later) and black fabric to go around the neck.
Step 5: Shoulder Armor


The base of the shoulder armor was a round Tupperware container. A perfectly round Tupperware container. I didn't think those actually existed; in making other costumes years before, I've always looked for containers that were perfectly spherical, without a ridge or flat part at the bottom, but they were never perfectly smooth and round. Luckily, I stumbled upon a lettuce container at a dollar store that had a spherical lid. AMEN!
Using heavy-duty kitchen shears, I was able to cut them into the right shape. I added other details with foamie sheets and hot-glued them on. The bicep pieces were more foamie sheets, with some handbag texture, and straps from the handbag glued on. For the straps, I added some Velcro to let them strap on tightly, and also be easily loosened.
Step 6: Gauntlets and Gloves


More foamie sheets for the gauntlets.
The arm blades presented a challenge; since I would be using this costume in public (or maybe go to a convention in it), I wanted them to be safe. I didn't want to risk being asked to remove them by security because they were dangerous. I also wanted them to be durable, avoiding snapping or bending like cardboard or some plastics might. I was lucky to find some extra-thick foamie sheets at a craft store (about 1/4 inch thick) which gave me the best of both worlds. Being so thick, I was able to use a rotary tool with a sanding bit to shape and give them beveled edges. I smoothed the surface a little bit with a clothing iron, which also helped to remove small debris from the sanding process. Superglue secured them onto the gauntlets. They're safe, well-shaped, and durable enough to offer no real danger of damage.
One detail that was interesting to make was the indentations of the blades on the gauntlets. I outlined the shapes of the blades and then pressed into the foam using a measuring spoon. These depressions are a great detail that were very easy to add with the flexibility of foamie sheets.
I initially wanted to make the gloves from scratch. About 10 minutes into that, I knew they weren't going to look as good as I wanted them to. I figured pre-made gloves would be much better for the specific details and materials Batman's gloves should be made of. I searched eBay for mechanic gloves, gardening gloves, racing gloves, leather gloves. There were some that had somewhat similar details, but none were that good. Just as I was about to give up the search, I came upon these. Perfect Dark Knight gloves. Sans the knuckle pieces, but still, extremely close to what the originals look like.
For the knuckle pieces, I got a plastic egg tray from the thrift store and cut them up, added some foamie details around the edges, and then glued them on.
Step 7: Belt and Pants


I'm ashamed, but I'll admit it; I didn't even try to make the belt from scratch. I knew there was already a decent pre-made costume version, so I bought that straight away. A quick cover of gold spray paint to make it more metallic. Additional silver and black details painted on.
For the leg armor, I again traced outlines of the pieces from an image of the suit, cut them out, traced outlines on foamie sheets, and cut those out. Then the fun of hot gluing them onto my legs! Just on top of black tights and mesh. Not too bad, but does get a little hot at times. Especially squirting hot glue right onto your crotch. An underlayer of clothing or two helped absorb that heat before my skin did. I initially made a mannequin for this sort of work, but in the end decided that gluing the armor onto my real legs would make for more accurate form.
Step 8: Undersuit Mesh and Adding the Armor


The under-armor mesh is a specific fabric that I didn't find in any local store, so I ordered some off of eBay here. It was a good stretchy fabric, but I did have to cut it into the shapes I wanted for the pants and torso/arms. I also had to figure out a good method to bind them together at the seams. Hot glue was too fragile, and had no stretch. Same with superglue. Didn't have a sewing machine, and certainly wasn't going to sew it by hand. Liquid latex proved to be the best bind. It was stretchy, and incredibly strong. I can try to tear the seam apart as hard as I can, and it doesn't weaken at all. Flipping the seam inside-out made for a smoother seam on the outside.
More hot glue to add the armor onto a tight black shirt and the mesh. I glued the shoulder armor onto the neck piece, and also glued the elbow pieces of the gauntlets onto the sleeves. This would make all of the upper body, except for the mask and gloves, all in one piece, easy to slip on and off. Speaking of slipping on and off, this would be another point where flexible foamie sheets are good; when putting the shirt on, it folds and wrinkles all over the chest. But once I slip my arms in, I can then pull the rest of the shirt down to my hips and flatten the armor, giving me critical "wiggle room". A zipper for the back of the shirt would be a great idea. I didn't make back armor, since it would be covered by a cape anyway.
The cape was a black bed sheet that I added Velcro pieces onto, which would attach to other Velcro pieces on the underside of the neck armor. I had initially bought just a scrap black fabric, but the bed sheet looked much better.
There wasn't too much painting required for the suit. Some gray paint on chest armor, some black spray paint on the armor, and some protective clear coat finish.
Step 9: Bane's Mask


I had initially planned to make the mouthpiece on top of a paintball mask, but eventually decided it would be easier and more accurate if I just sculpted it from scratch. So I did. Then, like Batman's mask, made a plaster mold, and cast it out of latex. For the mouthpiece, with all the little air holes, I drilled holes into a piece of the Tupperware container, and glued that in.
Then I had to fit it to Kevin's head. To make the mask easily removable, I decided to make the mouth piece and the cheek pieces separate, attachable via Velcro. The cheek pieces, made from foamie sheets, were attached to an over-the-head piece of cloth as a template. I trimmed it down and re-sized it until it was the right fit and shape on his head. Then I cut a long piece of foamie sheet for the middle of the head, and added some tubes onto the sides. The tubes I used were a 3/4 inch protective wire wrap, cut in half lengthwise
The tubes on the mouth. Boy. Sometimes it stinks to be dedicated to details. Looking at high-resolution official pictures of Bane, I noticed that some of the tubes had a specific texture. It wasn't just ribbed, it was like a diamond pattern. I searched internet stores, hardware stores, anywhere to try and find something that texture that was flexible or modifiable enough to use. I didn't. The only places I saw it was on metal tools, like dentist picks or jewelry tweezers. I finally noticed that the sculpting tools I had already have that texture on it, and got smart and decided to dip them in latex. After a few layers, I could peel it off, turning it inside out, and that would give me a flexible tube with that diamond grip texture. Voila.
The ribbed tubes were initially going to be 1/4 inch protective wire wrap, but that ended up not being quite as flexible as I wanted. A friend recommended Lego Technic hose pieces, which were much better. The flat tubes on the sides would just be pens. For the little pieces where the tubes connect to the mask, I used cut up pieces of pens. Sometimes I wanted slightly larger diameter pieces. It was difficult to find tubes like that in just the size I was looking for (that I could cut with scissors), and so cheap noisemakers I found ended up working. For the flexible tubes, I put pieces of bent wire on the insides to help keep their shape. All of this hot glued on. More detail pieces on the sides made from foamie sheets glued on. Same as the details on the tubes on the middle of the mask, in addition to power cord tube running underneath the cheek pieces, and small rings for the tabs on the middle of the mask.
Looking at behind-the-scenes pictures of Bane in daylight, you can some subtle colors; it's not just solid black and silver. Finding just the right color was a challenge, but it ended up being mostly an olive drab mixed with a little bit of blue.
Most homemade Bane masks I've seen have been sculpted as a whole and then cast into a latex mask. That's a good way to do it, especially for a tight fit, but I do like how it looks pieced together from parts, rather than just a single rubber piece.
Step 10: Bane's Vest and Vambrace


For the vest, I started off with a stretchy brown fabric, and cut it to the shape of the vest. Then I cut up a leather bag, which luckily had padding underneath, and made armor pieces and hot-glued those on. I also added black paint, mixed with some water, onto the leather armor to make a darker finish. Then glued on a bunch of random belts in a similar manner to the original. The vambrace was similar, just a cut up leather bag, with straps from the bag added on. Add some belts, black pants, maybe a long-sleeve brown shirt, and some boots. Simple enough. Much easier than a Batsuit.
Step 11: Final Thoughts and Advice

- There were several pieces that I had to completely remake because they didn't work the first time: the chest piece, the boots, the cape, and the cowl. It was frustrating to start from scratch again, but it was definitely worth it. Doing it right the first time would be easier, though. Heh.
- The gloves and belt were worth the cost of buying pre-made. Trying to make those from scratch would have taken a few extra days, and wouldn't have looked nearly as good.
- I learned during filming a fight scene that my costume wasn't really battle-ready; the neck kept popping open and one of my boots tore. If I need more mobility in the costume, I need to plan for that better during construction. Some foamie sheets should be double-layered for reinforcement.
- Armor pieces needed to be attached strongly. With a costume like the Batsuit, where the cloth folds and bends a lot, they need to be secure as to not fall off when putting the costume on and off.
- If I had a good mannequin, that would have helped a lot with gluing pieces strongly onto clothing. I might need to invest in one.

Participated in the
Halloween Epic Costumes Contest


