

Introduction: Treehouse Build


I started my treehouse project one year ago, and in that time I've learned that the TV show, Treehouse Masters, has made everyone an expert... or so they'll tell you. But there isn't a standard code book for treehouses, and there are a couple different ways of doing most things. For the most part, this treehouse is a stickbuilt house on top of a timber frame foundation, bolted to a few trees.
This Instructable will show you the way this treehouse was built, some design and fabrication challenges unique to treehouses, and what each step looked like.
Step 1: Planning Ahead

The most critical part of building a treehouse safely is planning ahead. I spent a few months planning. I read Home Tree Home by Pete Nelson and a bunch of blogs on treehouse building and design (some of which are alarmingly unsafe). I took a ridiculous number of measurements. I drew and revised plans. And I ran a bunch of calculations, but I won't go into too many details about calculations.
I selected a stand of five Douglas Firs for the placement of the treehouse. I fell two of the smaller trees (about 12" and 18" diameter) and milled them in place with an Alaskan Saw Mill. The beams from these trees would become my main supports spanning between the treehouse attachment bolts.
When it came to the design, I wanted something that efficiently used building materials, was lightweight, and had a loft and small deck. I ended up foregoing the covered part of the deck that's shown in the drawing, making minor changes to the timber frame foundation, and changing window sizes during the construction process. But otherwise, the original design survived.
Weight of the structure would be an ongoing theme. It's important not to overload any of the load bearing elements of the treehouse: the attachment bolts, timber frame, cantilevered floor joists, and the trees themselves.
Wind is a major concern for any treehouse. The higher in the tree, the more wind will have an effect. Mine is relatively low (about 10' at the attachment bolts), but even then I had to consider the pressures from wind pushing on the structure and how much each tree will sway during a wind storm.
Step 2: Treehouse Attachment Bolts


The standard method for attaching a treehouse of this size to multiple trees is by using a Treehouse Attachment Bolt (TAB). These bolts are specially designed for treehouses, and they're only manufactured by a couple companies. I chose to use the Garnier Limb, which is designed and manufactured in Cave Junction, OR. Garnier also hosts a World Treehouse Conference every year and have done a lot of research and development to manufacture a quality TAB. Their customer service was great, and they even rent the special drill bits needed to install the giant TABs.
Each Garnier Limb can handle about 8,000 lbs (when unsupported) before failure. But of course, I wouldn't want to load them with anything close to that much weight.
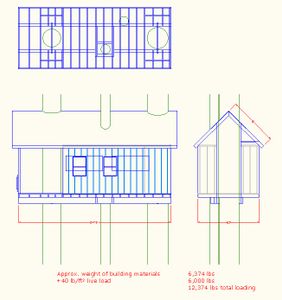
My completed treehouse weighs about 6,500 lbs, plus 6,000 lbs of live load if it's full of people and furniture. These numbers are figured by calculating the weight of each and every component and adding them up. When doing these figures, I always round up. I didn't know at the time what I was using for the interior, so I calculated the weight assuming 1/2" sheetrock (which is WAY heavier than what's really in there).
With a total estimated weight of 12,500 lbs, I wanted the frame to safely support 24,000 lbs so I'd have a little extra safety margin worked in. That means 4,000 lbs per TAB, which is only half of what a Garnier Limb can handle before it will fail. So I added a cable suspension system to the end of each TAB to increase the weight capacity. This is a common procedure, and Garnier sells the parts necessary, but I fabricated my own. The cable is 5/16" steel w/nylon coating, anchored with a 3/4"x12" Lag Screw.
Locating the pilot holes for the TABs was a challenge and absolutely critical to get right. I could fix minor errors by leveling the timber frame foundation later, but that's not a preferable option. I used a laser level to place three marks on the West side of the trees. I located the pilot holes on the East side by using a home-made water level (3/8" tubing and red Kool-Aid). Before drilling the pilot holes, I adjusted for the varying thicknesses of the home-milled timbers.
Each TAB is anchored to the timber frame of the treehouse with a special bracket. There are two static brackets and four sliding brackets. The static brackets attach to the timber frame at the biggest tree. That way, when the biggest tree moves, it moves the whole treehouse with it. The sliding brackets attach to the timber frame at the smaller trees, so as the trees move out of sync with each other, the treehouse floats on top of the sliding brackets. If the treehouse were bolted directly to the trees without sliding brackets, a major wind storm would rip the treehouse apart. When you're in the treehouse in the wind, you can hear the sliding brackets doing their job.
Each timber is notched for the bracket and the brackets are secured with 1/2" galvanized lag screws.
Step 3: Timber Frame Foundation


As I mentioned, I milled the timbers from trees on site using an Alaskan Saw Mill. It was all my Stihl 026 could handle, and took the better part of a day. I let the timbers dry for a few months, but certainly not the recommended 1 year per 1" of thickness that is standard for anything going indoors. This wouldn't have a serious effect on the strength of the wood (calculations were made using green doug fir), but it sure made them heavy.
Getting the timbers from the ground to accurately placed in the trees took some crafty block/pulley work with my truck's Superwinch 9500.
When the timbers were in place, I'll admit that they weren't perfectly level, but they were pretty close. As the tree grows, it grows outward, but the TABs shouldn't move vertically at all.
In my foundation design, there are 3 long timbers running North-South and 3 short timbers running East-West. At the North and South ends, there is a 10 foot timber that functions as an end cap. And in the middle there is a short ~48" timber spreading the 3 longest timbers to an appropriate spacing.
Where the timbers meet, they are notched to fit into one-another, and I added 3/16" stainless steel angle brackets attached with 1/4" lag screws. The brackets aren't shown in the photos, but I've attached a drawing of them.
Step 4: Sub Floor


Here's where I started getting a lot of help from friends and it really started to look like something.
We marked out and squared the location of the sub floor on the timber frame foundation using nails and string. There was a lot of running back and forth on the catwalk created by the timber frame to get things just right. We placed the first and last joists, ran a string between them to mark where each joist needed to sit, and started laying out joists every 16".
The Sub Floor is made of 2x6x10' on 16" centers. Where there's a tree trunk in the way and the floor joists can't span all the way across, we doubled up joists on either side of the tree and boxed in the trunk. We also added joist brackets to relieve some of the stress added by cantilevering out so far. These brackets are basically just heavy duty shelf brackets that I custom built for this application.
I also added another support for the Eastern-most timber frame piece. The span was 17 feet, so it was a little bouncy in the middle. The walls would have actually helped to spread the load and alleviate some bouncing, but adding an extra support really put my mind at ease.
We started laying joists at the South end, and added 3/4" CDX plywood as we went so we'd have a platform to work from. All joists are secured to the Timber Frame Foundation using Simpson H1 hurricane ties. Blocking was added between the joists where they meet the timber frames.
We had to cut the plywood floor to fit around each tree. We left a 3" gap around the trees to allow for some movement in the wind and future tree growth. Those gaps get covered with 8" strips of rubber later to keep critters out (mostly). The cable supports for the TABs have to run through the floor, so now was the time to mark and drill holes for that. At the floor level, any tree movement is indiscernible. Judging by the paint wear on the sliding brackets, it's only about 1/4"-1/2". Tree movement near the roof is much more obvious.
The decking is all 2"x12" planter box cedar, because it is cheap, available, and strong. And frankly, it looks really cool. Since the decking is taller than the sub floor, it was critical to seal the walls and sliding glass door from moisture that could build up on the deck.
Step 5: Walls (and Couch)


This is where it gets built like any other building, just up higher. So I won't go into too many details about construction techniques that aren't unique to a treehouse.
The real problem with putting walls and a roof on a treehouse is that you don't have a level space to work. Normally, you could do your framing on the ground next to the foundation, erect the wall, then add sheathing. With a treehouse, the logical method is to build as much of the wall as you can on the ground, then hoist it into the tree, windows and all. I've even seen one design where they built the entire treehouse at ground level around the tree, then hoisted the whole thing up, installed their TABs under it, and lowered it back down onto the TABs. My method was a little less sophisticated.
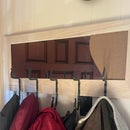
We broke the four walls into six wall sections (plus gable ends) to make them easier to handle. Each wall section was built in the yard using 2x4s on 16" centers. Everything was screwed together, because nails could eventually back out after years of windstorms flexing the panels. All of the doors and windows were re-purposed from remodels or demolished buildings.
The wall sections were each hoisted onto the platform with the truck winch. One person had to man the winch remote, while another steadied the wall section as it slid up the 2x4 sliders. Once up, each wall section was squared up with the floor and leveled. On the smaller wall sections, we left the plywood sheathing overhanging to attach to the next panel. That way we wouldn't have a seam between wall sections where plywood and framing meet. The sheathing also extended below the bottom plate of the framing to attach to the fascia of the sub floor.
Before adding the last wall we put the couch in, because we didn't think we could get it onto the deck, around the tree, and through the sliding glass door after the walls were up. Turns out we could once the deck railing was up, but that's another story (see interior section).
Step 6: Roofing


The Roof is a 12/12 pitch (45*), made with 2x4s on 16" centers, with 3/8" cdx sheathing and corrugated metal panels.
45 degrees is a very steep roof. The reason is threefold: 1st, it allows any snow buildup to slide off, reducing weight on the structure; 2nd, it deflects limbs and debris from puncturing the thin sheathing; 3rd, it allows more head room in the sleeping loft.
Insulation was leftover from a friend's barn project.
Normally the roof would be built on the ground and hoisted into the trees like the walls were. But I simply didn't have the equipment for that. Instead, it would all have to be built in place. This was hands-down the most difficult part of the build.
Working on It required two people at all times, so it wasn't something I could do after work for an hour or two each day. We ran the truck's winch cable through a pulley high in one of the trees. One person would harness up in climbing gear and the other would raise/lower him as he worked. It was slow, but effective. The winchman would also have to toss up the drill or tape measure whenever they were dropped.
The roof is framed with a 2x6 king joist running North-South from one gable to another (but interrupted by a 42" tree). 2x4 joists run from the king joist to the wall top plates. They are notched and blocked where they meet the wall top plate. Large 3/4" gussets help to anchor the 2x4 joists to the 2x6 king joist. Rolls of fiberglass insulation were placed between the roof joists and sheathing.
We placed roofing paper on top of the sheathing before attaching the corrugated metal roofing. The metal roofing was leftover from a friend's multiple shop projects, so half of it is green, some is grey, some is blue, etc. All of the green is on the east side, and no touching panels are the same color on the west side.
Where the trees protrude through the roof, the panels were cut with a RotoZip with a grinder-style cutoff attachment. Which actually worked really well! Each hole was then sealed off with 8" wide x 1/8" thick rubber. The standard procedure here is to use an inner tube from a tractor or truck, but the tree I'm sealing is 42" in diameter, and it's really expensive to get an inner tube that big. Instead, I found I could get a 50 foot roll of rubber from rubbersheetroll.com for $80 delivered. It was just barely enough for the entire treehouse: Two trees through the roof and two trees through the floor all got at least one wrap around their trunk. I attached the rubber with staples and short screws, then added some caulking where the rubber meets the roof panels.
When it rains really hard, I still get some water in the treehouse. There are imperfections in the bark that allow water to trickle down the trunk a little bit. Plus, bark is very porous, so when it gets saturated, there's no stopping it from sweating onto the floor. I've tried a hemp rope loosely spiraling around the tree trunk to function as a gutter to direct the water into the tree's hole in the floor. It's better, but not perfect. But... it takes a pretty big rain to get any on the floor.
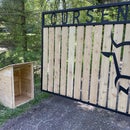
Step 7: Suspension Bridge and Deck Railing


Building this suspension bridge could easily be another Instructable in itself... maybe another time.
Here are the key points to how this bridge was made:
The suspension bridge runs about 30 feet from the tree that protrudes through the deck to another smaller deck up the hill from the treehouse.
The smaller deck platform consists of 4 cedar posts, each anchored 4 feet into the ground. 2"x6" cedar connects the posts to each other and act as joists for the 2" x 12" cedar decking. The cable runs between the joists (they're notched for it) and the decking.
I use 2"x12" cedar for all of the decking parts of the treehouse, and the suspension bridge is no exception. To save materials and weight, I cut the 2x12s into 2x3 slats for the bridge decking. Each slat has a 5/8" hole to accommodate a 5/16" cable with nylon cover (1/2" overall diameter). There is a 2" cpvc spacer between each slat. These will degrade from UV rays over time, but they're not load-bearing, and they are protected from impacts that would causes cracking.
To attach the bridge on the treehouse side, I cut some stainless plates for anchoring the cable to the tree. They are anchored with 3/4"x12" lag screws. The cables run over the top of the treehouse deck, and the deck is supported with an extra cable on this side.
To build the bridge platform, I spent a solid hour threading cedar slats and cpvc spacers over and over onto cable.
When I had enough on there, I pulled it tight and anchored it to the two back cedar posts of the small deck. I used extra cable and ferules to make sure the two cables of the bridge aren't pulling the cedar slats apart.
I got a 3" diameter ship dock rope from craigslist to use for the railing on the suspension bridge. 3" U-Bolts hold it in place. 200' of paracord ties it to the decking of the bridge.
The railing for the treehouse deck is 2"x6" cedar with 5/16" cable.
Power to the treehouse is run underground to the small deck platform, then runs on the underside of the suspension bridge.
Step 8: The Inside


Sometime during the winter I found a vintage leather couch on the free section of craigslist. It would fit in the small space better than the big fake leather couch I had in there before, so I enlisted my dad to help me carry the old one out and new one in. The suspension bridge can handle two men and a couch, but it sways a bit with every step. The rope railing definitely came in handy. We also managed to get my kegerator across the suspension bridge, but that actually went pretty easily with a dolly.
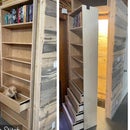
I didn't know exactly what I wanted to do with the inside, but I knew I wanted it to be light, manly, and cheap. I just happened to have some aluminum roofing material laying around so I cut it into 36" long pieces to use as the bottom section of wall. I used fir 2x3s on top of that to break it up a bit, and 1/4" floor underlayment for the top section. A/V and electrical wires all run through the walls, and the aluminum panels are screwed on, so if I need to run more wires for any reason I can access the inside of the wall.
I had yet to build a ladder to the loft, and I had this idea that I wanted to incorporate a ladder into the countertop. I got an old cable spool from work to use as a wrap-around bar top. I took it apart, sanded it all up, and cut a hole in the middle fit around the tree. I split it apart at a seam and rejoined it around the tree. The frame it sits on doubles as a ladder onto it, and 2x3s act as the classic treehouse ladder going into the loft.
All of the lights and the heater are on Neo wifi switches. The lights can be turned on/off from in the sleeping loft, and the porch lights and heater can be turned on before you get out there.
There is an Optoma projector hanging from the loft for watching Netflix or BluRays on the PS3 and a little lcd TV for streaming music on the PS3 without having to turn on the projector.
Step 9: Outro: Treehouse

It has come a long way from a stand of trees to what it is now, but there's still a lot more work to do. For now I'm just going to sit back and enjoy it.
Still on the to-do list:
Paint the exterior.
Put in flooring. I have been collecting scraps, and my wife has been cutting them to 1/2" long to use as an endgrain floor. Haven't decided on a pattern, though.
Trim work. The windows and door are lacking any trim.
Rope ladder for trap door. Every treehouse needs one.
Insulate the floor.
Put sheathing on the ceiling.
Step 10: Update


It has been much improved since writing the Instructable.
The outside is painted, the flooring is finally done, and the trap door is in.
Burlap is going up on the ceiling, but it's not done.
