

Introduction: Hidden Door Book Shelf


Check your wifi, because this is going to be a long one with lots of photos. It's kind of a two-parter.
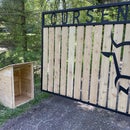
So I've got this small closet space inside a house remodel project, and I want to build a book case with a secret latch to access the space behind it. The shape is a little weird, so I'm breaking it into two parts: a cabinet on top and a bookshelf on bottom. Since I don't need a 7 foot tall bookshelf, I'm putting some junk drawers in the bottom half. I will also use the drawers to hide some metal bracing to support the cantilevered weight of the book shelf.
Supplies
Consumables:
- Pre-finished 3/4" oak plywood
- 3/4" plywood banding
- 2x6 douglas fir
- S4S cabinet wood
- Set of heavy duty door hinges
- Drawer slides
- Cabinet door hinges
- Miscellaneous screws
- Wood Glue
- 18ga brad nails
Tools:
- Tape Measure
- Track saw and/or Table saw
- Router, 23/32 router bit
- Clamps
- Brad Nailer
- Square
- Level
- Hot iron
- Masking tape
Step 1: Framing for a Cabinet Box


As you can see in that first photo, I've got a weird shaped opening because of the floor beam above. So first, I want to simplify the shape of the book shelf by creating a separate cabinet above it. This should also help to camouflage my bookshelf so it doesn't look like it's a door with shelves.
Step 1: framing in an opening for a cabinet box.
It's pretty straightforward: I built a rectangular opening in the front, then used a level to place some support boards in the back of the closet. In the next step, I put together a box to slide into the opening.
You'll notice I write down my interior dimensions right on the 2x4s. That way I can just glance up there to remind myself instead of climbing up my ladder to measure it again.
Step 2: Building the Cabinet Box


Cutting the plywood
I'm not doing drawings for this; it's a simple box, so I'm just going to do it in my head. I've said it before and I'll say it again: Woodworking is just building a box. I'll put a sketch together for the big bookshelf, and I'll explain dimensions there. But for now, let me instead focus on HOW to cut pre-finished plywood.
You see, plywood, and especially Pre-finished plywood, likes to chip out a give you ugly seams if you don't cut it correctly. When a saw blade cuts through wood, it's really just chipping wood away at a really high speed. The teeth on the blade are little alternating chisels, chipping away as you cut. They always push the wood, so you need to know how your saw is cutting it so you know whether you should cut it with the pretty side up or the pretty side down.
Take a look at my 3rd photo - I had just cut the plywood with my track saw, pretty side up. and ooooh that edge looks bad! This happened because the teeth of the saw are rotating UP as they cut, so they're pushing the chips through the veneer, chipping it.
The best way to cut using a track saw or a skilsaw is with the veneer facing down. That way the saw teeth are pushing the veneer into the wood where it can't chip out. But... then it chips out the back side of the plywood. Fear not! there is an alternative option so neither side chips out!
If you place a piece of masking tape on the side likely to chip out, the tape will actually hold it together well enough leave you with a clean cut!
If that chipped out edge on my first cut bothers you as much as it does me, you'll appreciate this next step.
Routering the edges to create a better joint.
My favorite way to build a cabinet (and the standard for most cabinet shops) is to router a groove, then glue and brad nail. It's best if you add some clamping pressure when you nail it, but it's not 100% necessary for most cabinets. The nails hold the boards tight enough together for the glue to set properly. This way you don't have to clamp it and wait for the glue to dry before you can move on to the next step.
When routering, for most applications I like to router a groove that's half the material thickness. In this case, I'm using my Kreg router setup gauge to get the depth perfect. I love this little tool. When you're selecting the appropriate router bit, keep in mind that 3/4" plywood isn't really 3/4". Use a 23/32" router bit for nice tight grooves. 3/4" router bit would work, but the fit would be loose.
These pieces are small enough that I can router them on the table router. Notice in the picture that I've clamped a sacrificial board to my aluminum guide so I don't damage it.
There is a right and wrong direction when feeding a router, and it can be tricky to remember which way to feed it, especially when cutting grooves. Honestly, I can never remember which way... but routers and saws are all the same - if the tool wants to pull your material out of your hands, you're going the wrong direction. You should always be pushing against the tool's cutting resistance.
Nailing the pieces together.
Again, there's a right and a wrong way, and I think most people don't know it. Brad nails aren't round like framing nails - they're flat. And they like to bend in one direction more than the other. So if you're getting nails bending and poking out your material, turn your nailer 90 degrees. And if they do punch through the side of your material, pull the messed up nails out in the direction you're shooting them. They won't go back out the top like pulling a framing nail; you've got to pull them through. Same thing goes for removing a barbed fish hook... but I digress.
Step 3: Mounting the Hinges


The Hinge.
There are hinges specifically designed for this application. They are recess-mounted above and below the bookshelf. The problem that I have is that I'm not willing to drill and recess a hinge in my heated concrete floors because I will ruin them if I hit a heat line. Chances are slim, but the cost is too high to risk it.
So I got the beefiest door hinges I could find. I'm screwing them into a 2x6 instead of directly into the bookshelf because the veneers of the bookshelf won't hold screw threads as well as a 2x6 would. So instead, I'll use some strong screws to go into the 2x6, then I'll hide some strong screws in the bookshelf, screwed into the 2x6.
The levelness of the hinges is critical, because if I have any sagging in the bookshelf when it's fully loaded, I'm going to have to add a caster to support the other end. If the hinges aren't perfect, the caster won't support its weight when it swings open.
Man, if I had a dollar for each time I've installed a hinge with the pin facing down... I'd be a dollar richer today. I always forget to check that! Whatever. It'll still work.
I used a laser level to line up edges of the hinges, then a regular framing level to line up the 2x6 to attach to them.
Step 4: Math... Uhhg


Planning
My set of plans, as written on this cocktail napkin.
Since it's thick and going to hinge, I have to use math to figure out how wide it can be without rubbing when it opens.
I used pythagorean theorem to calculate my max width. I had an opening width of 33.75", a cabinet depth of 10.5", and I wanted my hypotenuse to be 1/8" less than the opening (33.625") so it doesn't rub.
My cocktail napkin plans had a couple dimensions wrong on it, but luckily they were oversize-errors, so I just had to cut twice. When I wing it like this instead of having details plans and cutlists, I definitely waste more material. I could have saved about 1/4 to 1/2 sheet if I would have CAD this up and put together an efficient cut list.
Cutting
These sheets are heavy and my table saw is too far away, so I used my track saw to cut my 3/4" plywood parts.
I have a 4' track, so I have to cut 8' panels in two parts.
If I planned ahead better, I would have routered the slots for the shelves before ripping the plywood. That way I would have perfectly aligned slots and grain-matched Left Side/Back/Right Side parts. But since I didn't yet know how many shelves and drawers I wanted, I cut the panels first, and intricately laid out the router grooves later.
Like I mentioned in step 2, I usually router grooves that are half the material thickness, so 3/8" in this case. But I am going to be putting a lot of force on the back panel of the bookshelf, so I went with 1/4" deep router grooves to maintain a little extra rigidity.
On my drawing I'm aiming for 10.5" overall depth, so I cut my sides, bottoms, and shelves at 10.125" because I messed up and was thinking it was a 3/8" router depth instead of the 1/4" depth that I just explained... So now it's all a 1/8" shallower than I expected, but nobody will know but me... and now you.
Interesting side note... You'll see in the picture that on my compound miter saw I cut with the veneer facing down. I get almost no tear-out doing it this way, but on my non-compound miter saw, I have to cut with the veneer facing up.
Step 5: Routering Slots


And more math
Since these panels are so big, I've got to router them all with my hand router and not the table. I mean, I could set up a dado blade set on the table saw and they'd be pretty good, but I can get better quality with the router. First, I've got to figure out how far offset my router cuts with this bit so I know where to clamp my guide. There are two ways to do this: Cut a piece of scrap and measure it (easier); or, take some measurements and do more math. I chose the math option, and honestly I still don't know why. Basically, I measure my guard diameter, half it to get the radius; add the radius of the cutting bit; and that should give me the distance from the edge of my cutting bit to where I need to place my guide.
Since I have so many slots to layout and router, I ripped a piece of scrap to this dimension so I don't have to measure my offset every time.
Remember how I said a router cuts better traveling in one direction than another? It's really important when cutting slots down the middle of the sheet, because if you're traveling the wrong direction, it'll push your router where you don't want a slot, and that's incredibly difficult to fix.
Layout the sides for routering
I routered the slots in the back panel first, then clamped the sides up to it and transferred marks onto each side. This is more accurate than measuring where the slots should go with a tape measure, because it takes into account any minor errors I made when I cut the slots in the back panel. I used a mechanical pencil and was meticulous about laying out the router guide, because this part needs to be perfect. My slots all need to line up to within 1/64", and I can't get that accuracy with a tape measure.
Step 6: Glue Up


Always dry fit first
Always dry fit. If you don't, you'll end up with glue everywhere. You won't know what order to clamp stuff to actually make it fit together, and if you cut something wrong or need to sand to make something fit right, you'll be working with a glue-covered piece, and it'll get glue all over the place.
I had to sand a taper into the edge of most shelves to get them to align into the slots of the back and sides without damaging the veneer.
I also labeled each shelf with numbers on masking tape and kept them in order, just in case there were any fitment issues if I swapped the order.
Gluing
I glued in three stages: lay the back panel on the work table and add shelves and left side; add right side; add top and bottom.
Clamping and tapping with a rubber mallet was required to get the shelves into their slots and deep enough to add brad nails.
Once the brad nails were in the left side, I could remove clamps and move on to the right side: glue, clamp, repeat for all the shelves... and then nail.
After the sides, tops, and all shelves were installed, I stood the bookshelf up and nailed the shelves to the back panel. I measured from the top-down to each shelf, laid out a center line on the back (which will be hidden, so who cares if there's a blue line on it), and nailed each shelf from the back.
Step 7: Mounting and Bracing


Hanging a heavy bookshelf by yourself
I used two clamps to hang the bookshelf from the framing above. This way I can level the top and shim it like a door if I have to.
I used 2" long deck screws with a color similar to the oak bookshelf to go through the 3/4" plywood and into the 1-1/2" 2x6. I sunk a single screw near the top to support the weight, removed the clamps, and leveled the bookshelf before driving a second screw near the bottom. I placed screws where they'd be less noticeable - hidden under each shelf and inside the drawer cavities.
Check fit, clearances when opening, squareness before sinking all of the screws.
Bracing because it's heavy
Books aren't light, so I added steal bracing in hidden spots. I put a couple on the outside to keep joints from splitting apart under load, and I braced each of the four bottom shelves that will be hidden by the drawers.
Step 8: Drawers


I like building drawers. It's just a perfect little box, and you can make it as complex or simple as you want.
Design of a drawer
The really nice drawers use a dovetail joint to connect the sides to the front and rear. but you can also use a butt joint, dowel pins, drawer lock joint, or like a dozen others. I'm going to keep with the same joint I've been using, because it's simple and fast.
The bottom of a drawer is often 1/4" hardboard set into a routered groove 1/4" up from the bottom of the sides/front/back. I'm using 12mm plywood and a 15/32 router for my drawer bottom and groove, because that's what I have lots of scrap of.
Drawer Routering
I'm using my standard half-material-thickness for routering depth. I'm still using 3/4 oak plywood for the drawer bodies, so 3/8" deep for all routering.
When I router the 15/32" groove for the 12mm drawer bottom, there are a couple important things to note:
First, I set my depth a little bit more than I did for routering the 3/4" grooves. The reason for this is twofold: so I have a little extra slop in the drawer bottom for expansion/contraction with humidity variances; and so the joints between the sides/front/back of the drawer aren't affected by any imperfections in the bottom panel.
I'm using plywood, not hardwood for the drawer body, so it won't be affected by humidity as much as a solid hardwood drawer body and plywood bottom would.
Drawer Assembly
Assembly is identical to the bookshelf: dry-fit, glue, clamp (if necessary), brad nail. Then stack in a pile to install later.
Step 9: Drawer Mount and Fascia


Drawer Slides
Normally drawers have their slides mounted on the bottom 1/3 of the sides. I don't know why. But I put bracing for the bookshelf there, so these drawers are getting mounted at the top of the drawers.
I use the top of the drawer cavity as a guide, so no need to level. I mount the left and right slide, then hold the drawer where it fits the opening best, then sink a single screw attaching the slide to the drawer body, then pull the slides out and square it up before sinking the second screw.
Drawer Fascia
The fascia will hide any imperfections in how I haphazardly mounted the drawers.
Usually drawer fascias are solid wood, preferably book-matched or grain-matched so they look coordinated. But in my case, I'm using the 3/4 oak plywood again. And I'm glue-and-nailing it again. Normally I'd nail it from the inside using nails shorter than the total thickness of the drawer front and fascia, but I can't fit my nail gun in these tiny drawers, so I have to nail it from the outside, right through the pretty fascia. Remember how I said the brad nails are actually flat? The little nail heads and dimple from the nail gun head is least noticeable if you drive the nails so they match the grain. Then a little wood putty, and they're practically gone.
Step 10: Edge Banding


Prep edges
There are a few edges that don't line up perfectly. I had one or two little gaps and one or two little shelves that protruded beyond the bookshelf side. I filled little holes with wood putty and sanded down the raised bits so the edge banding would have a flat surface to adhere to.
3/4" edge banding is not 3/4"
Edge banding tends to be oversized. And Plywood tends to be undersized. So expect to have to trim edge banding. I try to line up one edge of the banding perfectly so I don't have to trim one piece twice.
Most edge banding is pre-glued with heat-activated glue. Some are peal-and-stick, and some are glue-free, but they're pretty rare.
Cut wood with scissors?
Edge banding is a wood veneer. You can cut it with a razor knife or chisel, which is best for trimming excess; or you can use a pair of scissors to cut your start edge. I always cut a piece about 1/2" longer than I need, and trim the excess.
You can usually wrap it around outside corners so you get a seamless corner, like on the drawer fascias in this case.
Gluing chipped veneer
I had a couple pieces of veneer on the plywood that pulled up along a cut edge. A little dab of glue and a piece of masking tape makes short work of it.
Step 11: The Mechanism


Stop blocks
First I need a stop block on the top and bottom so the bookshelf closes to a specific point and doesn't float around like an open door. For both top and bottom, I used a piece of oak plywood, pocket-hole screwed to the inside of the closet.
Latch mechanism
This mechanism is cable-actuated. When a book is pulled, a cable attached to it pulls a little lever on a latch, releasing the bookshelf and allowing it to swing freely. I struggled a lot with the mechanism, because I wanted to do it without damaging the book, but I also wanted the book to hinge, not slide, which proved difficult because of the lack of space for a hinge under the book.
I 3-D printed a panel to sit inside the book, with a cable mount sized to fit a bike brake cable.
I clamped the book, then routered a groove for recessing a metal hinge.
Then I heated the hinge with a plumbers torch, and set it onto the printed book panel, bonding them together without any screws. The book panel has a hole in the top to tie the book's ribbon bookmark to, so the panel doesn't separate from the book during use.
The hinge is mounted to the book shelf with one screw - just enough that it will stay in place, but still allowed to rotate and move a bit so it feels more natural when pulling on the book.
The latch itself is this one from amazon. Not gonna lie, I thought it would be bigger. I ordered two, because I figured my chances were high of messing one up, or just needing two for the project.
I drilled a 0.09" hole in the handle of the latch on my endmill. Then, a corresponding hole in the back of the bookshelf.
The cable runs directly from the 3D printed panel in the book, through the back of the bookshelf, and into the handle of the latch. An aluminum ferule holds the cable permanently in place.
There is no backup mechanism for if something goes awry and I can't get it to unlatch. The cabinet above will need to be removed so the latch mechanism can be access from above.
Step 12: Final Trim and Cabinet Doors


There is clearly a gap around the bookshelf, and you can see the hinges, so it's not really "hidden" yet. My hands are tied here. I've got to wait for the wall to be finished before I can add the trim that will hide the gaps and hinges.
Ditto for the cabinet face and doors on top.
So stay tuned if you want to see how I hide those gaps and finish out the cabinet on top.
Puppy tax

Participated in the
Books and Bookshelves Contest


