

Introduction: Veneered Table Top


This is a simple tutorial on laminating fancy veneers to a substrate material.
Tools needed:
Thin Air Press vacuum bag (26" x 28" bag used in this tutorial)
**comes with hand pump and breather netting
Sharp utility knife
Glue roller
Heavy straight edge
Masking tape
Paper template
Materials needed:
Solid substrate (plywood, mdf, particle board, solid wood, etc)
Veneers
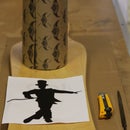
Step 1: Paper Template

I did a search on the internet for GRAPH PAPER and found this site: Online Graph Paper and used a layout there called Polar. I copied this to the largest sheet of paper my printer could handle. Once printed, I accurately cut out one slice of the printed template. For this project I used 12 cutout veneer pieces. You may choose to do more or less depending upon your design.
Step 2: Cutting Veneers


You will probably want to spend some time picking your veneers. Try to pick similar colored veneers, unlike the one I have done for this tutorial. Figurative veneers work well and I would recommend using one type of veneer, over multiple species.
Some veneers are easier to cut than others. A very sharp knife blade is a must for this project. Veneers, like burls can be difficult to cut due to the swirling grain pattern. Burls though, can make some of the most dramatic and beautiful designs using this tutorial technique. One way to ensure a clean cut is to masking-tape the veneer, over top of where you are going to cut. The pictures below show how I lay the template on top of the masking tape. This will prevent the knife from ripping the veneer or following the grain, as you cut.
It is important to have a quality, heavy straight edge. Place the template over the veneer that you have chosen. I use a couple of pieces of masking tape to attach the template to the veneer. Lay your straight edge on top of the template, precisely aligned with one edge of the triangle. Firmly press the straight edge down when cutting.
I am left handed, so I always cut my veneers using the same hand, pulling the knife towards me, making sure my right hand is well away from the blade.
It is better to make multiple cut strokes, rather than trying to cut through the veneer in one pass. Keep the knife as straight as possible when making your cuts. Once you have cut one edge, rotate the veneer, align the straight edge to the other side of the template and cut the second side. Repeat these steps until all your pieces are cut out.
The last photo in this set shows what your pieces should look like as they are being cut. Do not worry about removing the excess masking tape from the veneer.
Step 3: Veneer Layout


Assemble your wedges accurately into a circle. It is important to properly align the points of the wedges so that they meet and do not extend beyond one another. I use 2 pieces of masking tape about 1 1/2″ long to join the wedges together, stretching the tape across the seam so it pulls the cut seam tightly together. Then I place a length of tape along the seam, leaving the wedge points exposed. Tape only one side of your veneer circle.
This is what it should look like when you are done. Sometimes you may have to fit the last piece into the circle by re-cutting one side of the last wedge. If you are very accurate aligning your template while cutting, this will not be necessary. When all the pieces have been taped together, check to see how flat the circle can be pressed. If it does not lay flat when you press it by hand, you may have to re-cut your last wedge.
Step 4: Substrate & Glue


Depending on what you are making, you have many choices. Veneering over solid wood, birch plywood or MDF are among the many materials you can use. I use MDF for this project as it is inexpensive and easiest to work with. It can be routered if I want to make a fancy edge around my tabletop. You can also build a circular frame using solid wood where the veneers align with the cut wooden frame. This technique makes the table top look like solid wood when finished.
It is time to prepare your workspace. Have all the parts ready, including the glue, veneer, roller, the Thin Air Press vacuum bag, breather netting and finally, the manual vacuum pump. Set everything up to be close at hand when you begin your glue up as you have limited time for applying the glue before it starts to dry.
What glue to use?
There are many types of glue that you can use for veneering. You want a glue that advertises a long wet time. Epoxy glues, (like West System) work well and have the advantage of not swelling veneer like water-based glues. Unfortunately epoxy is fairly pricey and toxic smelling while curing. Water-based glues, like woodworker’s glue, work well for veneering but special consideration has to be taken for veneers expanding because of the water in the glues. I use Titebond III as it has a 9 minute wet time and is waterproof after curing. A quality polyurethane glue will also work for this project.
When you are ready, apply an ample amount of glue to the substrate material. Do not apply glue to your veneered circle as the veneers will curl and will be difficult, if not impossible, to work with. It is best to use a short-napped roller to evenly apply glue over the entire surface of your substrate. A thick build up in only one area will cause the veneer to pucker while pressing – an even coat is a must! Once you have applied the glue, place your veneered circle, tape side up, onto the glued substrate. Align the veneer so there is no overhang.
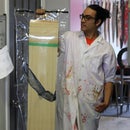
Step 5: Vacuum Bag


Quickly place the veneered substrate into the Thin Air Press bag. Place the supplied breather netting over top of the veneer. This material allows for even evacuation of the air from the TAP bag while pressing. Make sure that your project is centered in the bag.
The next step is to peel the paper from the sealing tape and to pull firmly on either side of the TAP bag, stretching the bag flat along the sealing tape. Take your finger and carefully press the sealing tape to the vinyl TAP bag. As you do this try to work from the inside of the bag towards the outside. Look for any light colored areas where the tape is not firmly pressed down. These will be very visable and only need a little thumb pressure to remove them.
Now press the pump against the grey one-way valve and remove the air from the TAP bag. Because the form inside the bag is flat, it should take less than 30 seconds of vigorous pumping using the TAP kit’s manual vacuum pump. You have achieved maximum vacuum when you feel the handle on the pump hard to pull and you can not pull the vinyl away from your project. This will create over 13 lbs per square inch.
In a few minutes, check to see if you have any leaks along your sealing tape by pulling at the edge of the vinyl. If the vinyl pulls away from your project, look at the sealing tape for any light colored areas and use your thumb to press these out. Once done, you can re-pump your TAP bag. The process is very simple and if you follow the basic instructions, the TAP bag will maintain vacuum for as long as it takes your glue to dry. I leave a project like this in the TAP bag for at least 4 hours. Check to see what the glue instructions say to be sure, as some glues take longer than others to set.
Step 6: Finishing

After the glue has dried you can remove your project. The paper strip that you removed from the sealing tape should be placed back onto the tape when you open up your bag. Do this before you remove your project as it prevents any flakes of glue from getting onto the sealing tape while removing your project. The sealing tape is re-usable many times over as long as you keep it clean.
Here are a couple of examples of my finished projects. I built these for retail displays as an example of the type of project you can build using the Thin Air Press kit from Roarockit. In the example photo, you can see that I routered a profile onto part of the edge to show what a finished top can look like. It was fun to play around with this project and found it quite simple to do. The cutting and taping took about an hour to complete and I think the results are great!
Courtesy of Ted from Roarockit.

Participated in the
Craft Contest


