

Introduction: Voice Controlled LED


Hi friends, in this instructables I am going to show you how to control an LED on Arduino through bluetooth using voice. Instead of using an LED you can also use a relay to control appliances using your voice. So lets start this interesting instructables !!!
Step 1: Collect the Materials -


1) HC-05 or HC-06 bluetooth module.
2) An LED of any color.
3) Any arduino board.
4) A laptop with Arduino IDE pre-installed.
5) AMR_Voice app.
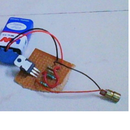
Step 2: The Schematic -

Step 3: The Code -
Copy the following code and upload it in your arduino board.
/******sketch for WhatsUpArduino App*******/
#include <SoftwareSerial.h>// import the serial library
SoftwareSerial chat(10, 11); // RX, TX
void setup() { chat.begin(9600); }
void loop() { if (chat.available()){ String readStr = ""; readStr=chat.readString(); //pinMode if(readStr.startsWith("pinMode")){ String pin=readStr.substring(readStr.indexOf("(")+1,readStr.indexOf(",")); int pinNo=pin.toInt(); String mode=readStr.substring(readStr.indexOf(", ")+2,readStr.indexOf(")")); if(mode=="INPUT"){ pinMode(pinNo, INPUT); } if(mode=="OUTPUT"){ pinMode(pinNo, OUTPUT); } if(mode=="INPUT_PULLUP"){ pinMode(pinNo, INPUT_PULLUP); } chat.println("done"); } //digitalWrite if(readStr.startsWith("digitalWrite")){ String pin=readStr.substring(readStr.indexOf("(")+1,readStr.indexOf(",")); int pinNo=pin.toInt(); String value=readStr.substring(readStr.indexOf(", ")+2,readStr.indexOf(")")); if(value=="HIGH"){ digitalWrite(pinNo, HIGH); } if(value=="LOW"){ digitalWrite(pinNo, LOW); } chat.println("done"); } //digitalRead if(readStr.startsWith("digitalRead")){ String pin=readStr.substring(readStr.indexOf("(")+1,readStr.indexOf(",")); int pinNo=pin.toInt(); int val=digitalRead(pinNo); if(val==1){ chat.println("it's HIGH"); } if(val==0){ chat.println("it's LOW"); } } //analogWrite if(readStr.startsWith("analogWrite")){ String pin=readStr.substring(readStr.indexOf("(")+1,readStr.indexOf(",")); int pinNo=pin.toInt(); String val=readStr.substring(readStr.indexOf(", ")+2,readStr.indexOf(")")); int value=val.toInt(); if(pinNo==10 || pinNo==11){ chat.println("You were trying to write on pins which are used by bluetooth RX/TX");// analog write/PWM on pins used by bluetooth can interrupt communication. } else{ analogWrite(pinNo, value); chat.println("done"); } } //analogRead if(readStr.startsWith("analogRead")){ String pin=readStr.substring(readStr.indexOf("(")+1,readStr.indexOf(",")); int pinNo=pin.toInt(); int val=analogRead(pinNo); chat.println("it's " + String(val)); } } } /********end of sketch**********/
Step 4: Test -
After downloading the app, go to your mobile settings and then pair your bluetooth module named HC-05 or HC-06. Use the password as 1234 or 0000 to pair the bluetooth module with your phone.
Once you have paired the bluetooth module, open the app and then click on the three dots present in the top-right corner of the app. Then click on the button displaying 'Connect Robot' and then click on the button displaying HC-05. Wait until the module gets connected. After the app is ready to interface with the bluetooth module, click on the mic picture in the app and then say TV on. The LED will be switched on. To switch off the LED, say TV off.
If you want to switch on the LED by saying some different command, then you have to change the word *TV on by the command. Don't forget to put a * symbol before writing any other command. Never use any symbol as a command. * symbol is used to start a command.
Before -
//----------Turn On One-By-One----------//
  else if(voice == "*TV on") {digitalWrite(led1, HIGH);}
  else if(voice == "*fan on") {digitalWrite(led2, HIGH);}
  else if(voice == "*computer on") {digitalWrite(led3, HIGH);}
  else if(voice == "*bedroom lights on") {digitalWrite(led4, HIGH);}
  else if(voice == "*bathroom lights on") {digitalWrite(led5, HIGH);}
After -
//----------Turn On One-By-One----------//
  else if(voice == "*fan on") {digitalWrite(led2, HIGH);}
  else if(voice == "*your command") {digitalWrite(led1, HIGH);}
  else if(voice == "*computer on") {digitalWrite(led3, HIGH);}
  else if(voice == "*bedroom lights on") {digitalWrite(led4, HIGH);}
  else if(voice == "*bathroom lights on") {digitalWrite(led5, HIGH);}


