

Introduction: Waterfall Countertop W/ LED River Inlay (from Concrete)


If you like this Instructable, I would greatly appreciate your vote in the Epilog IX Contest. The winner gets a laser cutter, and I promise I'll make some really cool Instructables with the laser cutter, if I win :)
It is also entered in the LED Contest, so if you really like it, give it a vote in that one too.
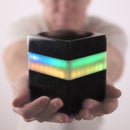
This video explains how to make a one-piece DIY concrete waterfall countertop with an inlaid river of flowing LEDs that cascades over the waterfall edge (using neopixel LED strips). The LEDs are individually controllable so they can be animated, and even have music syncing visualization modes.
This is the first of two videos for a mancave makeover at a friend's house. Part 2 will be uploaded within the next week, and will show how to make and install a reclaimed wood feature wall with floating LED TV panel, and the installation of the cabinets.
The countertop is made from a glass-fiber reinforced concrete (GFRC) concrete mix, which is pre-cast in a melamine form. I made the mix from scratch (recipe links are below). I mixed 280 lbs of the dry materials (including powdered pigment) all at once, so the color would be consistent. I used 40 lbs for the face coat, and the remaining in batches for the back coat with glass fibers.
I used an LED controller that has music reactive modes, chasing modes, and solid color modes, with an RF remote, to control the WS2812 LED strips. (https://goo.gl/u6Xj6Y) The LEDs are covered by a smoke grey transparent acrylic sheet, which is inlaid so it sits flush with the concrete countertop.
Step 1: Gather the Materials


CONCRETE FORM MATERIALS:
- Two (2) 4'x8' melamine sheets (3/4")
• Black 100% Silicone Caulk: http://amzn.to/2B64iRY
• Paste Finishing Wax: http://amzn.to/2kF565e
• Cake Fondant Tool for perfect edges: http://amzn.to/2w0JCVx
LED PRODUCTS
• Music Controller w/ Remote: https://goo.gl/Wjdzyp
• WS2812 60 LED/m strips : http://amzn.to/2BEn92t
• WS2813 Strips (new LED chip w/ data redundancy): http://amzn.to/2DTtRTS
• 5V LED power supply: http://amzn.to/2DUKWNd
• Acrylic sheets (for diffusers): https://goo.gl/8nqoJa
• Spray Frosting for Acrylic: http://amzn.to/2DgZEgn
CONCRETE (GFRC) PRODUCTS:
• GFRC Recipes (w/ product links): https://goo.gl/35RvFM
• 1.5 Bag of AR Glass Fibers: https://goo.gl/c9Vw9x
• Hopper Spray Gun (for face coat): http://amzn.to/2Cf9dxi
• Concrete mixer (HUGE help for GFRC): http://amzn.to/2kEnZFi
• concrete sealer: http://amzn.to/2xW7Gth
• Compaction Roller for GFRC: https://goo.gl/KJV3nv
• Powdered Concrete Pigment: (1 lb) http://amzn.to/2DXZU5k or (3 lbs) http://amzn.to/2lfJRHt
TOOLS I USE:
- Angle Grinder: http://amzn.to/2B6fwWG
- RZ dust mask: http://amzn.to/2wM8F1t
- Diamond Grinding Wheel (for grinding underside of table): http://amzn.to/2yRL6RY
- Level: http://amzn.to/2yQhYuk
- Herzo Dust Shround for Angle Grinder: http://amzn.to/2yPymLr
- Bosch 18V cordless circular saw: http://amzn.to/2wcDgnN
- Bosch 18V cordless Drill & Impact Driver Kit: http://amzn.to/2BCI753
- Dewalt 12” Miter Saw: http://amzn.to/2yQRgS6
- Dewalt Table Saw w/ 32” Rip Capacity: http://amzn.to/2yQd2Fy
Step 2: Make the Melamine Form


This is a pre-cast design, so the countertop is being cast upside down. To make the form from melamine, you'll need to do the following:
(a) CUT COUNTERTOP BASE: Cut a base piece of melamine to the exact dimensions of your countertop, in my case 76" x 26".
(b) CUT WATERFALL BASE: Cut a base piece for your waterfall to 3/4" longer than the height of your waterfall section, and the exact width (same as the base piece). In my case this was 38.25"x26" for a 37.5" waterfall (1.5" taller than the 36" cabinet height).
(c) CUT SIDES: Cut melamine strips for the sides of your form to the height of your countertop plus 3/4". In my case, the counter was 1 5/8" thick so the sides were cut at 2 3/8". It is easiest to cut these strips on a table saw. Cut all the strips at once, so the height is identical. Then use your miter saw to cut the strips to the lengths you need.
Side cut list:
- 2x sides for the top (80"). The two sides for the top can be a few inches longer than the length of the base piece.
- 1x end piece (27.5"-30"). This can also be a bit longer, better too long than too short.
- 2x sides for the waterfall (35 7/8"). These need to be cut to exactly the height of the waterfall section (37.5") minus the height of the countertop sides (1 5/8").
You cut the sides with a circular saw if you don't have a table saw. Just be very careful to make cuts consistently straight and of uniform width (so the sides are all the same height)
(d) CUT LED CHANNEL MOLDS: Use a table saw to cut the molds for the concrete channels where you will put the LEDs. I made these from strips of melamine. A 2" wide channel will allow for two parallel LED strips. IMPORTANT: set your table saw blade to an angle (I set it at 15 degrees, but exact angle doesn't matter), so the sides of the channel molds are sloped. This way, when you cut the acrylic diffusers, you can cut them at the same angle, so the angled sides of the concrete channel will hold the diffuser in place, flush with the surface of the countertop. Then use 3/4" electrical tape to cover the exposed sides of the strips, so that water doesn't soak in when you pour the concrete.
(e) ASSEMBLE THE FORM: pre-drill holes, and then screw your sides to your base and waterfall. I used 1.25" drywall screws for this. (d) place your wood slab in the form upside down (with top of slab against bottom of form). (d) Apply paste wax to the inside of your form and bottom/sides of slab. (e) caulk the inside edges using black silicone caulk and the cake fondants. (Check out my GFRC videos on my YouTube channel to see this process in action.) After the caulk cures and you pull the excess to leave clean caulk lines, and your form is ready.
Step 3: Cut the Foam Inserts for the Countertop
You will cut inserts from 1/2" pink insulating foam (i.e., Foamular) to go inside the form, so the concrete is only 1 1/8" thick (except at the sides, where it is the full 1 5/8" thick). Just use an exacto knife to score the foam sheet so it is about 1-2" less than the size of the table in both directions. After you score the foam, it snaps easily by hand. If you want it precise, you can also cut the foam with a circular saw or table saw.
Step 4: Mix and Spray the Face Coat


See my previous instructable for GFRC recipes, material links, and mixing instructions: https://www.instructables.com/id/GFRC-Floating-Con...
I mixed up 280 lbs of dry ingredients for GFRC (cement, sand, pozzolan, pigment, any powdered admixes) in a large tub, so the color would be consistent between face and back coats. I also scooped out a couple pounds and set it aside to use as a slurry coat later.
I then took 40 lbs of dry mix, and added the wet ingredients (water, polymer, defoamer, and only a very small amount of superplasticizer since we want it to stick to verticals), and mixed it up. Again, see previous instructable for detailed mixing instructions.
After waiting 5 minutes and making sure face coat was still runny pancake batter consistency, I used a hopper gun to spray the face coat, spraying corners first, then sides, then the middle of the form. QUICKLY, use a chip brush to lightly brush the coat in and remove any bubbles. Work a bit harder with the brush in corners to remove bubbles there.
Optional: wait until face coat firms up, then spray second layer of face coat. If doing this, make each face coat layer no more than 1/8" (so 1/4" total).
Wait for the face coat to firm up before adding backer coat. You want it to be firm but still wet, so you can't push through it easily with your finger, but it still sticks to the back coat.
Step 5: Hand Pack the GFRC Backer Coat


The timing of your backer coat is important, so make sure your face coat has firmed up enough (but not completely dried out), before you start your backer coat. Usually this only takes 30-60 minutes,
You can wait until the face coat is ready to begin mixing your back coat, so long as you have everything measured out in buckets (so mixing only takes a few minutes). The process is similar to mixing the face coat, except you add glass fiber at the end. Again, see my previous instructable for more details on the recipe and mixing process for the back coat: https://www.instructables.com/id/GFRC-Floating-Con...
Note that for this build, you want to be careful with the superplasticizer, don't use too much. You want a wet but play-doh like consistency that will allow you to hand pack the back coat against the vertical face coat of the waterfall.
After packing the GFRC to 3/4" (approx), put in your 1/2" foam inserts. Then cover the foam with another 3/8" of GFRC (or slightly more -- better a little too much than too little, since you can grind down underside later).
Step 6: Grind Down the Underside of the Form


Let it sit for at least 24 hours (36 hours if it is under 70 degrees). Then, if your concrete has gone over the edges of the form, you'll want to use an angle grinder with a diamond cup to grind down the underside, before you remove it from the form. It is important to do it before removing the top from the form, so that you can use the sides of the form as a guide to grind the underside evenly all around.
When grinding, make sure that the underside of the countertop and waterfall don't jut out at all, which would prevent them from being placed flush against cabinets.
Also, grind down the bottom side of the waterfall section (which at the top when in the form, since its upside down). See video here.
Step 7: Demold the Concrete, Sand, and Seal


After grinding the underside down to be even with the edges of the form on all sides, it is time to demold the table top. Just unscrew / and pull the form apart.
If the side walls don't come off easily, use a rubber mallet to gently tap the sides of the form away from the concrete. If you flipped the piece over before demolding, it should be fairly easy to remove the bottom of the form (which is now on top). If it doesn't come off, then use a plastic putty spackle (not metal or anything sharp that could scratch the concrete!) to gently pry the bottom off. If it is really tough, then there is likely a vaccum between the form and concrete. In this case, you can use an air gun attached to your air compressor to shoot air between the form and concrete. This will break the seal created by the vacuum, so you can remove the bottom of the form. Next given the whole service a quick wet sand, by hand, with 400 grit sandpaper. Just sand until you feel it smooth a bit. You'll feel it when you've removed the texture of the melamine, which is all you need to do. Then, apply a concrete sealer of your choice. Just follow the instructions that come with your sealer.
OPTIONAL: before sealing apply a slurry coat (or two) to fill in voids and get a perfectly smooth surface, and then sand off the slurry coat(s) to get a pinhole free surface. Use the mix you set aside earlier, which is the same as the face coat. You can add a tiny bit more plasticizer, if needed. If you do a quick search for "slurry coat concrete countertop" on YouTube, you'll find a number of good videos showing the slurry coat process.
Step 8: Install the Countertop


My countertop was about 275 lbs. So get the help of some friends to set it in place. The counter can rest at one end on the waterfall section, so you don't need as much support underneath as you would otherwise. However, extra bracing isn't a bad idea. I installed a couple of these countertop support brackets at the other end, securing them to studs in the wall, instead of placing the counter directly on our Ikea cabinets: http://amzn.to/2BI9Yh9
Step 9: Cut the Acrylic Diffusers


I used a sheet of smoke-gray transparent acrylic to make the diffuser strips, and cut them on the table saw.
I took the piece of the form that I'd used to make the LED channels, and re-used it to make sure I set my table saw on the exact same angle (15 degrees). This way, when I cut the acrylic diffuser strips, they are the exact same width and bevel angle as the channel in the countertop, and can be placed flush against the top of the countertop without any other support from below.
Before installing the diffusers, I sprayed the underside of them with a frosted glass spray. This gives a bit more of a diffuse look, and more importantly, makes it so you can't see the LEDs through the diffusers when the LEDs are off.
Step 10: Install LEDs and Acrylic Diffusers


Drill a hold through in the bottom of the concrete channel so you can hide the wires to your LEDs by running them through the hole. Use the tape on the back of the LEDs to stick them in the concrete channel and if they come loose at all, you can also use some clear silicone caulk to adhere them to the bottom of the channel in the concrete.
Then set the acrylic diffusers in the channels. Optionally, you can put some clear silicone caulk on the side walls of the concrete channels and press the acrylic diffuser strips into them, so the diffusers are secure. If you do this, I recommend (a) using painter's tape to protect the concrete top from the silicone squeeze out, and (b) spending extra for WS2813 LEDs (you won't be able to access the strips easily, and WS2813 strips have redundant data lines, so they continue to work if individual LEDs goes out, whereas older WS2812 strips will short out entirely when one LED goes out).
For this build, I used an off-the-shelf LED music syncing controller that only cost about 10 bucks. This store-bought controller includes an RF remote, does music syncing, has chasing modes, and solid color modes. It is a pretty good bang for the buck. https://goo.gl/Wjdzyp
To wire dual LED strips like I did, just plug the JST connector on both LEDs to mating JST connectors, and wire the same colored wires from the mating JST connectors together. Then connect the output from your LED controller so the signal from the controller goes to both LED strips in parallel. Then plug the 5V power adapter into your LED controller and fire it up.
Step 11: Sit Back and Watch the Blinking Lights :)


Runner Up in the
Epilog Challenge 9

Participated in the
LED Contest 2017


