

Introduction: Metalworking Tools and Materials


This is the first lesson in my online beginners Metalworking Class that covers the bare basics of metalworking. It is meant for those who have never done any kind of metalworking before, but have an interest in learning the basic tools and concepts. By the end of this class you will be able to cut and drill pieces of metal, fasten them together, and polish them. This may seem rudimentary, but is enough to get you started and provide just enough knowledge to dive deeper into the subject with confidence.
Nevertheless, when you are ready to invest more time and money into diving deeper into metalworking, you will have some familiarity and won't be going in blind.
In this lesson we will cover tools and materials.

While this class does not require the use of any shop tools. We will also loosely be reviewing them when applicable. This is to familiarize you with workshop tools that best correspond to the hand tool techniques you are learning. However, this is by no means training in these tools and you shouldn't expect to know how to use them by the end of this course.

Throughout this class we will be learning about metalworking by converting an aluminum tube into a teleidoscope. This is like a kaleidoscope, but it has a spherical lens in the end of tube instead of a container of colorful beads. At the end of the course, you will also be presented with an option for converting this into a kaleidoscope should you wish.

This project is designed with the absolute beginner in mind, and can be completed with accessible hand tools. With the exception of a hand drill, there are also no power tools required. This class is designed to introduce you to some fundamental concepts and techniques in a literally hands-on manner.
Step 1: Tool List

Below you will find three supply lists (tools, cleaning/safety, and project materials), followed by an explanation of some of the items on each list. These lists may seem intimidating, but they are really is just the basics.
⁕ indicates Amazon
⊚ indicates McMaster
⍙ indicates other suppliers
(x1) Hacksaw ⁕
(x1) Table vise ⁕
(x1) Hand file set ⁕
(x1) Deburring tool ⁕
(x1) Corded drill ⁕
(x1) #36 and 6-32 drill and tap set ⁕
(x1) Center punch set ⁕
(x1) 16 oz. ball peen hammer ⁕
(x1) Steel ruler ⁕
(x1) Calipers ⁕
(x1) Scribe ⁕
(x1) Dykem steel blue layout fluid ⁕
(x1) Tap Magic ⁕
(x1) Adjustable tap handle ⁕
(x1) Assorted sandpaper pack ⁕
(x2) 4" buffing wheels ⊚
(x1) Surface Scratch Remover Buffing Compound ⍙
(x1) Pink Scratchless Buffing Compound ⍙
(Please note that some of the links on this page contain affiliate links. This does not change the cost of the item for you. I reinvest whatever proceeds I receive into making new projects.)
Step 2: Tools Overview
Follows is a more in-depth overview of the tools we will be using and what they are generally used for.

A corded drill is the only real power tool that we will be using in this class. While cordless drills get all the fanfare, corded drills give you the most bang for your buck - particularly for metalworking. You don't need to be particularly portable in the shop, and corded drills never run low on power. They also have a lot of torque, which is useful for metalworking. While they typically don't have all the fancy settings you may find on a cordless drill, these drills basically do one thing, and they do it very well.

For this course you will only need a 7/64" drill bit. That said, you may as well invest in a basic drill bit set. This is just generally useful for metalworking. We will be discussing drill bits more in the drilling lesson.

Another thing you will need is a 6-32 tap, and a tap handle wrench. This is used to thread drilled holes. We will be discussing this much more in the fastener lesson.

If it is solid, you can likely cut through it with a hacksaw. A hacksaw can cut through just about anything, it just may take a while. In this course, we will be cutting metal using a hacksaw. Aside from learning about how metal cuts in a hands-on manner, it should give you a healthy appreciation for power saws.

A table vise is a handy tool when holding parts by hand won't cut it. For this course, a small vise that clamps onto the table will do (pictured). If you get deeper into metalworking, you will want to get one more heavy duty (preferably with a built-in anvil) that bolts onto your workbench.

For more delicate shaping operations, a hand file set is much more useful than a hacksaw. Files come in a range of shapes, and sizes. They also have a range of cutting teeth arrangements to provide finer or rougher cuts in the metal. You may notice that my files here are all bastards. This does not mean they were forged out of wedlock, but have 30 teeth per inch (TPI). This is about an average tooth count, and good for general purpose use. There are countless configurations of files available for just about every imaginable purpose. Files are one of the most fundamental tools of metalworking, and are used in almost every aspect of metalworking for shaping and finishing parts. While filing metal may seem like a simple activity, it can take a lifetime to truly master.

When you saw and drill metal, you leave behind sharp raised uneven edges called burrs. The deburring tool is designed to remove them. By dragging along the edge of the cut surface, the burr is simply scraped away. This leaves behind a nice smooth beveled edge in its place. We will go over this more in a bit.

When metalworking, you will want a hammer. If you have a standard claw hammer at home already, that will be fine for now. However, for metalworking you will eventually want to invest in a ball peen hammer and a dead blow (both pictured above). A ball peen hammer has a striking surface on one side, and a ball on the other for shaping metal. This is much more useful than a generic claw hammer, since you will unlikely have any nails that will need removing. In addition, a dead blow has a counterweight inside of the striking head that minimizes rebound and translates most of the force downwards onto the surface being struck. This is useful for shaping metal (amongst other things).

Center punches are used to mark the center of the hole you are trying to drill. When used correctly, they leave behind a small dimple that will keep your drill bit in place and prevent it from wandering. You shouldn't consider drilling metal without first center punching it.

A scribe is used to leave a really light scratch on the surface of a metal part. This is used for marking cut and drill lines. This is preferably to pencil or marker because a scratch line is thinner, more accurate, and does not wear off easily.

If you are going to making scribe lines on your metal, you are likely going to need to do some measuring. It is recommended you get digital calipers and a metal ruler. You have likely used a ruler before, but may have not use calipers. So, to explain, digital calipers have two jaws which slide back and forth upon a track. On the readout, it tells you the distance between the two jaws to a fraction of an inch. This is useful for making really precise measurements, which you often need to do for metal. Unlike softer materials such as wood or plastic, metal has no give. You need to be spot-on with your measurements.

For this course you will want to get wet/dry sandpaper in a variety of sizes from 220 up to 2000. This is a little different than normal dry sandpaper used for woodworking. The most important part, is that the paper is stronger and doesn't rip as easily. We will be discussing sanding much more in the finishing section.

The buffing wheels we will be using in this class are shank-mounted and designed to go into a drill bit. They are basically a bunch of thin layers of fabric sandwiched together. It is the edge of the sandwiched fabric disc that is used to buff metal. This is yet another thing we will discuss more later.

If you are using a buffing wheel, you will want to get some metal-appropriate buffing compound. There are many different types of buffing compounds. Essentially, they act upon the surface of the metal much in the same way a fine sandpaper does. This is a finishing touch used to create a smooth, shiny, surface upon metal.
Step 3: Chemicals
Throughout this course we will be using a handful of different chemicals. We are not using anything particularly caustic, but it is important to always be mindful when dealing with chemicals and handle them carefully (i.e. don't ingest or spill them).

Dykem steel blue layout fluid is a blue ink used to coat the surface of metal for marking cut lines.

Tap Magic is a cutting fluid for cutting threads into drilled holes using a tap. It serves as a lubricant to decrease friction and a cooling agent to absorb the heat of machining threads.
Step 4: Safety and Cleaning

It is important to get the appropriate safety and cleaning materials for working with metal. The following is the minimum requirements.
⁕ indicates Amazon
⊚ indicates McMaster
(x1) First aid kit ⁕
(x1) Safety glasses ⊚
(x1) N95 dust mask ⊚
(x1) Pack of rags ⊚
(x1) Microfiber polishing cloth ⊚
(x1) Apron (optional) ⊚
(x1) Nitrile Gloves ⁕
(x1) Hearing protection muffs ⁕
(x1) Brush and dust pan ⁕
(x1) Push broom ⁕
(x1) Simple Green ⁕
Step 5: Safety Supply Overview

When doing metalworking, it is unlikely you will be wearing all of the safety equipment at once like I am, but let's take a moment to discuss what you need:
- Eye protection- You should always wear safety glasses, even if you are just using hand tools. These are a must. McMaster-Carr (linked) has a pretty rad selection of safety eyewear for all styles and tastes.
- Dust mask- A N95 dust mask should be worn when sanding, buffing or grinding metal.
- Nitrile gloves- These can be worn when sanding to keep your hands clean. These should never be worn when handling rotary tools (any power tool that spins).
- Apron- This is more for the safety of your clothing than your own personal safety. Stain removal is a drag.
- Ear Protection -When using power tools or hammering, things can get loud. Passive noise canceling ear muffs are a great way to protect your hearing.

Aside from personal protective equipment, you will also want to get a basic first aid kit. This does not have to be anything too fancy. It should have materials to clean and dress scratches, cuts and bumps. Since we are not really using power tools, potential injuries will likely be on the more manageable side of the scale.
Step 6: Cleaning Up

To clean up, at the very least, you should have a broom. The broom is used to sweep everything up into a nice neat pile.

You should also invest in a brush and dust pan is for getting that neat pile of metal scraps up off of the floor. It can also be used for cleaning off work surfaces as well.
This should be more than enough for all your basic metalworking clean-up needs.
Step 7: Project Materials

For the class project we will be making a teleidoscope which is like a kaleidoscope, but with a spherical lens on the end instead of beads. It can easily be converted to a kaleidoscope by inserting a clear canister filled with small objects in the end instead of a crystal ball lens. Should you want to also have the option to use it as a kaleidoscope, I recommend buying the 5 gram plastic jars listed as optional below.
⁕ indicates Amazon
⊚ indicates McMaster
⍙ indicates other suppliers
(x1) 1.5" x 12" aluminum tube ⊚
(x1) Pack of 5 6-32 thumb screws ⊚
(x1) 1.5" plastic washer ⊚
(x1) 31.52mm flashlight lens ⍙
(x3) 6.75 x 1.0625 front surface mirror ⍙
(x1) 30mm crystal ball ⍙
(x1) Clear packing tape ⁕
(x1) 3M 30NF Fastbond contact adhesive (or contact cement of choice) ⁕
(x1) 50 count 5 gram plastic jars (optional) ⁕
Step 8: Metal Stock

Metal stock tends to come in sheets, bars, rods, and tubes.
Depending on the form factor of the metal stock you are using determines the type of tools and processes used to work with it.
For instance, thin sheet metal requires a very different set of tools to cut, shaped and bend it than square tubing. That said, the general principles we discuss in this class remain roughly consistent.
Step 9: Metal Stock Overview

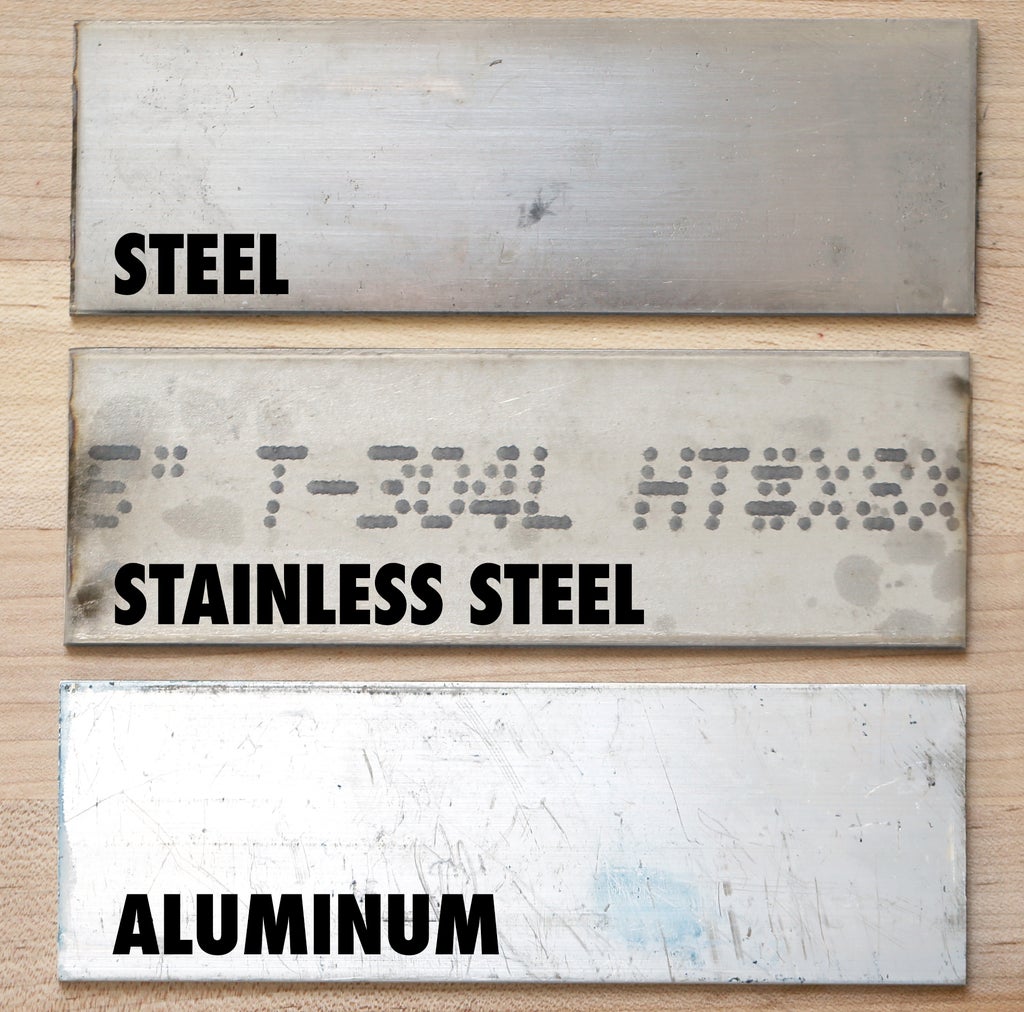
The most common types of metal you will encounter while doing metalworking are steel, stainless steel and aluminum.
Steel is an alloy of iron and carbon. Alloys are combinations of pure elemental metals that when combined together create metals with new and different properties. In the case of steel, adding carbon to the iron creates more strength. Steel is typically ferromagnetic, meaning magnets can stick to it, and it can be magnetized. Carbon steel also oxidizes (rusts) and needs to be treated to prevent this from happening. It is considered a harder metal, and usually falls somewhere between stainless steel and aluminum. The steel stock you will most encounter will be low carbon (mild) steel. It will also be hot or cold rolled, but you can learn much more about that in the welding class.
Stainless steel is a steel alloy with chromium added in. The addition of chromium enables the steel to resist oxidation in most situations, thus preventing tarnish and rust. Stainless steel is typically not ferromagnetic as a general rule, but certain types sometimes are. In addition, stainless steel is typically less brittle than steel, but it ultimately depends on the different steel and stainless steel alloys that are being compared.
Aluminum is an elemental metal and has the symbol Al on the periodic table. Aluminum typically oxidizes very little and does not rust. However, you may see aluminum tarnish a little as it corrodes. Aluminum is not ferromagnetic. The nice thing about aluminum is that it is a soft malleable metal and is easy to machine. However, it is a little more expensive than steel, easier to dent, and more difficult to weld.

You may also encounter brass, and copper.
Brass is a yellowish metal alloy made of copper and zinc. It is a soft metal and is typically softer than aluminum. Brass oxidizes by tarnishing, much in the same way a piece of fine silver might. In other words, it loses its luster and gets darker. It is not ferromagnetic. Brass is often found in plumbing. However, it is most commonly used as a decorative metal on account of its color.
Copper is another elemental metal. It is a soft metal like aluminum, but arguably slightly harder as a general rule. When copper oxidizes it tarnishes and then turns green on account of a buildup of copper carbonate that is a result of its interactions with the environment. Like brass and aluminum, copper is not ferromagnetic. It's an expensive metal to work with, so it is largely used for decorative purposes. Outside of decoration, copper is most commonly encountered as the metal traces on circuit boards, due to its excellent ability to conduct electricity.
Step 10: Next Lesson

In the next lesson we will be focusing on cutting metal.

Did you find this useful, fun, or entertaining?
Follow @madeineuphoria to see my latest projects.


