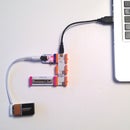
Introduction: LittleBits Serial Data
littleBits are fun little electronic modules you can use to build things. With the release of an Arduino module, you can now connect littleBits to your computer to control applications and other things running on your desktop.
Step 1: Grab Your Bits
Step 2: Connect Your Bits
The great thing about littleBits is that you really can't connect them incorrectly and do any damage. Here's how we'll connect up the bits. Power goes to d0/rx, and the slide dimmer goes to a1. That's about it! Don't forget to connect your 9 volt battery and turn on the power.
Step 3: Connect Via USB
Connect your littleBits via the included USB cable to a USB port on your computer. Nothing is happening? That's OK... we've got all the physical stuff done, but not we need to write some code so our littleBits know what to tell the computer.
Step 4: Write Some Code
If you've never used an Arduino before, you may want to visit the Arduino web site and familiarize yourself with things. If you've got some Arduino knowledge, you can jump forward and choose "Arduino Leonardo" as the board type, and whichever USB port your Arduino shows up as. (On my computer it's "/dev/tty.usbmodem411" but it'll probably be something else on yours.)
Once you're connected, try this code:
int myPin = 1;
int myRawValue;
int myValue;

void setup() {
  Serial.begin(57600);
  pinMode(myPin, INPUT);
}

void loop() {
  myRawValue = analogRead(myPin);
  Serial.println(myRawValue);
}
Upload your code to the Arduino and then open the Serial Monitor.
Step 5: Serial Data
Once your code has been uploaded, open the Serial Monitor (under the Tools menu) you'll see number streaming past. Make sure you set the correct port speed.
Move the littleBits slider up and down and you should see the values in the Serial Monitor window change.
If everything worked, you can now send serial data (values between 0 and about 767) to your computer via the littleBits thing you built.
If values between 0 and 767 seem a bit odd to you, don't worry, we can change that!
You may have noticed this line of code:
int myValue;
Which doesn't do anything... Let's fix that. Try upload this new code:
int myPin = 1;
int myRawValue;
int myValue;

void setup() {
  Serial.begin(57600);
  pinMode(myPin, INPUT);
}

void loop() {
  myRawValue = analogRead(myPin);
  myValue = map(myRawValue, 0, 767, 0, 255);
  Serial.println(myValue);
}
You'll see that we are now creating 'myValue' by using the map function. We take the input value (between 0 and 767) and map it to our desired output range (0 to 255). Open the Serial Monitor again and you should see values between 0 and 255. Experiment with the numbers, try mapping from 0 to 1000, or 0 to 10.
But what good is all this serial data that is just streaming into your computer showing you numbers? Not much... I should probably create another Instructable showing you a real-world example of controlling something. :)


