Introduction: 2 Disc Cardboard Automata - Fun Animations You Can Make at Home


On days when you are home, wanting something exciting to do, here is a fun way to spark up your day by making some animations using at-home available materials like cardboard and paper. In this tutorial, Paper Crane Lab teaches you how to make your very own cardboard animation using a very simple mechanism. Let us begin!
Age: 8+
Activity duration: 1 hour
You can find our video for the tutorial below, if you would prefer to follow along.
Supplies
- Our template (Printable template with measurements can be found here - http://bit.ly/pcl-2-disc)
- Thick cardboard
- White paper
- Toothpicks
- Ruler
- Blade (paper cutter)/ scissors
- Glue
- Pen and pencil
- Colours
Step 1: Gather Your Materials

Step 2: Cutting Out the Elements

Place the template on a piece of cardboard, and with the help of a pair of scissors or a paper cutter (adult supervision recommended), cut out the shapes as shown in the image. The black dots inside the circles and one set of rectangles indicate the holes. You can use a sharp pin/ pen or compass to do this. The tiny and wide rectangles inside the 8x12 cm rectangles and the 10x12 rectangles respectively, indicate the windows to be cut out of the shapes. To cut out the windows, and a paper cutter with some help from an adult.
Step 3: Create the Cardboard Discs


Once you have made the holes in the circles, ensure that it is big enough to allow a toothpick to go inside it. Now align the holes of three of the circles, and paste them together to form a thick disc. Push a toothpick inside the hole of the disc to ensure it goes through. We need two of these discs.
Step 4: Create the Top of the Mechanism Stand

To form the mechanism stand, take the smaller 5x2 cm rectangles shown in the diagram, and paste three of them together to form a thicker rectangle as shown in the image.
Step 5: Form the Mechanism Stand

Once that is done, paste these smaller rectangles on the two smaller sides of one of the 8x12 cm larger rectangles as shown in the gif. On this, paste the other larger rectangle such that it exactly overlaps on the first larger rectangle, and the windows that have been cut out, overlap as well.
Step 6: Connect the Animation Sticks Through the Mechanism Stand


In your shapes you have, you will find two stick like pieces of cardboard (long and thin) which needs to be attached to small rectangular weights of size 5 x 2.5 cm. Similar to the previous steps, paste two of the smaller rectangles together, and join them to the cardboard sticks using tape as shown. You now have all your basic components ready for the the 2-disc mechanisms.
Step 7: Assemble Your Discs


Push a toothpick each into the two discs you have created, through the holes. Join the two toothpicks together using tape, such that the two discs are staggered with respect to each other, as you can see in the images.
Secure the two toothpicks together firmly with tape, to ensure they do not fall off, or move away from the staggered position.
Step 8: Assemble the Mechanism Stand


Once that is done, push the cardboard stick- stand through the windows in the mechanism stand that you created previously.
Attach the supporting walls (10x12 cm rectangles) to the mechanism stand as shown. Once you have that, you can push the two ends of the toothpick through the holes created on the supporting walls (rectangles with wider windows) as shown.
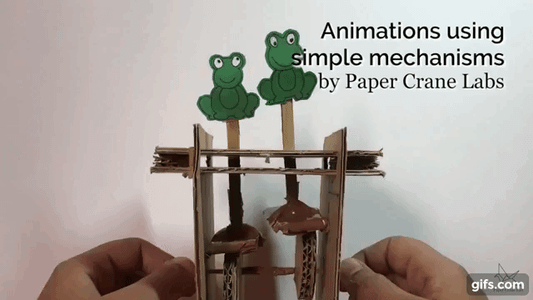
Step 9: Assemble Everything


Ensure that the discs align exactly with the cardboard stick stand as shown. As and when the discs move, the cardboard stick stand should move up and down with it.
Now you should have a working mechanism as shown in the gifs.
Step 10: Customize
Add your animation bits on top of the sticks to create your structure. This can be anything, from frogs to birds. Be creative, and build your own animation. Do send us your creation, and post how you liked it in the comments or on our Instagram page!
You can find our video for the tutorial here
For more such cool stuff, and to learn more about us, find us on instagram at : https://www.instagram.com/papercranelab/

Participated in the
Cardboard Speed Challenge


