Introduction: 3D Printed Indexing Gears (MVMT 68)
This mechanism uses rotary motion to move a gear quickly and precisely into a fixed position. Using skateboard bearings, you can snap these parts together and use the action for all kinds of useful (or useless) machines.
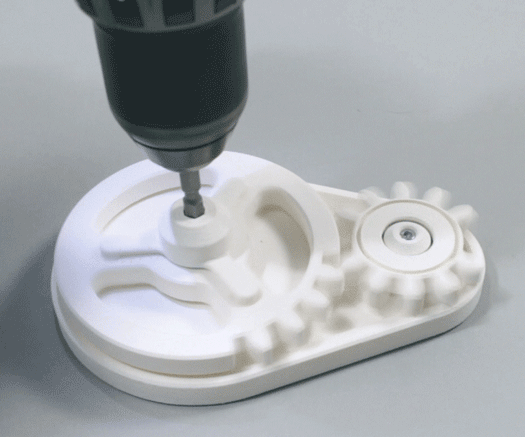
Using gears that have teeth and smooth gaps, you can make a gear spin and stop at just about any angle you want. This is similar to a geneva gear, but it's much simpler to 3D model and (I think) a bit easier to understand.
This is the first in a series of 3D printed mechanisms modeled in Fusion 360 using skateboard bearings and 3D printed parts. The idea is that you'll be able to use the mechanisms to make all kinds of projects that use mechanical assemblies like robots or any other machine you might want to make.
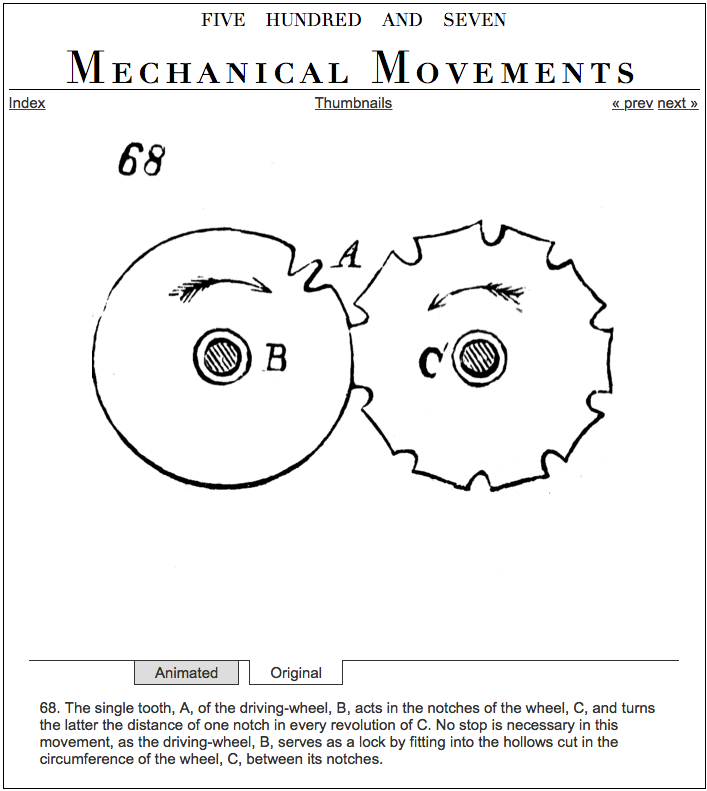
507 Mechanical Movements is an encyclopedia of common mechanisms from the 1860's that serves as a good reference for this kind of thing. This is going to be along project, so if you've got a specific mechanism you'd like me to make, feel free to make a request in the comments!
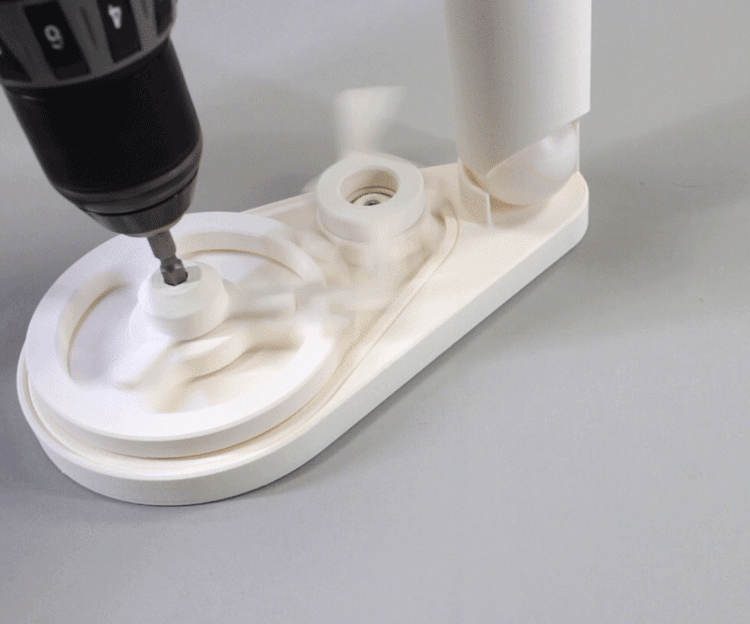
Oh, and what's it good for? You can add a couple of parts and shoot pingpong balls all over the floor!
Step 1: Tools and Materials
- Fusion 360
- 3D Printer
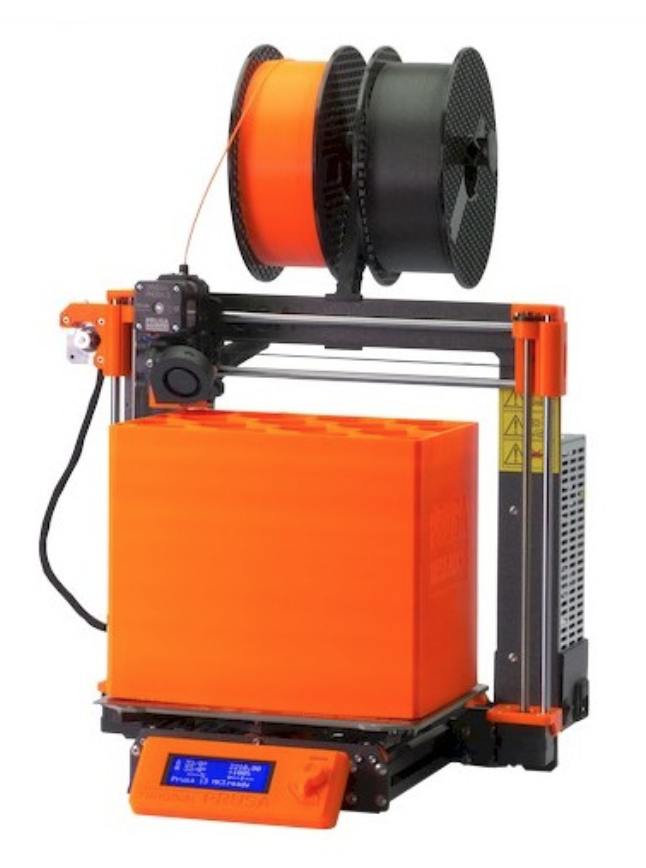
I use a Prusa I3Mk3S for just about everything. It's the best bang for your buck, in my opinion- very well made, 3D printable replacement parts, accurate and reliable.
- 3D Print Filament
- I used Matte Fiber HTPLA from Proto-pasta for this project, but pretty much any filament will work. I like this stuff because the finish looks really good.
- 608ZZ Skateboard Bearings: There are lots of types to choose from, but any cheap ones will do. Don't worry too much about "spin time" as you would with fidget spinner.
- M3 Screws + Nuts: You could use any screws and nuts around this size, but I find these work well for small 3D printed mechanical projects.
Fusion 360 is free and it's awesome. I use it for everything I design and fabricate.
Student / Educator License (renew free every 3 years)
Hobbyist / Startup (renew free yearly)
Follow along with this Instructable to model your own!
Step 2: 3D Files
The STL files are ready to load into your slicer to make exactly what you see in the model. The .f3d file is a Fusion 360 archive that you can upload to your own Fusion project.
Here's a link to the public Fusion 360 model if you want to avoid downloading and uploading, you can open it and save it as a new file: http://a360.co/2f1gYQ5
Attachments
Step 3: Making Spur Gears in Fusion
This mechanism is based on a standard spur gear. All you need to do is make some interfacing spur gears, then cut out some of the teeth to create the indexing action.
Fusion comes with a plugin that makes it easy to create spur gears. In this step I'll go through the process and explain some of the terminology.
Caveat: I'm not an engineer, I'm generalist designer who understands the complexities of topics like this with just enough depth to make what I want to make. There are many far more capable people than me on Instructables, hopefully some of them will chime in and correct me in the likely even that I get something wrong.
Spur Gear Add-In
To make a spur gear, go to ADD-INS > Scripts & Add-Ins, then select SpurGear from the list. You'll get a popup window where you can enter parameters. This is what they mean, more or less:
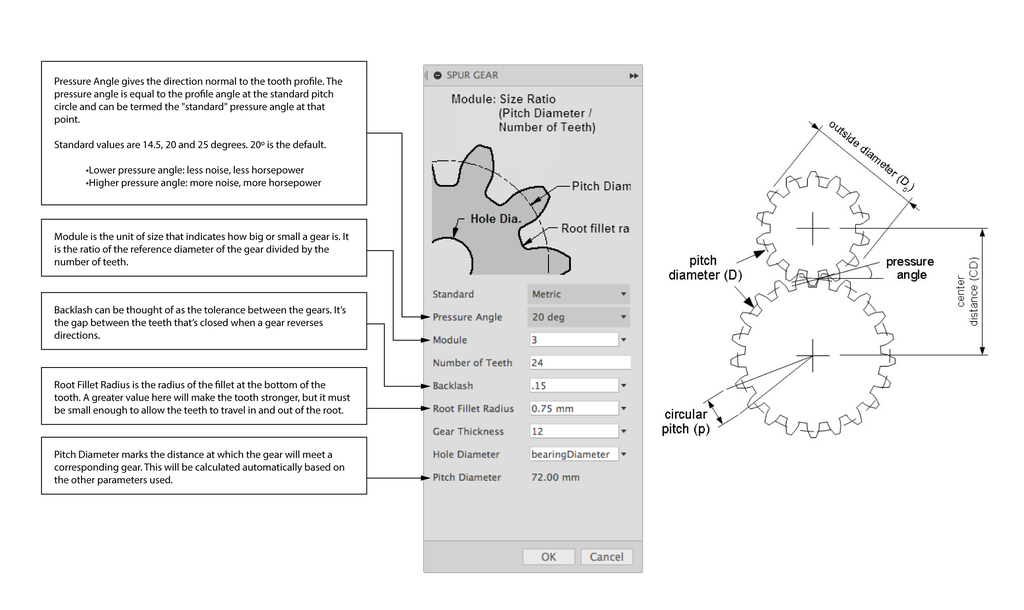
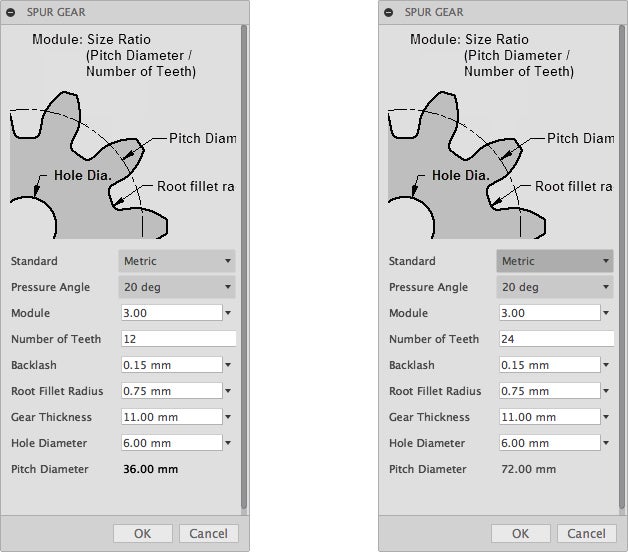
I'm going to make a 2:1 gear ratio with the larger gear being the driver. That means that the smaller gear will have 2 rotations to every 1 rotation of the larger gear. The smaller gear will rotate twice as fast. Watch the video above if you want to know more about what the parameters mean.
If you want to design your own gears, here's a great resource:geargenerator.comWith this browser tool, you can quickly design gear assemblies, see how they move, then copy and paste the info into Fusion to make 3d-printable gears.
The placement of the gears is simple. Just move one of them by the sum of the Pitch Radius (pitch diameter /2)of both gears. In this case, that's the (36/2)+(72/2) = 54mm. You'll know the spacing is correct because the green dashed sketch lines should be touching each other when viewed from the top.
The gears will be created in the same location with the same rotation, so to make them mesh correctly, just rotate one of the gears by a value of 360º/(Number of Teeth / 2). In this case, I rotated the 12-tooth gear by 15º.
Step 4: Turn Spur Gears Into Indexing Gears
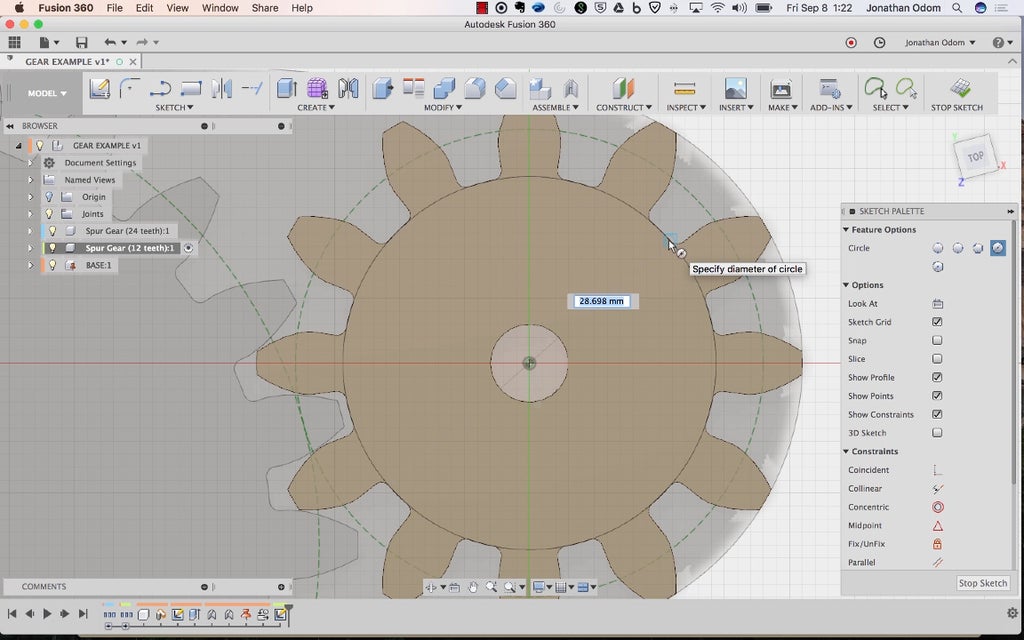
With the gears in place, you'll have to cut out some of the teeth to get the indexing effect. I'm going to make the smaller gear do the indexing, so I draw a Sketch circle snapped to the gear's root.
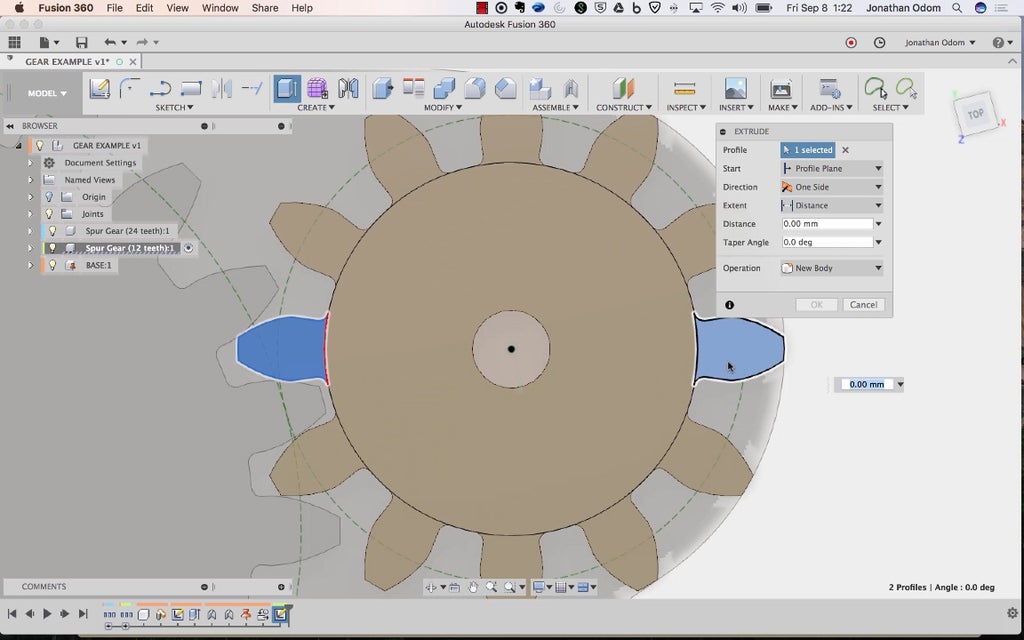
I want this gear to index at 180º, so I'm going to remove two of the teeth 180º from each other (on opposite sides as shown).
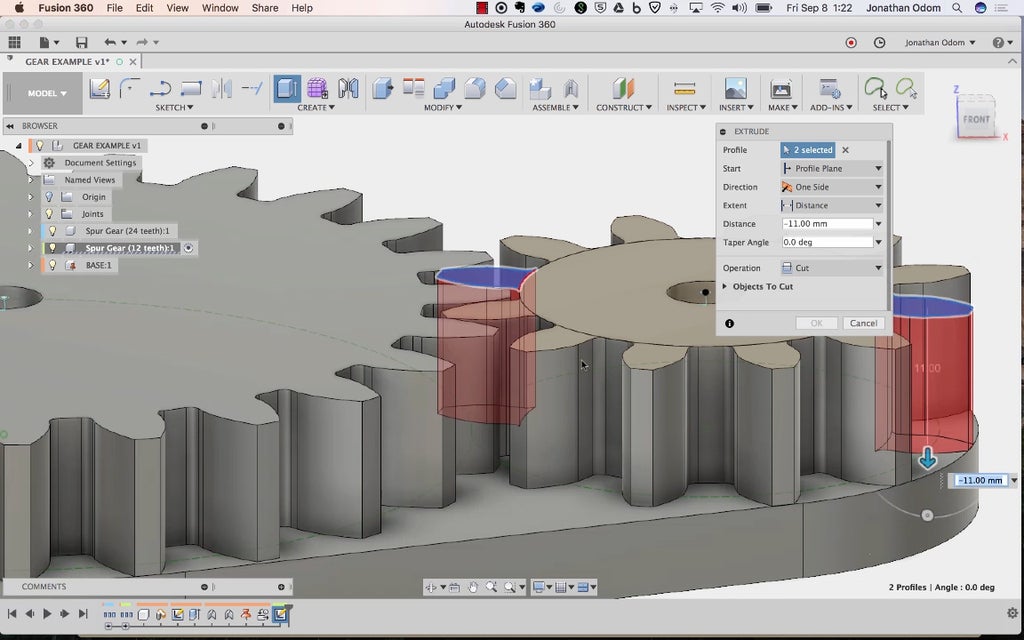
Using Create > Extrude, I select these two profiles and cut all the way to the base.
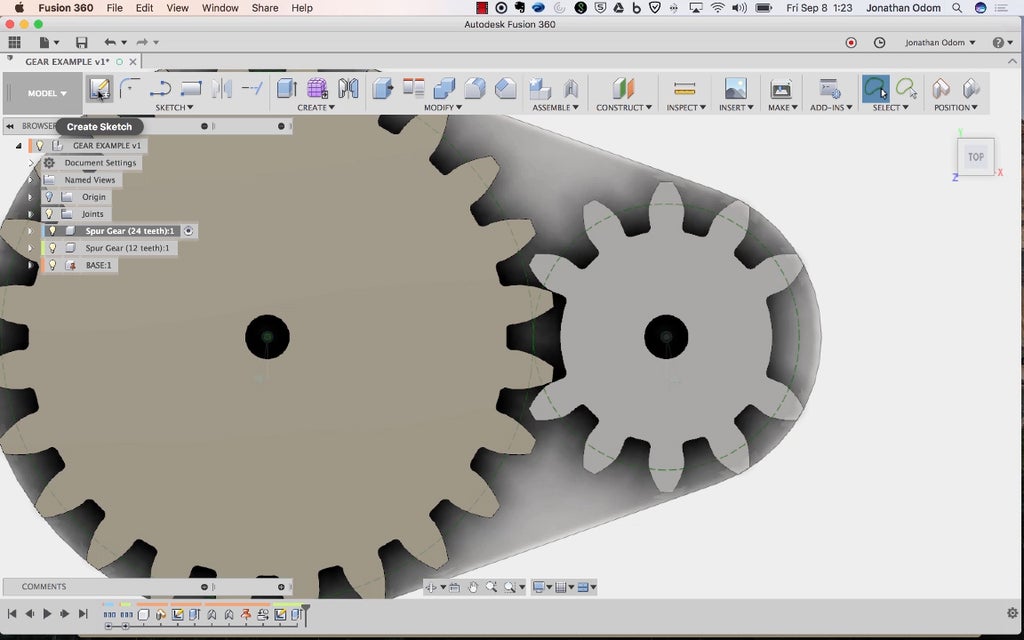
Now I'll need to alter the larger gear. I create a sketch on its top face.
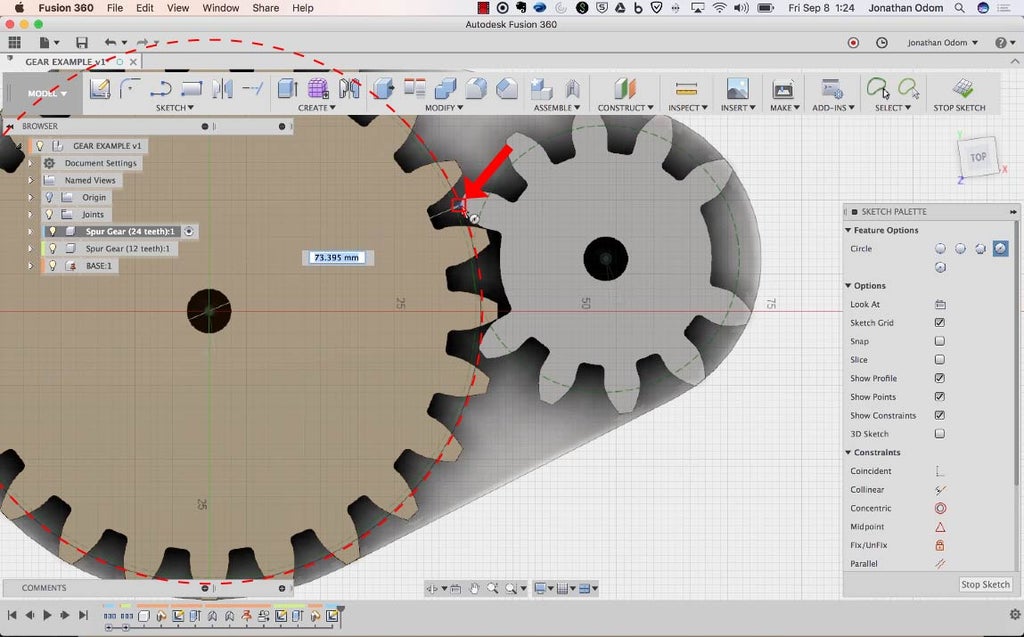
The circle you'll need on this gear is going to create a surface for the smaller gear to bear on while the larger one turns. This circle has to snap to the corner of one of the teeth on the sides of the gap as shown in the screenshot (you'll see why below).
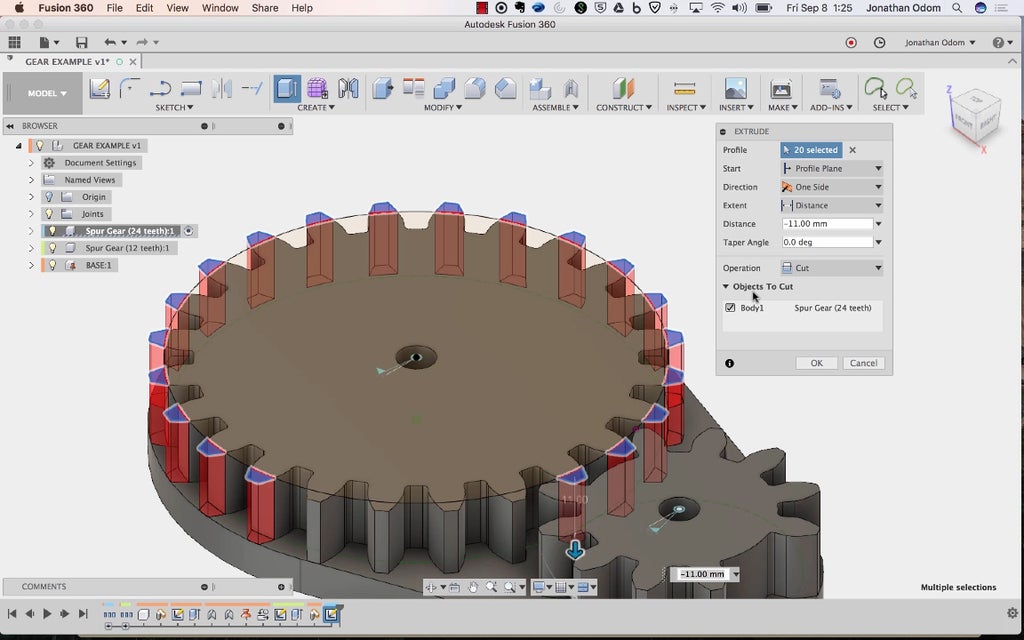
Using the new profiles made by the circle, I Extrude to cut the ends of the teeth that we won't be using. Since each of the tooth sections on the smaller gear has 5 teeth, we need 5 roots and 4 teeth on the larger gear.
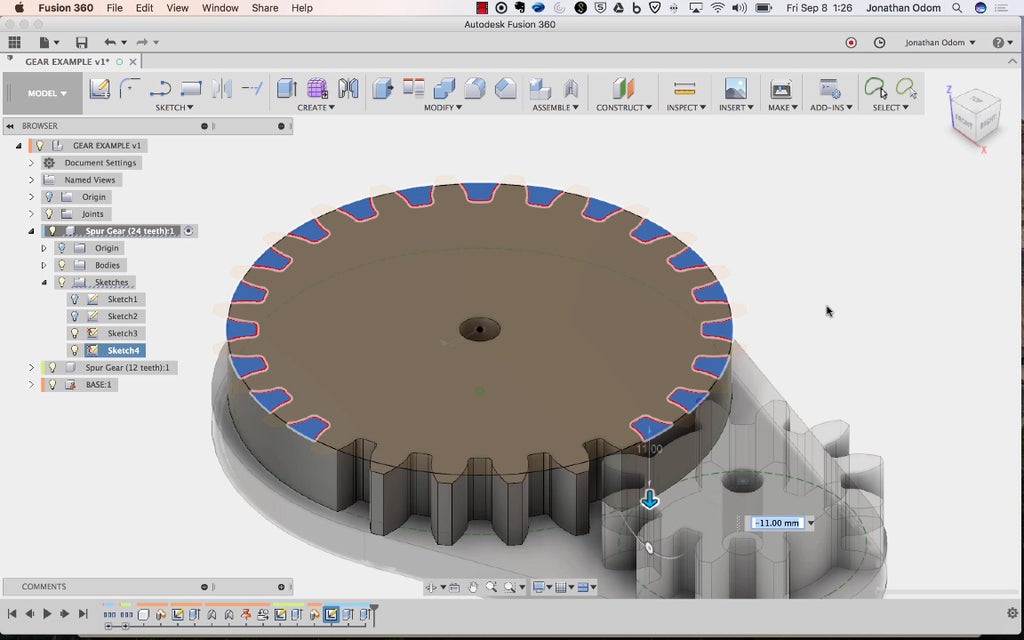
With those teeth cut out, I use the other profiles to fill in the gaps using Extrude with the Join operation.
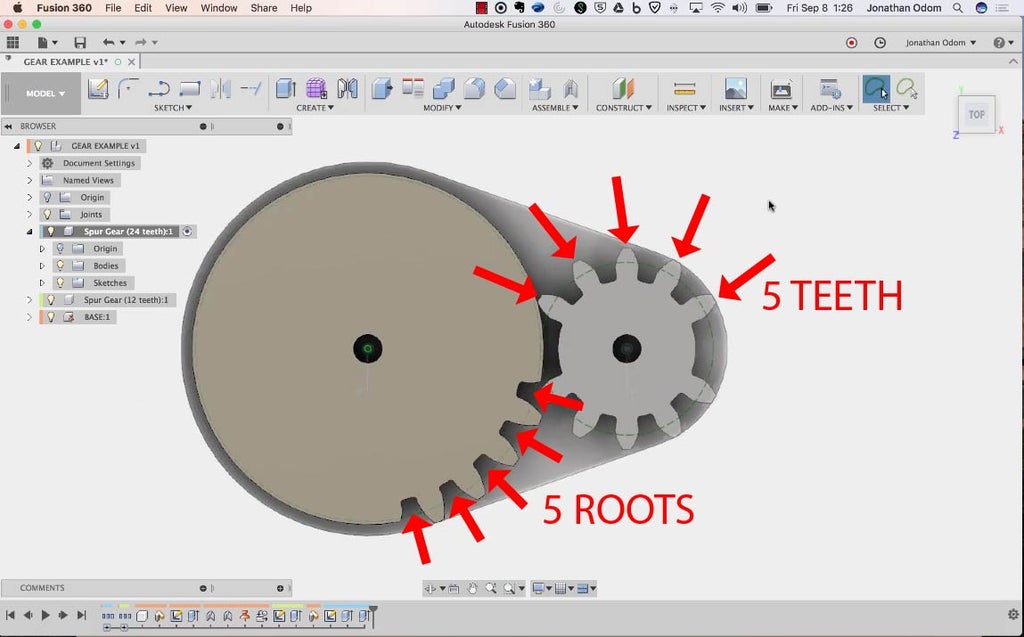
If we've got 5 teeth and 5 roots, we should get a 180º indexing movement on the smaller gear with each rotation of the larger gear.
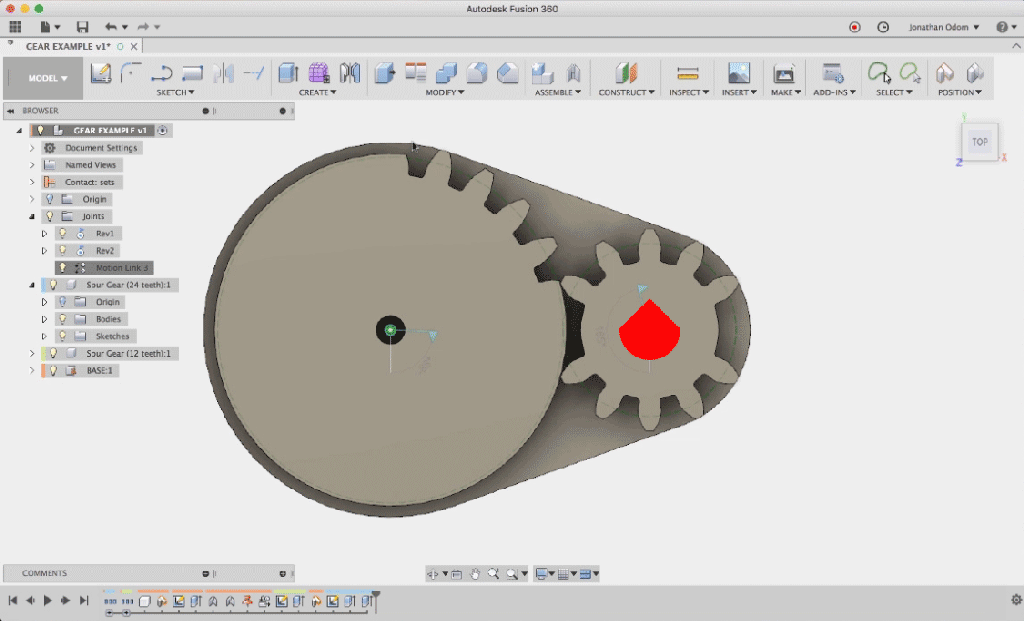
The arrow in the GIF above shows how the gear moves!
Step 5: Integrate Bearings and Hardware
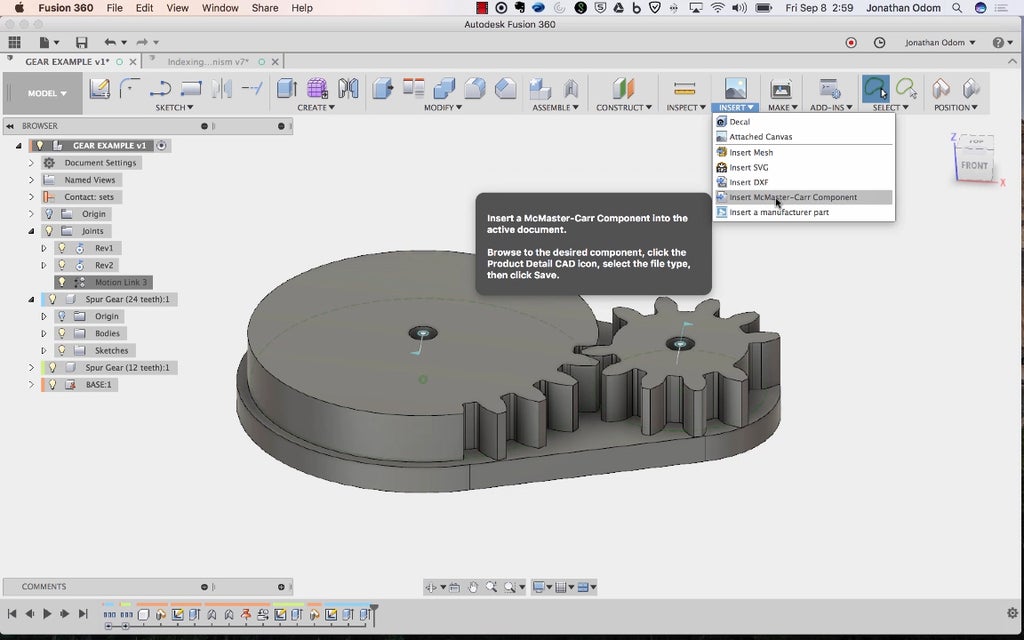
Now that the gears are ready, it's time to bring in the bearings and add some other features. I go to Insert > Insert McMaster Carr Part to find a bearing model.
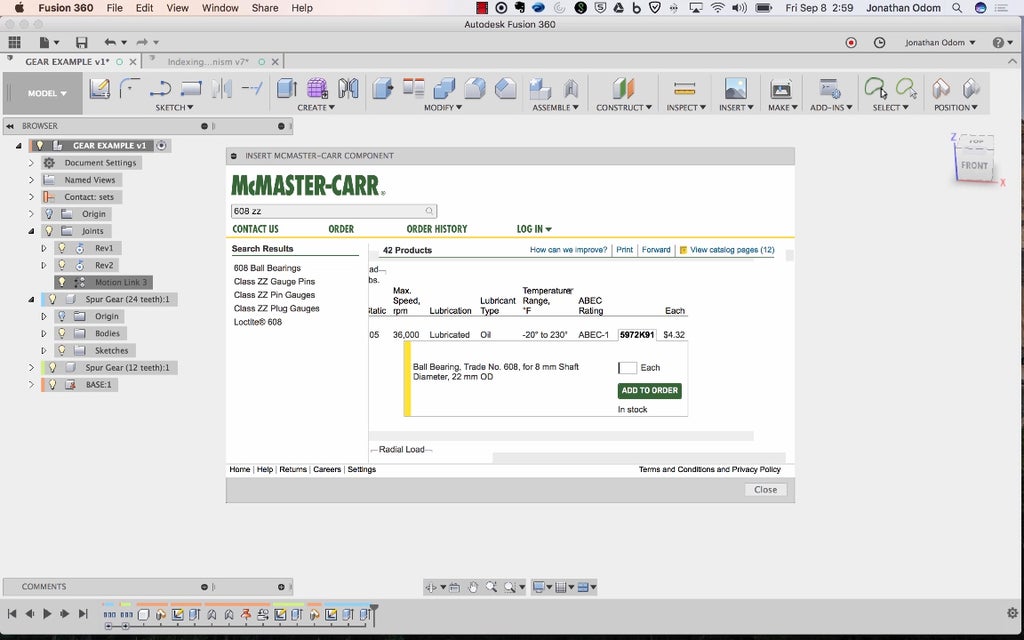
Searching 608ZZ (a standard skateboard bearing you can find just about anywhere), I pick the first one I find.
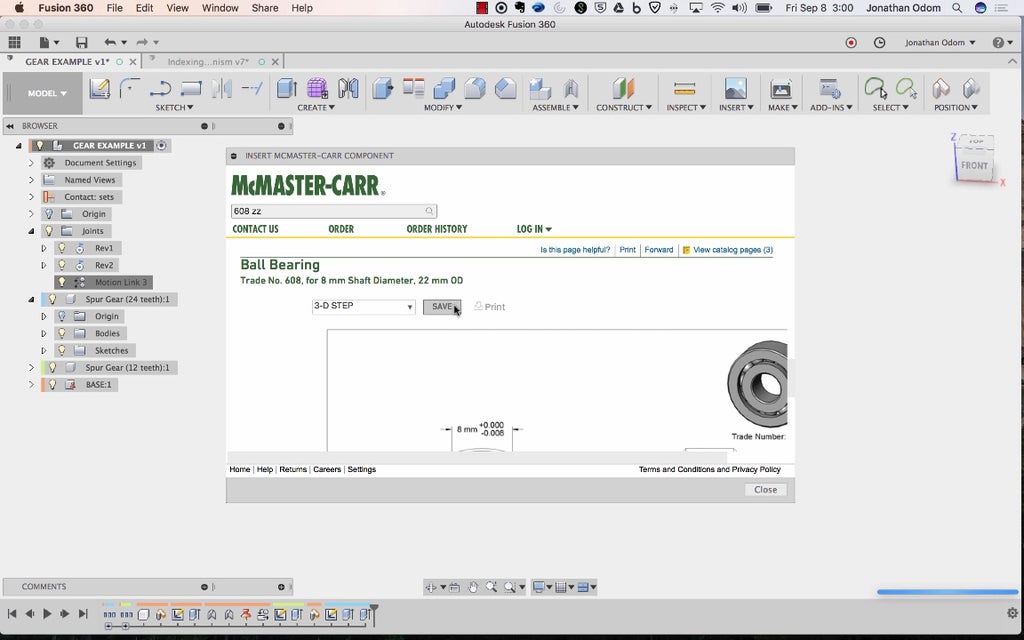
With the file type set to 3-D STEP, I click SAVE and the model comes in as a component.
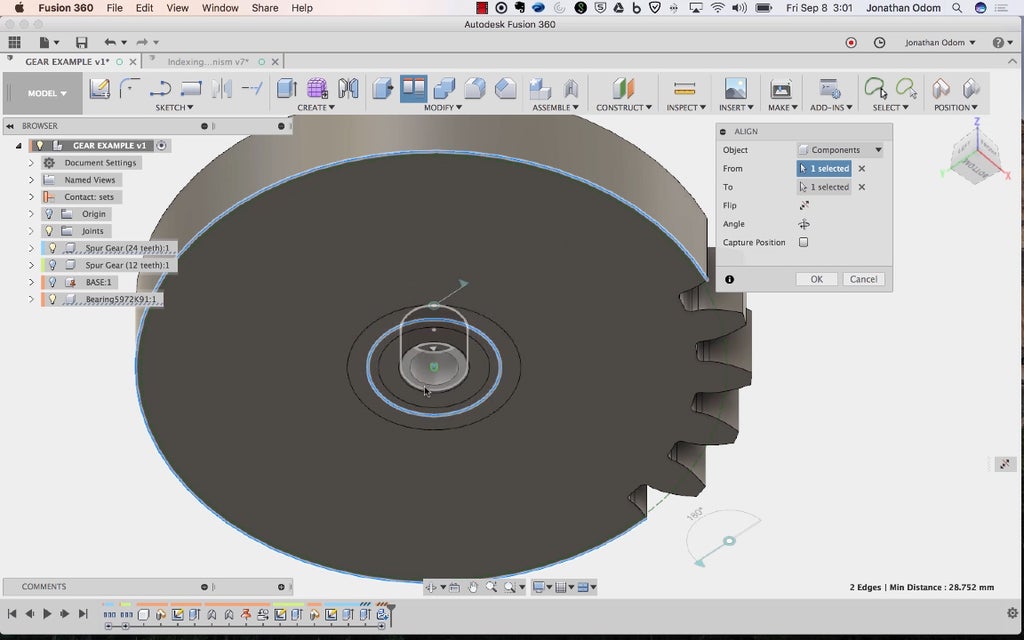
I move the bearing so that it's aligned to the center / bottom face of one of the gears.
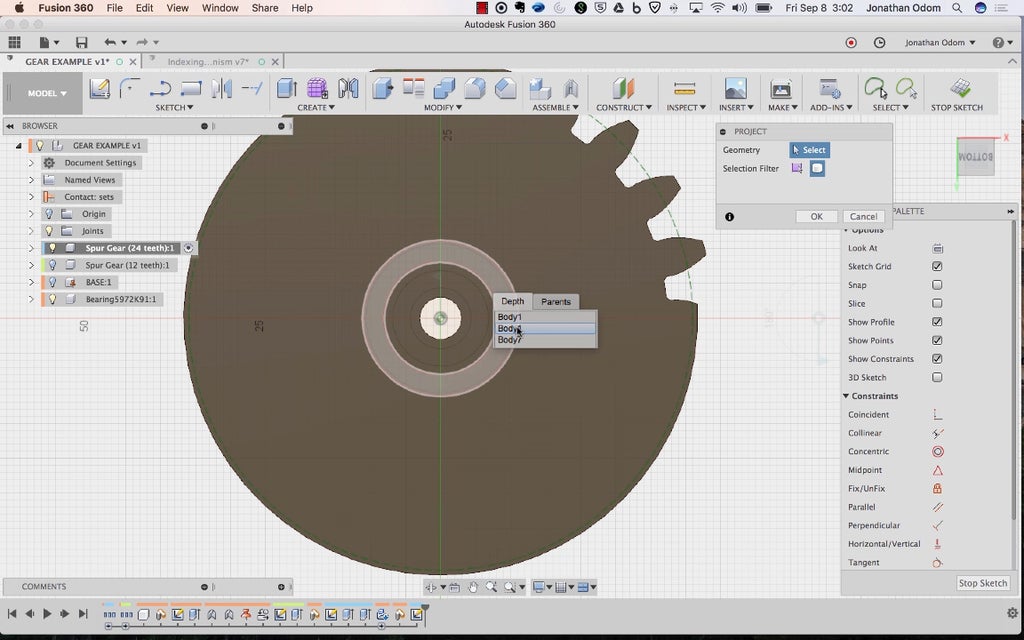
I create a Sketch on the bottom of the gear, then Sketch > Project / Include > Project with Bodies in the Selection Filter, then click on the outer ring of the bearing. This gives me the circular perimeter of the bearing.
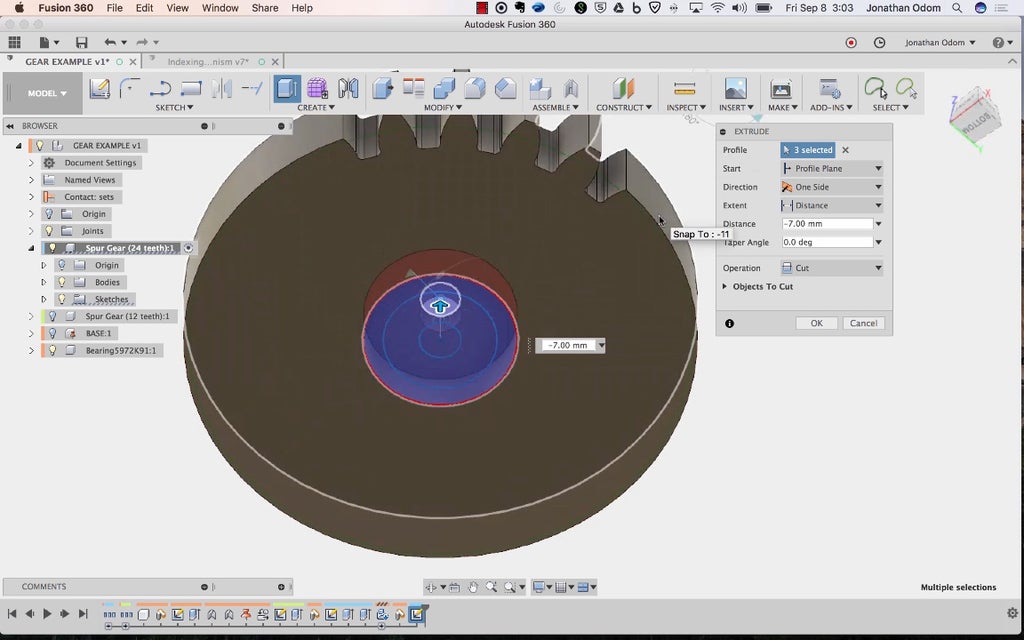
I use Create > Extrude to cut out a cylindrical shape that's the same height as the bearing, giving me a cavity in the gear. Watch the video above for more details on this step.
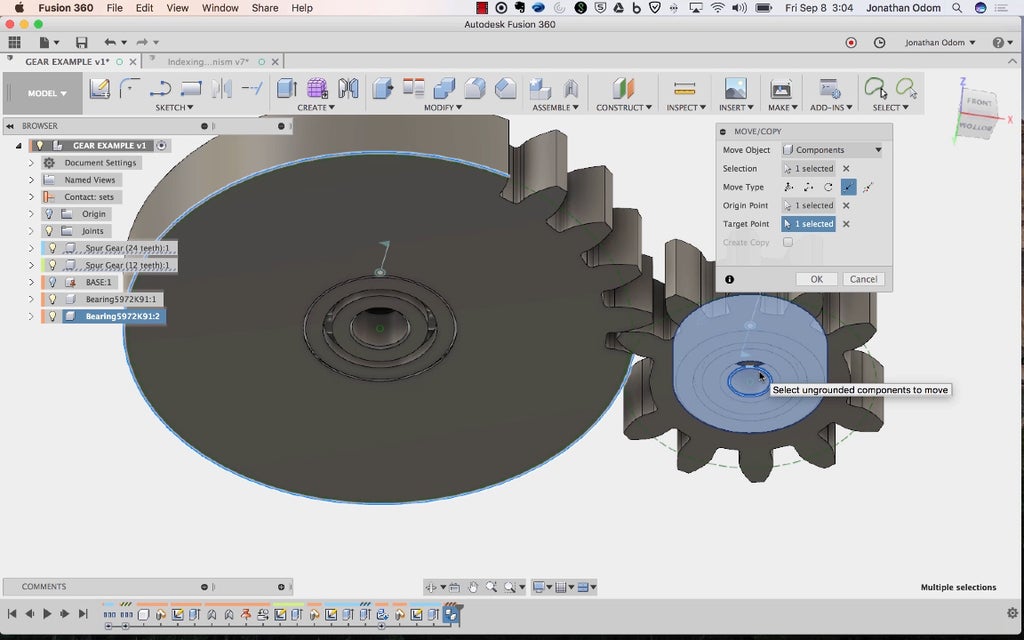
I copy the bearing over using point-to-point in the Move / Copy dialog box. This makes it easy to get the bearing in exactly the right place.
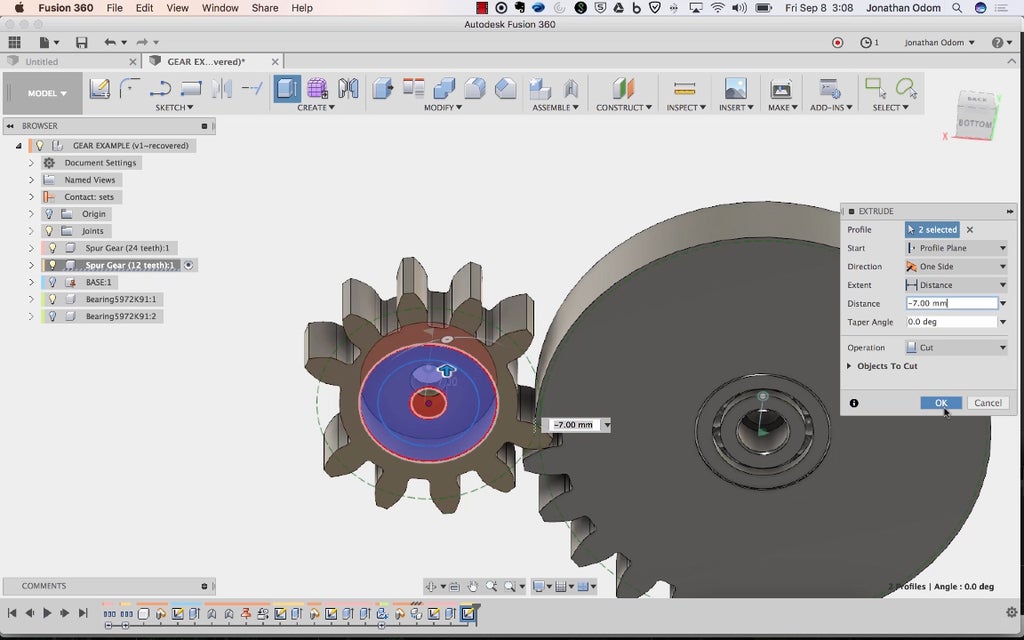
I repeat the Sketch - Project - Extrude steps I used for the other gear, once again making sure I'm only cutting through the gear by hiding the bearing in the Browser.
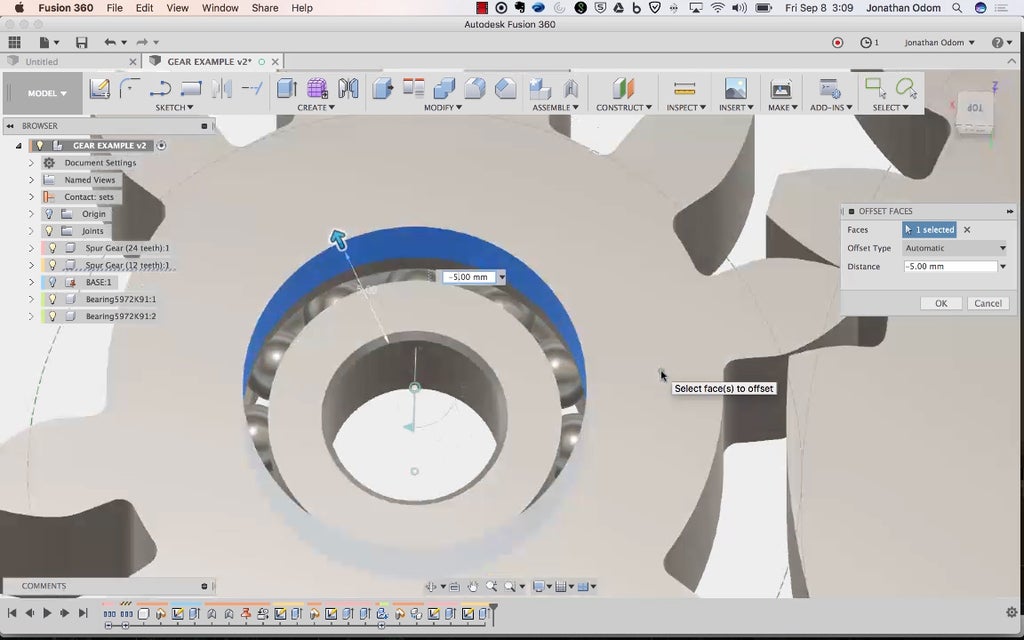
To ensure that the bearing rings move freely, I use Press/Pull to make the holes in the gears bigger than the inner ring of the bearing.
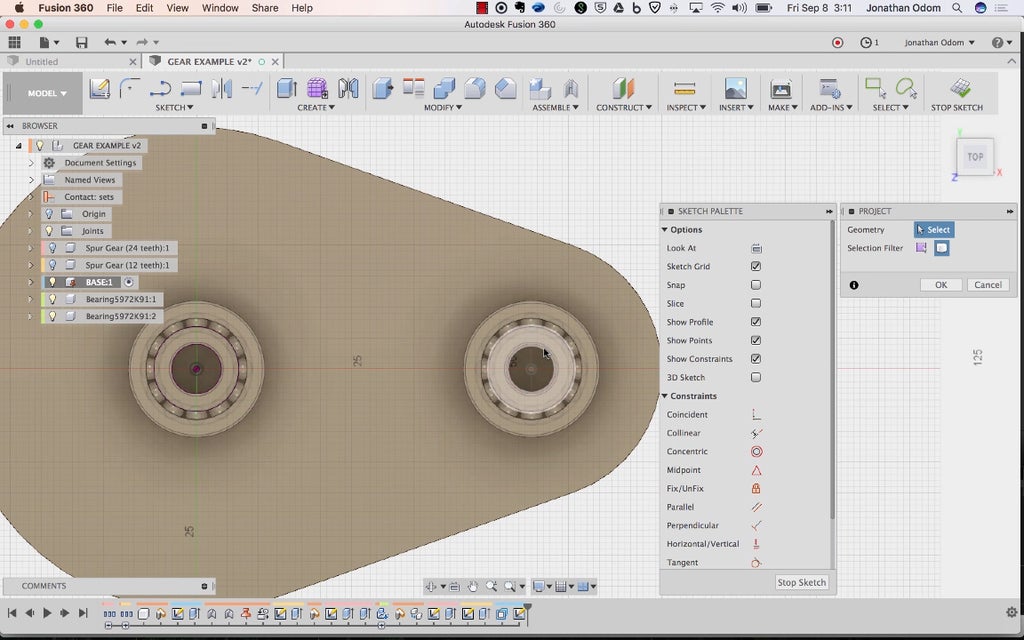
Now I need to add attachment features on the base. I create a Sketch on the top, then Project the inner rings of each bearing.
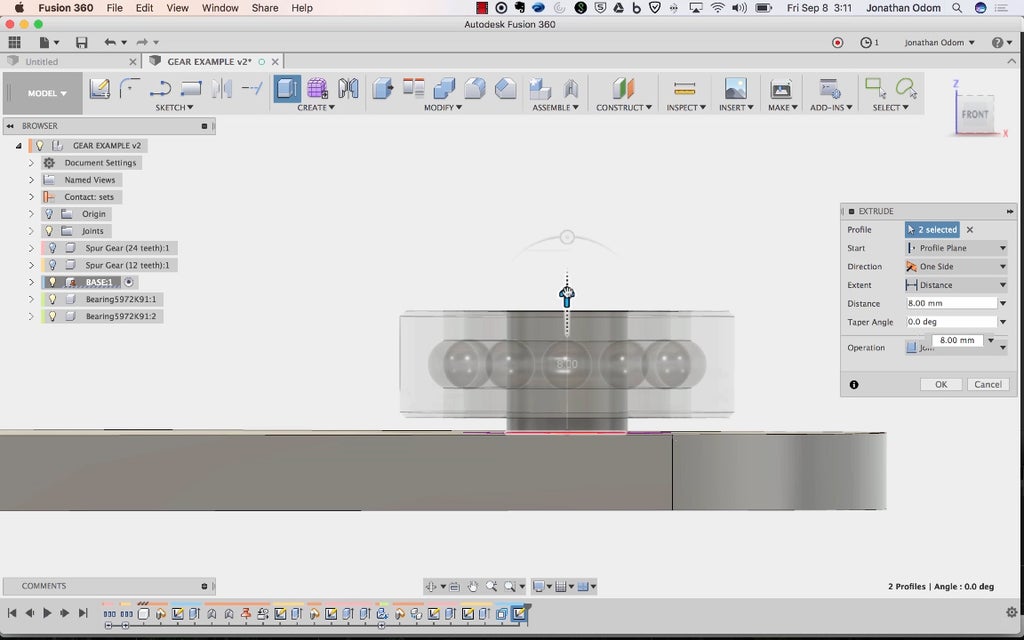
I Extrude the inner profile to just over half way through the bearing.
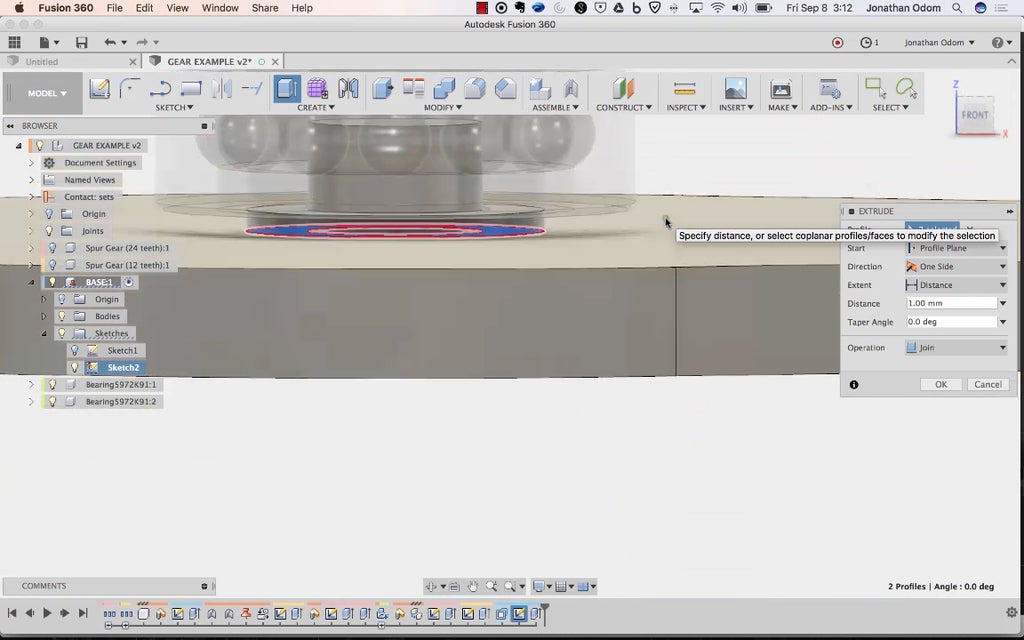
I then make a platform from the same sketch for the inner ring of the bearing to rest on. This will give the gear plenty of clearance to spin freely.
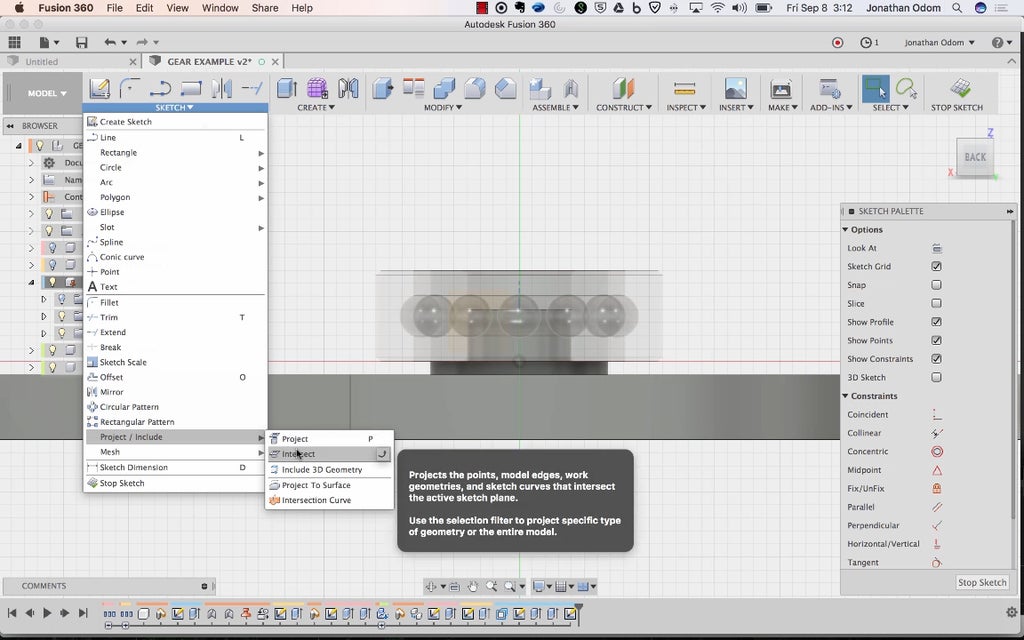
Now I need to make caps to hold down the bearings. I create a sketch in the side plane, which is coincident with both of the gear axes. I go to Sketch > Project / Include > Intersect.
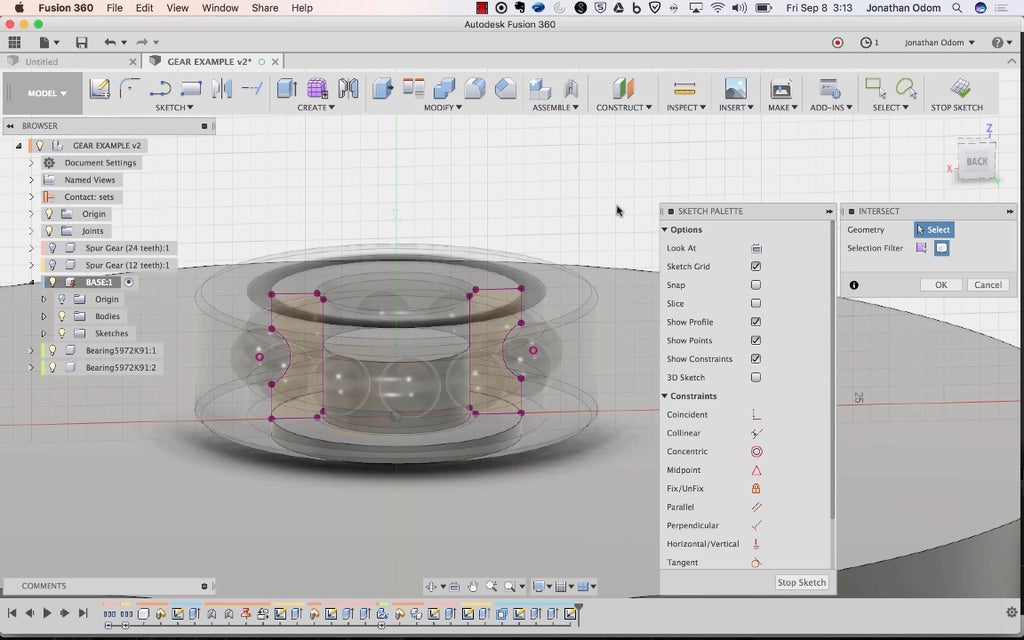
With Selection Filter set to Bodies, I click on the inner ring of the bearing. This gives me a profile I can use to ensure that my cap fits properly inside the bearing.
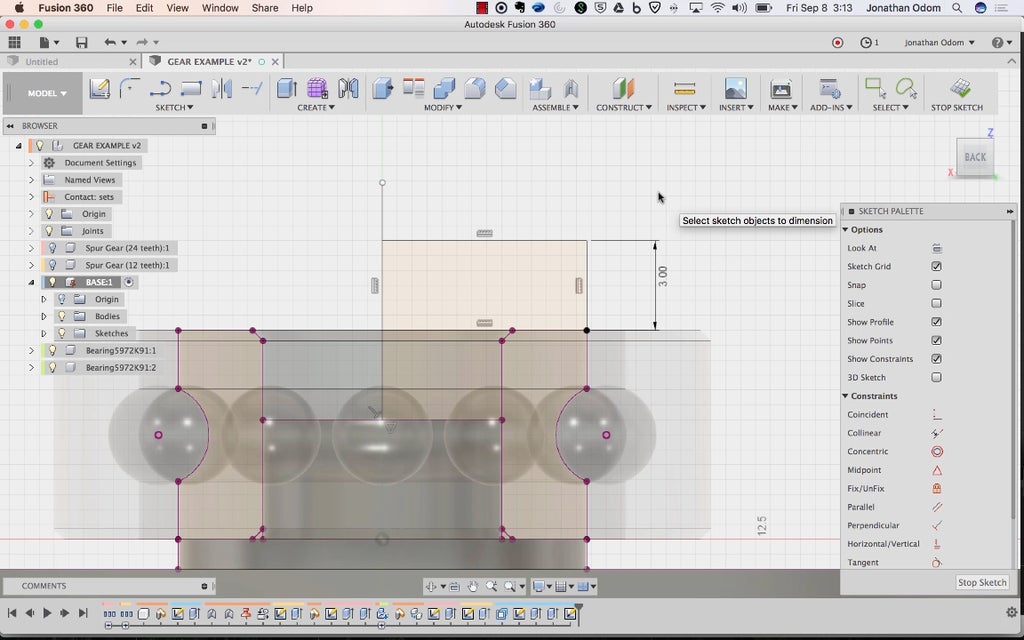
I draw half of the side profile of the cap, because I'm going to use the Revolve command to make the cap.
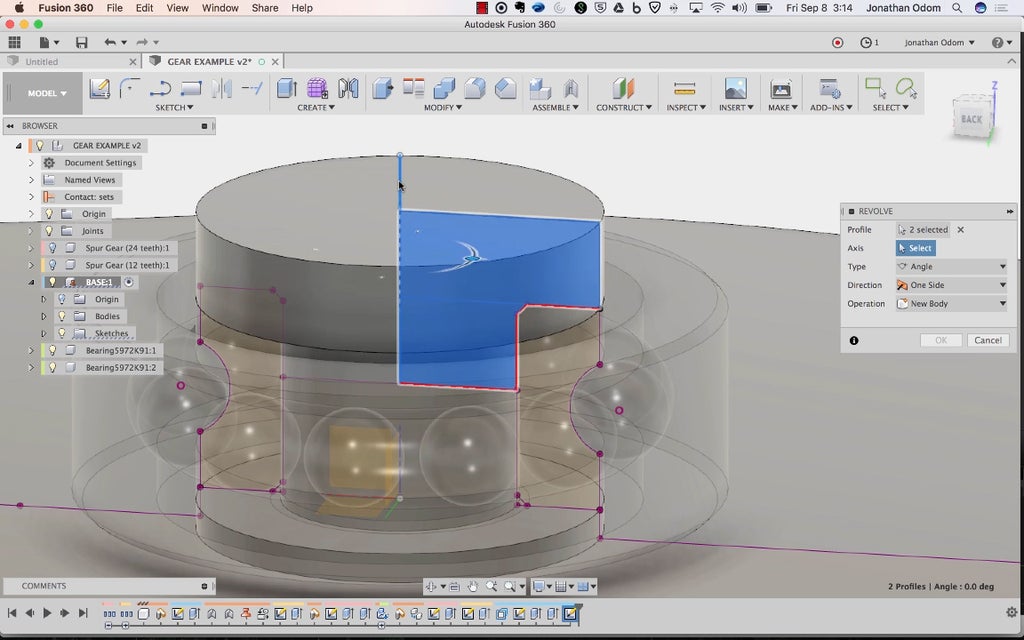
I go to Create > Revolve and select the L-shaped profile I just made. The Axis is the center line of the profile I drew. This should give me a mushroom shaped cap.
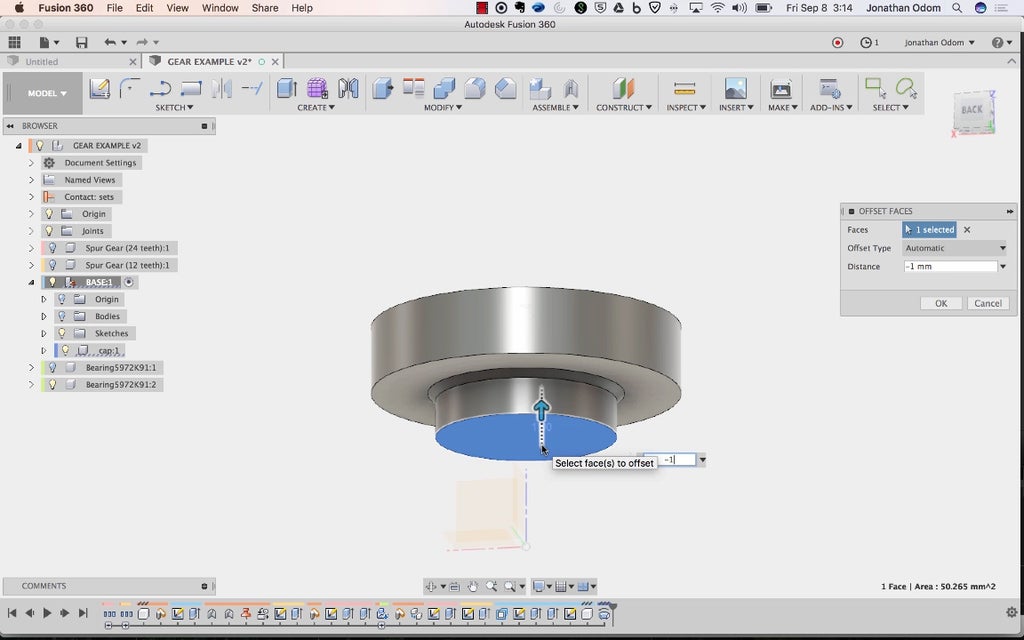
I use Press / Pull to give myself some space between the end of the cap and the top of the post below.
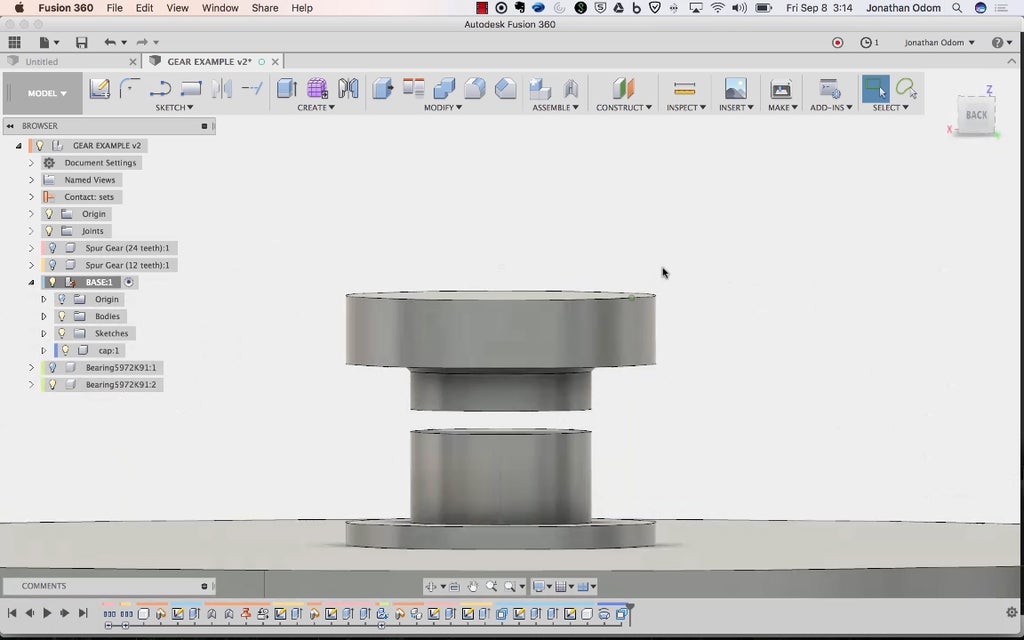
This gap will ensure that the screw and nut will be able to put enough pressure on this assembly.
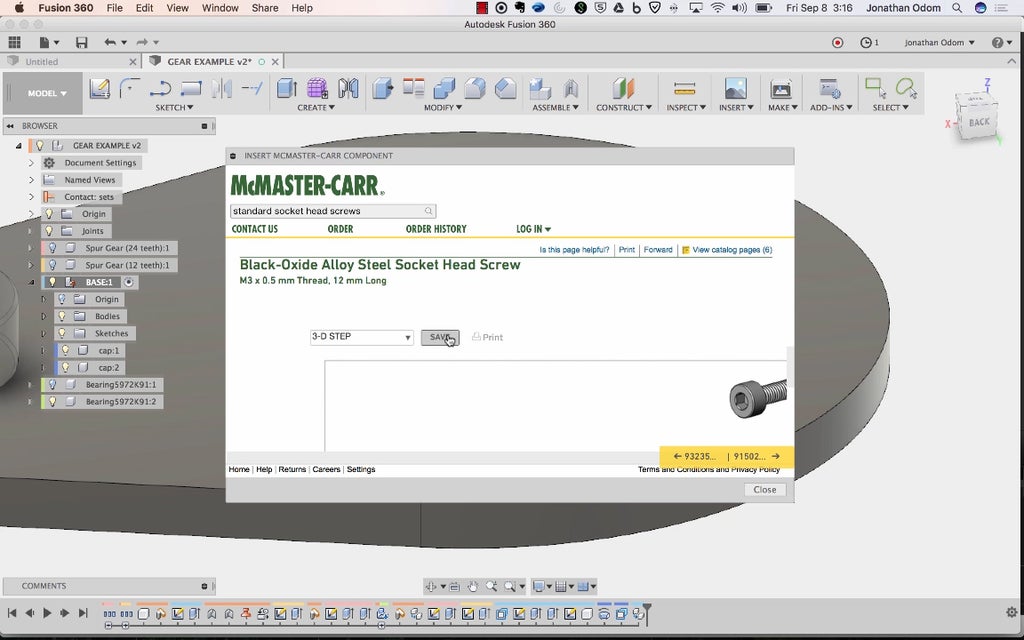
Next, I'll need an M3 X 25mm socket cap machine screw. I know I need a 25mm screw because I measured the distance from the top of the cap to the bottom of the base. I repeat the McMaster Carr steps I used for the bearing, this time searching for a screw that fits the bill.
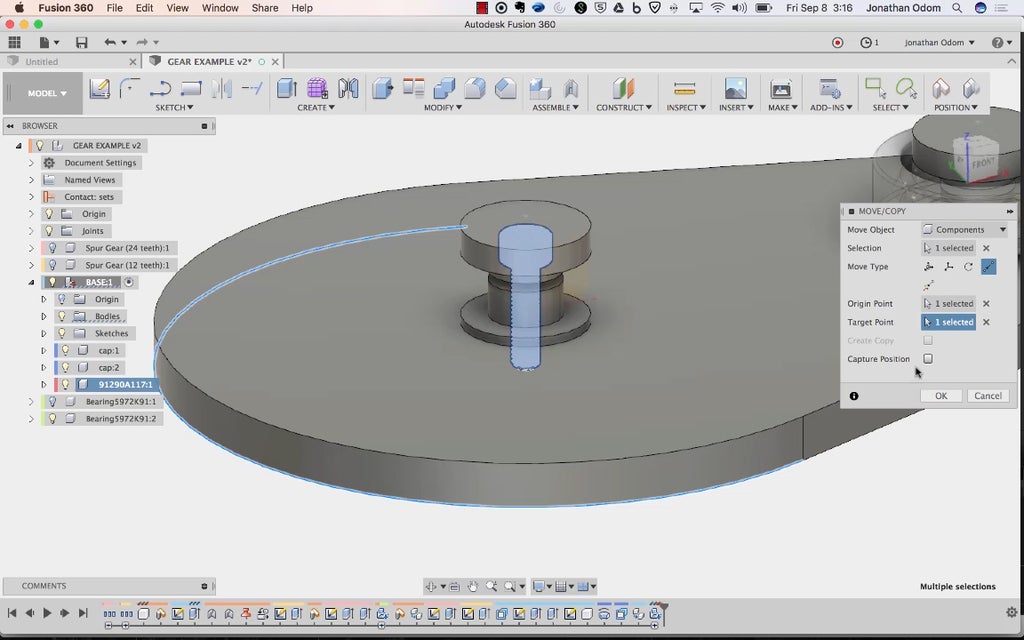
I align the screw so that it's centered on the axis of the bearing. This can be done with the align tool or point-to-point move.
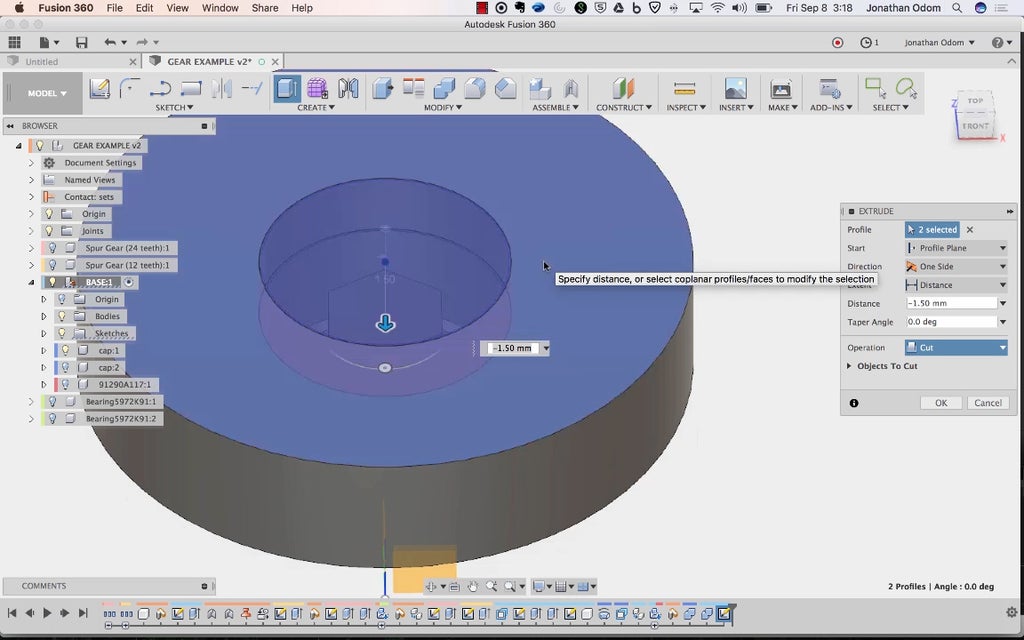
I make a sketch on top of the cap, project the profile of the screw from that view, then Extrude that profile to the bottom of the screw cap. Make sure you're not cutting through the screw too!
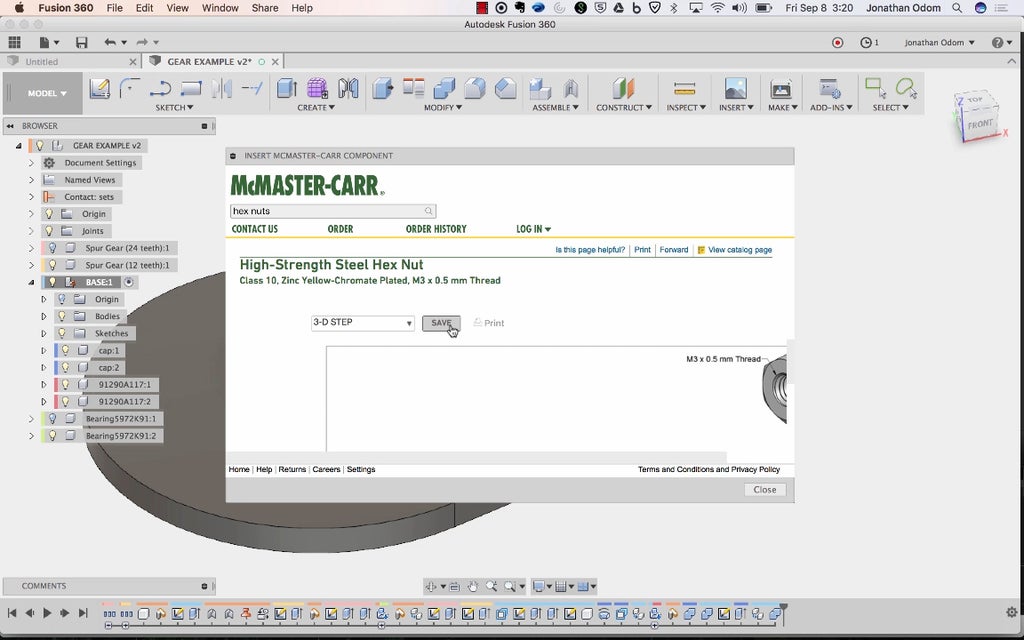
I go back to McMaster-Carr and bring in an M3 nut.
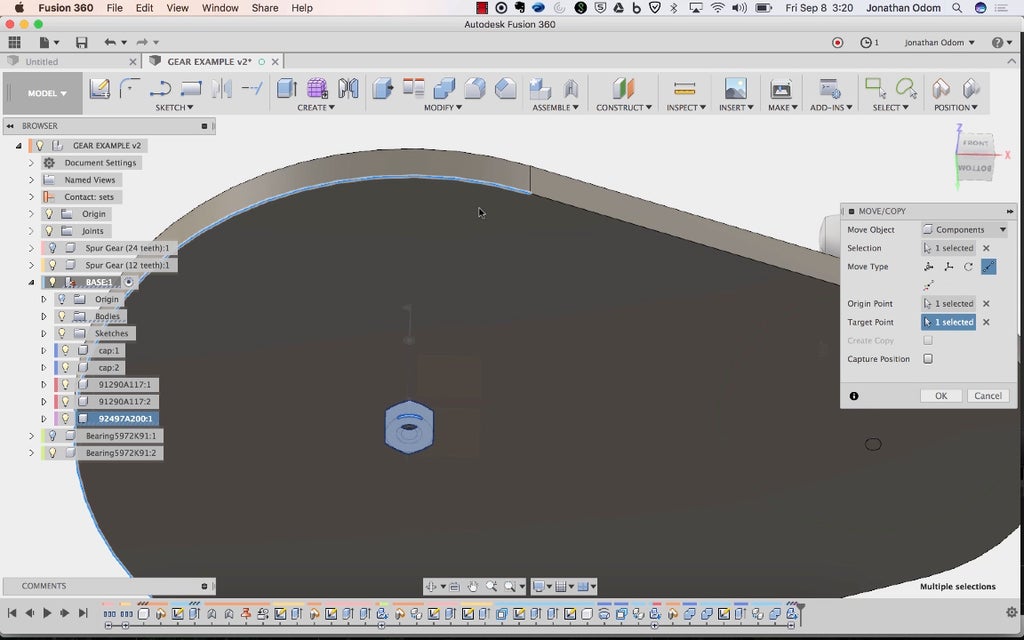
The nut also needs to be aligned to the bottom face of the base, centered on the screw. I copy the nut over to the other side to line up with that screw and bearing.
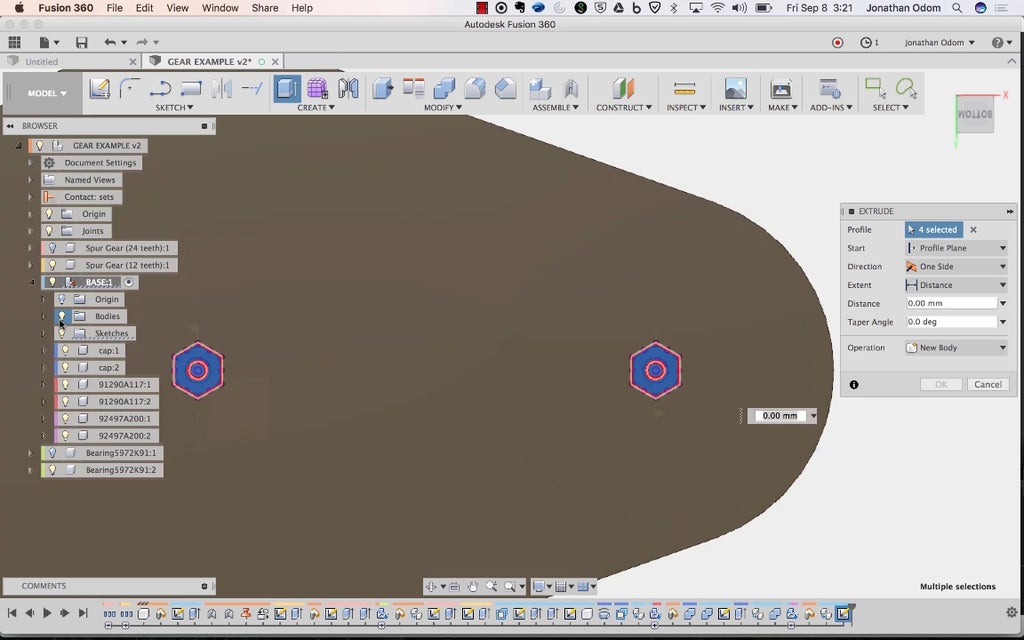
I create a Sketch and project the profiles of both of the nut bodies.
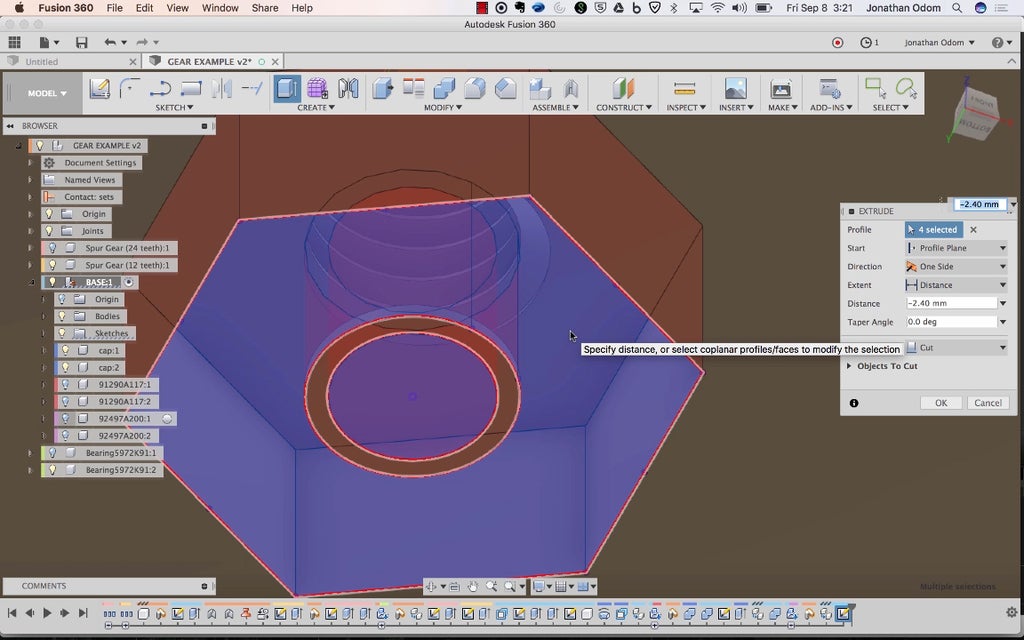
I use these profiles to Extrude and cut out the cavities, aligning the heights with the tops of the nuts.
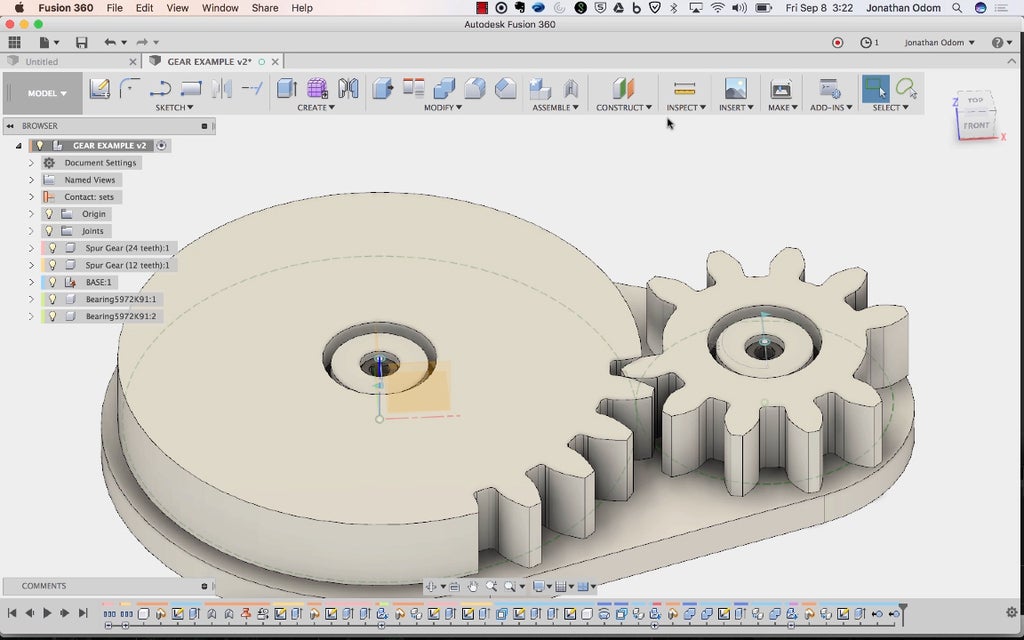
This will give you a working base model that you can use to make any number of different gadgets.
Step 6: Assembly
So what's this mechanism good for? Well, lots of things. It's mostly used in manufacturing- imagine a lever moving widgets onto an assembly line with equal spacing. It's used to switch tools on a CNC machine as well. I decided to use mine to shoot pingpong balls out of a tube in rapid succession!
If you open the Fusion 360 file, the whole assembly is there for your reference, and the STL files (step 3) are ready to print.
I added some features that smooth out the edges and make parts easier to assemble. If you're interested in this part of the process, ping me in the comments and I'll offer my advice on how to push your work forward.
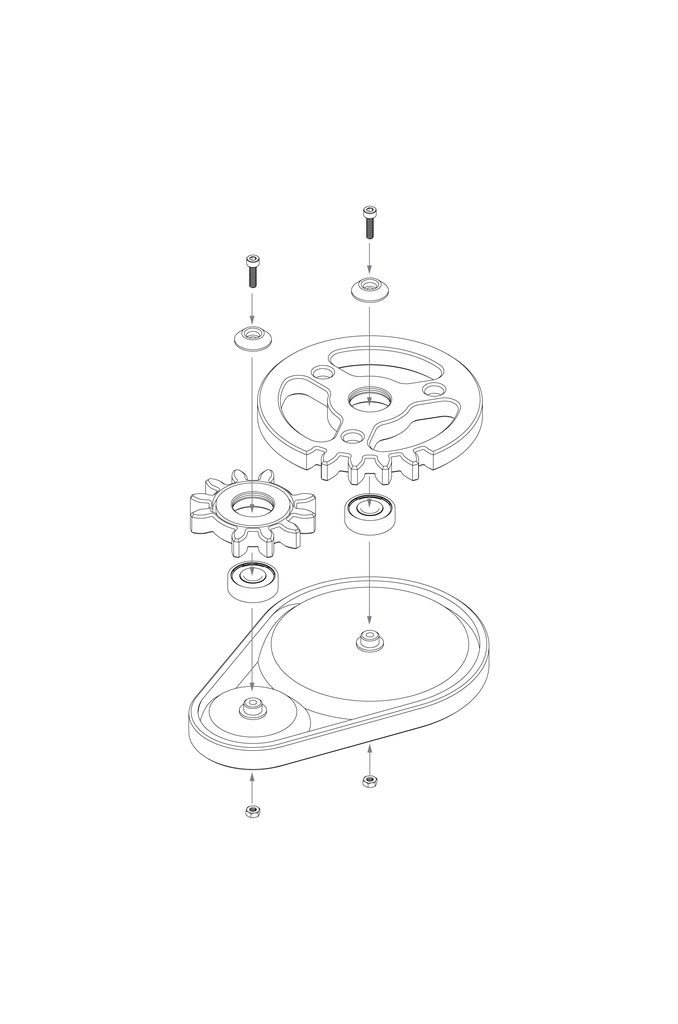
First, the bearings are placed on the posts on the base. The screws and nuts keep the bearings in place and the gears press fit onto the bearings.
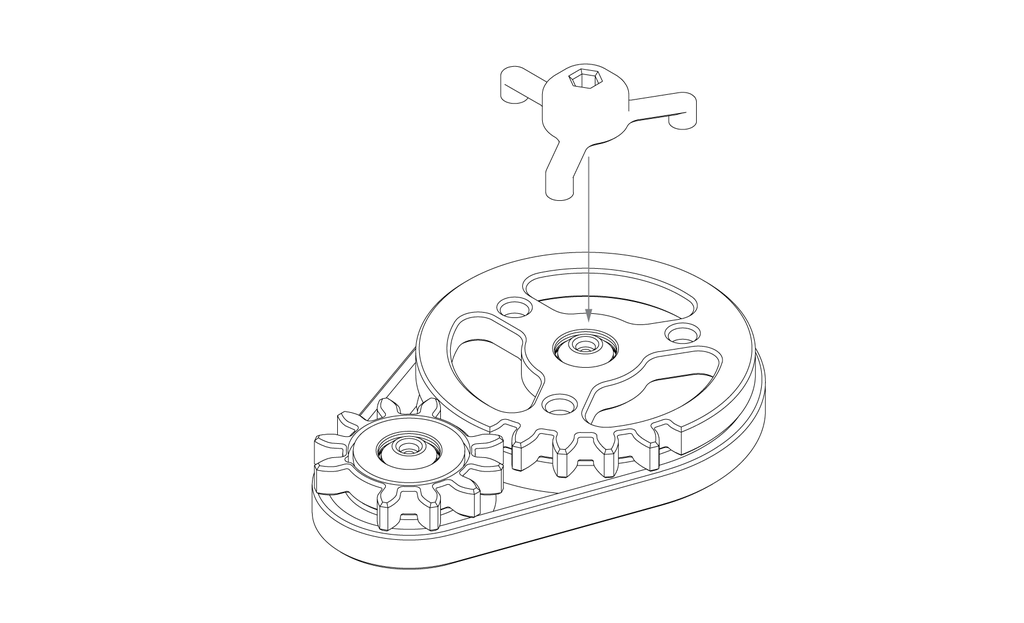
I made holes in the tops of the gears- 3 holes at 120º on the driver gear and a circular groove on the indexing gear. A little cap with a hexagonal hole on top press fits into the holes on top of the driver gear.
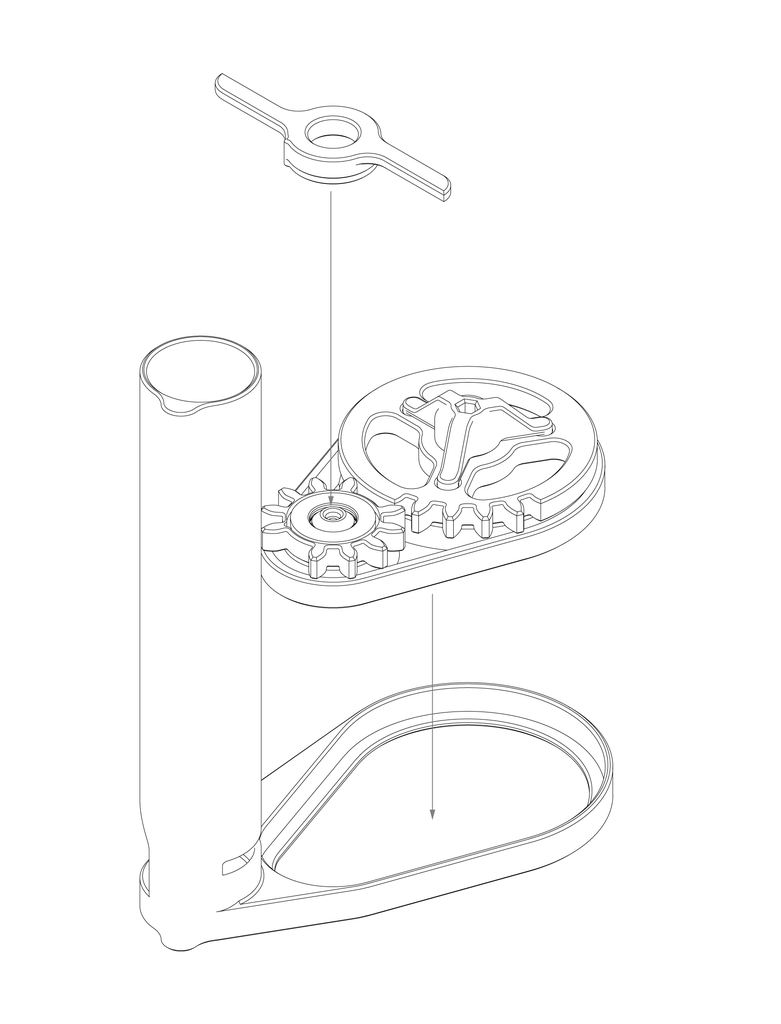
I designed a trigger mechanism to snap into the indexing gear, and a tube that fits 6 pingpong balls with a slot in the side.
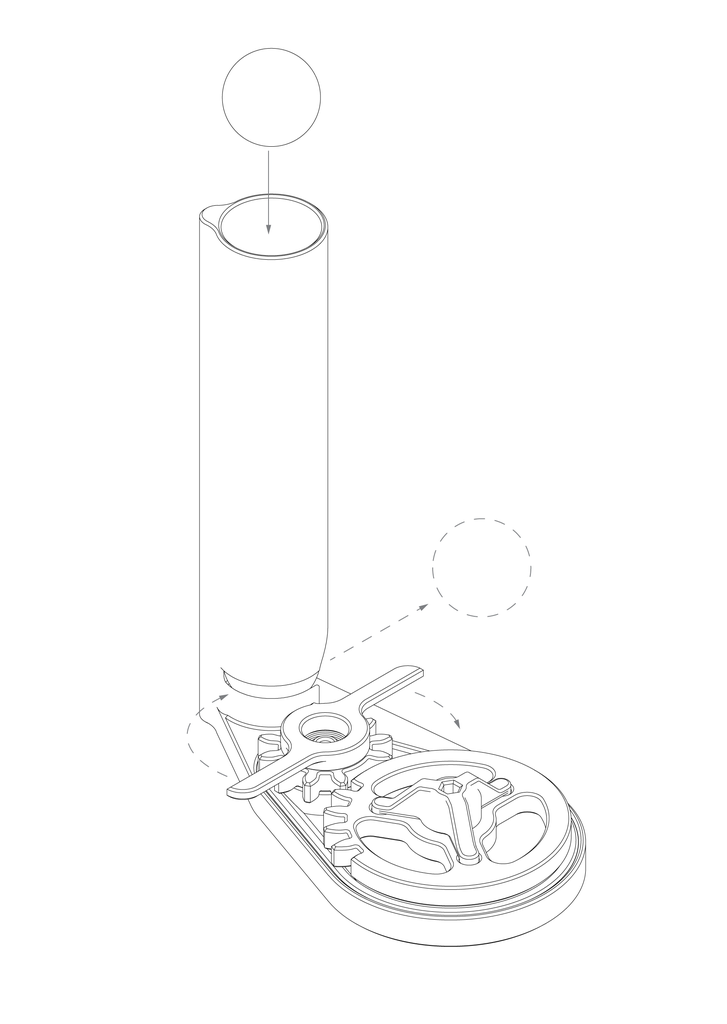
When the driver gear spins counter clockwise, the trigger swipes through the opening and knocks the balls out.
Step 7: Launch Some Pingpong Balls!
Here it is in action! What would you use this mechanism for? Post an IMadeIt below and I'll give you a free one-year premium membership.


