

Introduction: Arduino Plant Monitor


It can be hard enough to keep your plants alive and healthy if you dont have time to water them. It gets even harder if you are a trying to plant different species that requires different climats conditions.
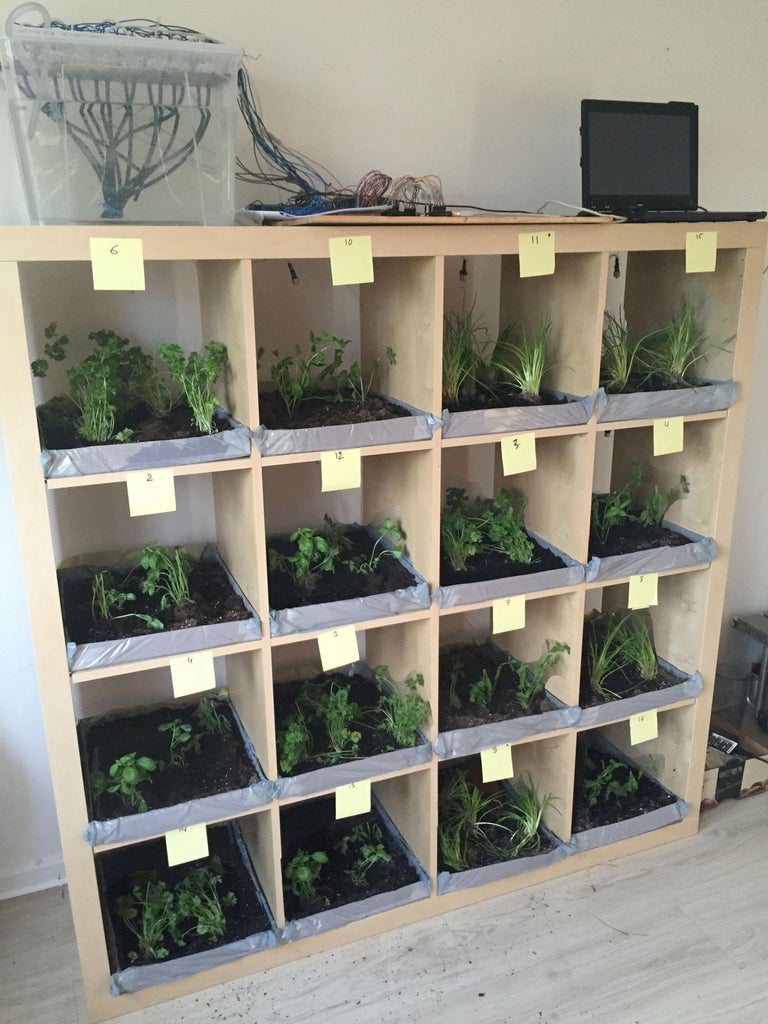
The Idea with this build is to make a seedstarter / mini-Greenhouse where i can mimic the necessary conditions for different plants.
Every one of my plants, have a special watering / lightning and temperature needs. The requirements of each one are stored in a database, and the plant is monitored through 3 sensors (Light / Temperature / moisture). Whenever a sensor register a value bellow the saved threshold the Arduino reacts, by turning the water pumps, lightning or the fan to cool the plant.
The plants can be monitored online as well. In my setup i have 16 plants. To make this Instructables short and clear i am not going into details explaining how software and hardware works, instead i will link to Instructables, that can explain topics. I will also share Both my code and schematics, which are commented.
Enjoy, and please remember to comment if you have any suggestions and ideas .... and if you like my Instructable project, please vote for my entry to the contest:)
( I will keep editing the Instructables over the next couple of days, uploading my code and so on :)
PS: the plants shown on the picture, were not grown by using the setup-up (It is not that quick qrowing plants !) it is just for the showing the end result.
Step 1: List of Materials

Here is what you needs :
Micro-Sprinklers, 20 nozzles, 10 meter hose - 8.90 USD
Storage Plastic box, 45 L, 56x39x28 cm - 5.73 USD
Mini Water pump DC 3-12V RS-360SH - 3.94 USD
Normally close, solenoid valve, 12 V - 5.2 USD
Ultrasonic Module HC-SR04 - 1.21 USD
Photoresistor Sensor Module - 0,99 USD
Arduino mega 2560 - 6 USD
Adafruit CC3000 wifi module - 44 USD
74HC595 shift registers - 1 USD for 10 pieces
74HC4051 multiplexers - 1,85 USD for 10 pieces
16 channel 12 V Relay - 12,52 USD
NPN resistor - 1,35 USD for 5 pieces
moisture sensor - 1,12 USD
PCB manifacturing - 17 USD ( you get 10 copies ! )
Aquarium Plastic tube, 3 meter - 2,89 USD
Step 2: The Frame and Earth Trays

The Frame:
The frame it self is made of an old IKEA Expedit, the one i had laying around had 16 holes in it, which was great for what i intended to do. It wasn't manipulated what so ever. Every square was 39x39x39 cm, large enough to starting a grow of a plant.
Cost : I had stuff so i used - 0 USD ( A new IKEA Expedit - 82 USD )
The Trays:
The trays were made from som cardboard, i cut it so it could fit inside the boxes of the closet, and the cardboard pieces were taped together. The cardboard tray was then set inside a plastic bag, to make it water resistant and then filled with some earth.
Cost : I had stuff so i used - 0 USD
Step 3: Watering Sprinklers

Watering Sprinklers:
I was quite in doubt here on how to proceed , there are different options, starting by just setting the water tube into the tray and let the water run or use something to spray the plat from above. I decided to go with the second Option.
I found some Micro Sprinklers in E-bay, They seemed fine since they only sprayed on a small area, so the wall of my boxes didn't became wet. Once received, the holes of the sprinklers were too narrow for my low pressure pumps so i had to make the hole a bit bigger using a drill, i went with 1 mm hole, that worked fine. Then i secured the sprinkles at the top of every box with some wires and staples.
Cost : Micro-Sprinklers, 20 nozzles, 10 meter hose - 8.90 USD
Step 4: The Water Container

The Water Container:
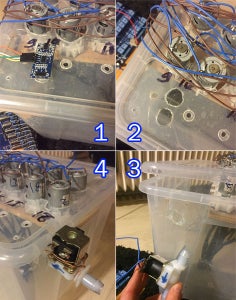
The water container is made of a storage plastic box from IKEA, The box holdes 45 L. In the cover i cut holes with my soldering iron according to the placement of my pumps. That way the wiring of the pumps was outside the box.
Cost : Storage Plastic box, 45 L, 56x39x28 cm - 5.73 USD
The Pumps:
For the pumps i chose 3-12V low pressure pumps, although they are a bit noisy, but it wasn't that bad, and they worked as they should. The pumps were secured to a piece of wood of the length of the water container, and went through the holes that were cut in the cover of the plastic container cover.
Cost : Mini Water pump DC 3-12V RS-360SH - 3.94 USD ( I used 16 of these = 63 USD )
Step 5: Adding Filling Valve and Ultrasonic Sensor
The Filling valve:
The Filling valve is a normally close 12 V solenoid valve. At the side of the plastic container i cut a hole with my soldering iron, and the valve is secured with a wire and glued with a glue gun. The Valve is then Attached to a watering hose.
Cost : Normally close, solenoid valve, 12 V - 5.2 USD
The Ultrasonic Sensor:
For automatic refilling the container, i had to know to level of the water. To achieve that, a couple of options are available. You can either use a water sensor with a couple of wires or use a Ultrasonic sensor. I went with the second option as i found it more reliable. I cut a couple of holes at the cover of my plastic container and then i secured the Ultrasonic sensor to it with a glue gun.
Cost : Ultrasonic Module HC-SR04 - 1.21 USD
se this instructable for more details about measuring water level
Step 6: The Software : the Web Interface

The Web Interface:
I wanted to be able to control the growth of my plants through my plants and also be able to follow the statistics of every plant. I am no programmer, so surely the code can be written more effectively, but it works !.
The website is programmed through JQuery/PHP and i used a MySQL Database. The website is hosted at 000webhost.com which is a free web hosting service. I wont go into details of explaining the code, but i will be listing the function of pages i have. I will attach my code here so it can be used freely.
Index.php
The index page, listes the plants i have, their picture and name, date of planting and the remaining days to harvest. It simply reads the database and displays it.
Details.php
The detail page, shows information about the chosen plants, here it displays the last read sensor value from the moisture, temperature and light sensors, the values are read by connecting to thingspeak.com. in addition to that i have toggle switches to manually activate the water pump, the growing light and the fan.
Stats.php
The stats page shows the values mesured by my sensors. The values are presented in a chart. The values are read by connecting to thingspeak.com. There i made a channel of every plant. Every channel have 3 fields; moisture, temperature, light.
Info.php
The info page shows different informations about the plant.
Attachments

Step 7: The Software : the Arduino

The Arduino software:
The hardest part for me was the electronics and the coding for the Arduino, as i mentioned earlier i am no programmer, so i had to make a lot of research and many questions at the Arduino forum. A Special thanks for Kurt Mckelvey, who helped with some good advices.
I am not planning to go through my code here, as i am going to attach it here and share it, but i will just explain the logic behind it.
In the loop section, the program starts by connection to the internet through the wifi module, then reads the sensors values through the multiplexers, and then upload the values to the thingspeak.com website, then those values are compared to each plants needs, if the program findes it necessary the pumps are turned on, so the plants gets water, light and air according to its need. Those are turned on though a shift register. Between every second watering, the ultrasonic sensor measures the depth of water inside the container, and then open the solenoid valve if the water level is low. The internet connection is then closed. The cycle runs 3 times a day.
Se This tutorial to understand more about shift registers, and this tutorial to know more about multiplexers.
Step 8: The Electronics

The Electronics:
That was a confusing part, and needed a lot of research, a journey where i learned a lot of stuff, and this was a big reward itself. At the beginning, i was only thinking about making a project involving moisture sensors for 32 plants, and as the project evolved and got a bigger picture, the light and temperature sensors idea emerged. I had also a better idea on how to optimise the hole settings. Unfortunately i am only going to share my old hardware involving the first set-up, since i want to want to add my project to contests, and i did not receive the parts for the light and temperature just yet.
I am sure this part will confuse alot of people,sorry for that, but as soon as i will get the boards and solder, i will update this step.
I had a lot of trial and errors soldering the parts, and due to the many connection of the shift-registers and the multiplexers and lot of wires i got confused. The solution to that was to make a PCB, that was a totally new field to me. After a bit of research i made my self familiar with the Eagle software, i drew the schematics and then sent it to manufacturing though dirtypcbs.com, a cheap, and reliable service.
Costs :
1 x Arduino mega 2560 - 6 USD
1 x Adafruit CC3000 wifi module - 44 USD
4 x 74HC595 shift registers - 1 USD for 10 pieces
5 x 74HC4051 multiplexers - 1,85 USD for 10 pieces
2 x 16 channel 12 V Relay - 12,52 USD each
1 x NPN resistor - 1,35 USD for 5 pieces
32 x moisture sensor - 1,12 USD Each ( 35,84 USD )
PCB manifacturing - 17 USD ( you get 10 copies ! )
Shift registers and multiplexers:
I went with an Arduino Mega due to the many pins needed. In hope for decreasing the number of the digital pins i used 4 shiftregisters, that way 3 Arduino pins allowed me to control 32 water pumps, and for the analog pins i used 5 multiplexers, 1 Master, and 4 slaves, that way using 6 digital and 1 analog pin of my Arduino i could control 32 sensor inputs.
Wifi and moisture sensors:
I used the Adafruit CC3000 wifi module. For the moisture sensors i used 32 cheap moisture sensors, To avoid corrosion of my sensors i used a transistor, so the moisture sensors are only powered when the reading takes place.
Relay:
The pumps and solenoid valve are connected to the Arduino though 2, 16 channels, 12V relays.
Attachments
Step 9: Testing
Here i am sharing a bit of my testing of the fan, the water pumps and the lights though my relays. Sorry for the quality of the video. I was using my Gopro, so a bit difficult to sight when you don't have a screen. But anyway it is showing the Concept :)
Step 10: Final Thoughts
Many people will ask, why bother about conventional "farming" when there are many alternativs out there, i am talking about aeroponics, hydroponics, aquaponics .. ect, True, those methods are easy to use, and garantie good results, the problem is that you cannot monitor every plant for it self and give it its necessary requirement of moisture, humidity, lightning. Specially if you have special variaties of plants as i have.
This project has been a big learning experience for me, alot of trial and errors and frustration, but at last, it worked. i would like to share some of my thoughts and also what i think could be upgraded.
- The wooden frame : I guess Building it with plastic woud be more effective, specially because of the moisture, and Water splashes. also it would be a good idea to add coverings at the front and the back to totally isolate the single plants.
- The Water container : it was a bad idea to place it at the top of the wooden frame, as the Water keeps dripping of the sprinkles because of the gravity effekt, so i had it removed to the bottom.
- The Hardware and software : Not doubt this is where the biggeste improvement can be done, for the software, more efficiant functions would be nice, the software as it is Works as it should, stable. But improvement can absolutly be done. For the Hardware, improvements can be done as well, i think in my next version i will go with a shift register that controls multiplexers instead of having master and slave multiplexers, i believe that would be more effective.
- Building a box for the arduino and the Electronics.
- All in all, i guess it would be a nice trick to designe it a "node" way, i mean that you can add "components to the main module without new code. lets say you have 5 plants, and you want to add 2 more, then you can just add to new boxes and every thing will Work. I guess i have to think about how it can be done,. Any suggestions are welcome :)
