

Introduction: Build Your Own WiFi-Controlled Drone Using ESP32: DIY Project Guide


Drones have become versatile tools with various applications, from photography to agriculture and defense. This project focuses on building a DIY ESP32 drone controlled via smartphones using accessible components like ESP32 modules, MPU6050 IMU, coreless motors, and plastic propellers.
Supplies
Components Required:
ESP32 Module: Main control unit for drone operation.
MPU6050 IMU: Provides stability control.
CP2102 USB - UART Controller: Facilitates programming and communication.
TP4056 Li-ion Charger IC: Manages battery charging.
MIC5219-3.3YM5 3.3v LDO: Regulates voltage.
MOSFETS: Control motor drivers.
720 Coreless Motors: Drive propellers for flight.
55mm Propellers: Generate lift.
Custom PCB: Houses and connects components.
Step 1: Circuit Design and Schematic Explanation

The first step in building the DIY drone involves designing the circuit and understanding its schematic. The circuit consists of several key components, including a USB port for charging and programming, a power path controller circuit for managing power sources, and an MIC5219 LDO for voltage regulation. The TP4056 charge controller is responsible for battery charging, with voltage sensing facilitated through a voltage divider. The main control unit is the ESP32 SoC, accompanied by a CP2102 USB to UART controller and an MPU6050 PMU chip for flight stabilization. Each motor is controlled by a motor driver circuit comprising SI2302 MOSFETs, which respond to PWM signals. Additionally, debugging LEDs are incorporated into the circuit to provide visual indicators of system status.
Step 2: PCB Design and Assembly


After finalizing the circuit design, the next step involves designing the printed circuit board (PCB) and assembling the components onto it. The PCB is custom-designed to ensure compactness and facilitate ease of assembly. Integrated feet for the drone are included in the PCB design, streamlining the assembly process. Components are carefully soldered onto the PCB according to the finalized circuit diagram, ensuring proper connections and alignments.
Step 3: Firmware Installation and Configuration
With the hardware assembled, the focus shifts to installing and configuring the firmware for the drone. The firmware is based on the ESP-drone firmware from Espressif and is written using ESP-IDF. Users have the option to compile the firmware from source using ESP-IDF version 4.4.5 or flash a precompiled binary file. Various tools such as ESPTOOL, ESP32 Flash Download Tool, or the ESP-IDF build system can be used to flash the firmware onto the ESP32 SoC. The firmware controls the drone's operation and interfaces with the smartphone app for remote control.
Step 4: Propeller Installation and Calibration

Once the firmware is installed, the propellers are installed onto the drone's motors according to the specified directions. It's essential to ensure that the propellers are correctly oriented to achieve proper flight dynamics. A power-on self-test is performed to verify that the propellers spin freely and in the correct direction. Any discrepancies in propeller installation or function are addressed to ensure optimal performance.
Step 5: App Installation and Drone Control
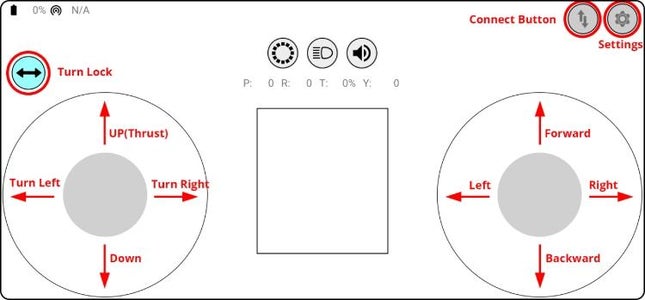
To control the drone, users need to install the accompanying smartphone app, which is available for both Android and iOS devices. The app allows users to establish communication with the drone via its WiFi hotspot. Once connected, users can utilize the app to control the drone's movements, including takeoff, landing, and directional control. The app interface provides intuitive controls for seamless drone operation.
Step 6: Preflight Check and Testing
Before taking the drone for a flight, it's crucial to perform a preflight check to ensure everything is in working order. The drone should be placed on a level surface with proper orientation, and the power should be turned on. LED status indicators on the drone provide visual feedback, confirming that the drone is ready for operation. Preflight checks include testing the responsiveness of controls and motors to ensure safe and stable flight operations. Any issues identified during testing are addressed before proceeding with flight operations.
Supporting file: Github.
Step 7: Conclusion
In conclusion, building a DIY WiFi-controlled drone using readily available components is a rewarding project that offers an affordable and accessible entry point into drone technology. With features like WiFi control, stability control provided by the MPU6050 IMU, and a compact design facilitated by the custom PCB, this drone project offers an excellent opportunity for enthusiasts to explore the world of drone construction and operation.
For a detailed step-by-step tutorial on building this DIY WiFi-controlled ESP32 drone.


