

Introduction: Circular Saw Guide


When I was recently undertaking a woodworking project, I found myself having to retrim the edges again and again that I had cut with a circular saw. This was because I found it hard to keep the saw straight while cutting. This resulted in me retrimming the edges of the timber and wasting scraps of wood. I have created this alignment tool to solve that. This will help guide the saw and prevent me from wasting wood, which will reduce waste and help the environment.
Supplies

I wanted anyone to be able to make this easily, that is why I am using a 3D printer for it. This will simplify the construction and allow it to be more readily available without any specialist tools. The file for it is linked below.
Step 1: Creating the Top Plate

First I created the plate that I would use to align my saw straight against the timber. I did this by extruding a simple rectangular sketch. I then split the body to create two notches for the side support to run along through. Finally, I created a back plate with two more notches in it to allow the bottom support to slide down and secure thetimber form all sides.
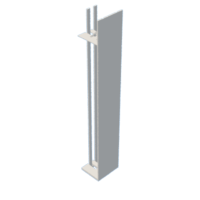
Step 2: Creating the Side Plate

I then decided to create the side plate that would be able to slide through the grooves in the top plate to secure the wood. I did this by creating a plate and then adding notches for the bottom plate as well as ridges to slide through the top plate. Finally, I added supports between the two to increase stability and longevity, making it less likely that it will break and have to be replaced. This reduces waste. I then combined the two parts I had created so far and they fit together perfectly as shown.

Step 3: Creating the Bottom Plate

I then wanted to create a bottom plate so it would be secure from all sides. I did this by creating two rectangles that would slide into the vertical notches on both the side and top plates. To hold it all together, I created an extra rectangle that would secure the two rectangles together. I then tested to see if the top and bottom plates would slot together (as shown below).
Step 4: Assembling

Finally, I then assembled all the pieces together and they all fit perfectly as shown by the animation below. This project will save me time and effort, as well as reducing waste and helping the environment. I hope it helps anyone else with the same problem as me.
Attachments

This is an entry in the
Build-A-Tool Contest


