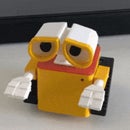
Introduction: Drinking Robot
In order to keep your healthy life, keep on drink fresh water is
very nice to your body. We need at least 8 cups of water. Because of the busy work, we always forget to do it. So let’s build a robot to remind you to keep on drinking water. This is the robot which is controlled by Arduino. As the Dino-robot style, (this is my website dino-robot.com), we just need simple material to do this robot. We just use one Arduino board and one servo to control the robot’s arm.
Step 1: Design the Robot 3D Model in 3dsmax
We use 3dsmax to design this cute drinking water robot. Because the
robot will keep on drinking, in order to save time, the mouth is always opening. The hand and arm should be accurate, let the robot can put the cup into the big mouth, drink all the water. After the 3d design, we can use 3dsmax to simulate the animation, let’s see what will happen in the future.
Step 2: Prepare Material and Circuit Diagram
Just like dino-robot style, we need simple material to make
robot. We need to prepare the material as below:
(1) four 1.5v battery and battery case, it’s the power for servo.
(2) One 9v battery for arduino
(3) One arduino mini usb, to fit in the small box.
(4) One 90 or 180 degree servo
(5) Wire, soldering iron, and glue gun.
(6) Two Switches one for arduino, and one for servo.
(7) 3d printer
This basic circuit diagram is shown in the figure.
Step 3: 3d Print All the Parts
In 3dsmax we separate
all the parts by colors. Use 3d printer to print it out by different color.
Step 4: Use Glue Gun to Glue All the Parts
We use the glue gun to glue all the connecting part. As shown in the photo. Here the making procedure of the robot head, head connected to the pipe. The motor servo only control the right hand, the left hand follows the right one. The servo is glued in the box body of robot. The 4x1.5v battery is the backpack for robots. The 9v battery and arduino board is in the box body. After we use the glue guy, the situation is shown as photos.
Step 5: Write the Code for Arduino
Write the code for the arduino, this code is the classic code
which can control the servo. Simple!
Step 6: Turn on Switches
Turn on switches, it moves! The drinking
robot will keep on drinking water.


