Introduction: Escape Room Engineering Review Game
I teach a few high school engineering classes, most of these classes are Project Lead the Way (PLTW). We cover a lot of material and skills throughout a given semester or year, which I then test my students on. To review for these cumulative semester/full year final exams I've always tried to do review games in class. Through a simple Google search you can find lots of great templates for review games to play in class. I usually end up doing Jeopardy or Who Wants to be a Millionaire style reviews. Over time these have started to feel stale and I've been wanting to change things up a bit, so I give to you my ESCAPE ROOM REVIEW GAME.
There are a ton of great resources for teachers to create these types of games for their classrooms. I used the website lockpaperscissors.co for a lot of help as I designed this game for my class. Several of these sites have kits you can just purchase as well but none of the kits seemed to be geared toward engineering/manufacturing courses like I teach. So, I dove in head first and created my own. Feel free to use my review game, or pieces of it for your own classroom activity. My main goal with this Instructable isn't so much a perfect step by step but more of a here's my thought process, here is what I came up with, and provide some help to anyone else wanting to try this out in their own class.
So without further ado, I give you my Escape Room Engineering Review Game.
Supplies
-Plastic Pencil Box
-Cryptex
-Locks with keys
-Combination Lock
-Scissors
-Construction Paper
-Tape Measure
-Calculator
-Old Phone
-Google Quiz
Step 1: Escape Game Overview
Activity Overview
This is intended to be a one day activity designed to be a review session for the cumulative final exam for my PLTW Introduction to Engineering Design class. We will have covered quite a lot of engineering content throughout the school year and this review game will not necessarily be created to review everything we covered. Instead, I'll cherry pick concepts that we may not have heavily touched on in a long while and/or skills that I know my students struggle with on the final exam every year. The different games, riddles, and challenges in the Escape Room (my classroom) will be related to these concepts, which I have listed below.
-Design Process
-Multiviews
-Measurement
-Unit Conversion
-Area Calculations
-CAD Modeling
-Property Analysis
*Volume
*Density
*Weight
*Surface Area
I generally have between 20 to 30 students per class. For this activity I would have them work in teams of two or three. I also only plan to create just one path/lock for each challenge. Once one group solves the puzzle and moves on and unlocks the next part of the game, I would just re-lock/reset that part for whichever group solves it next. If two groups solve it at pretty much the same time then they can both move on without having to reset in between. I'd make this a whole game a little class competition by having the students race to see who can "escape" in the fastest time.
Each group will receive one free hint to help them throughout the game, if they need it. If they use their one free hint and need further help they can earn additional hints by answering review questions from me. They can only get one additional hint at a time and only after they have used their free hint.
Escape Room Scenario
I decided to try my hand at making up my own escape room scenario, instead of using a pre-made one you can find online. Below is how I will introduce this activity to my class.
"It is the dreaded standardized test day at school and your evil test proctor, Mr. Wilds, has confiscated your phone. He has locked it in Golden Faraday Box and hidden the key through an elaborate number of challenges and riddles. Your phone is locked up until the entire school is finished with the test! How are you going to survive! Think of all the snapchats, text messages, tik toks, instagram posts, Netflix, and YouTubes you are going to miss!
It's up to you and your cohorts to out fox Mr. Wilds, complete his challenges, solve his riddles, and reclaim your phone! Oh but don't forget it's test day so no talking."
(The no talking piece is a very loose rule and it is only in effect until they get into the workshop for the thrid challenge)
Step 2: Challenge 1 - Design Process
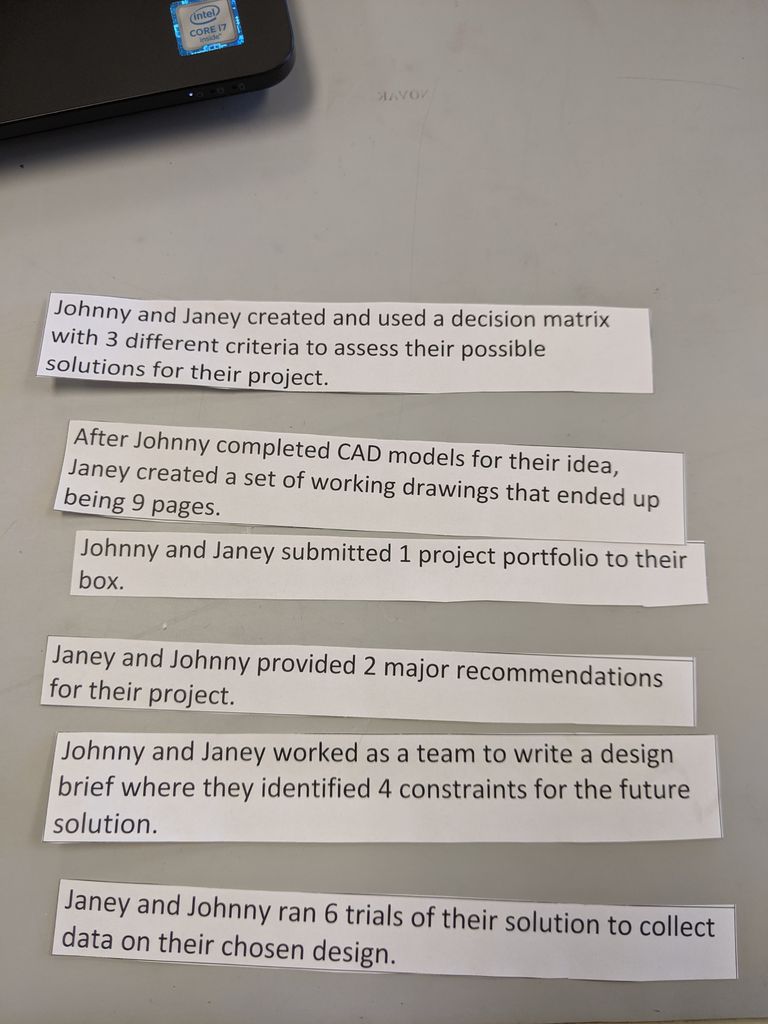
The first challenge is based on assessing the students knowledge of the steps of our design process. The students will receive strips of paper with actions of a fictional person or team going through the design process.

They will have to put the actions in the correct order of the steps of the design process we use. Once the steps are in order a number sequence will be revealed. There will be a number in each one of the actions. Once the actions are in correct order the numbers will be in the correct sequence.
Students will need to input the number sequence into the digital lock. The lock will be a question in a Google Quiz.

Once they enter the correct number sequence to unlock the lock box it will "release" a physical key to our classroom laptop cart, multiview drawings, and a Combination Lock Data Form which the students will need for the next challenge.

To "release" those items I will just physically hand the group the key, plans, and worksheet for the next challenge.
I watched this video by Chris Kesler on how to create a digital lock using Google Quizzes. It was actually a very easy process. And just as he states in the video you could use this method to make and use only digital locks for your classroom escape room which would be the cheapest way to do it. I like the idea of having physical locks which makes the whole activity feel more realistic.
I'll have the digital lock projected onto my projection screen which will hopefully indicate to the students what these numbers should be used for. I'll freeze the projection screen and have the students enter the numbers on my laptop so no other groups will see the correct or incorrect combinations. Other than that if they need further help they will have to use a hint.
With their multiviews, key, and combination lock-data form in hand its time to move onto the second challenge.

Step 3: Challenge 2 - Model Part With CAD

With the laptop cart unlocked, a set of multiviews, and the combination lock-data form in hand the students need to move onto using CAD. By creating 3D models students will be able to find the combination to unlock these "bolt cutters" which will get them to the next challenge.
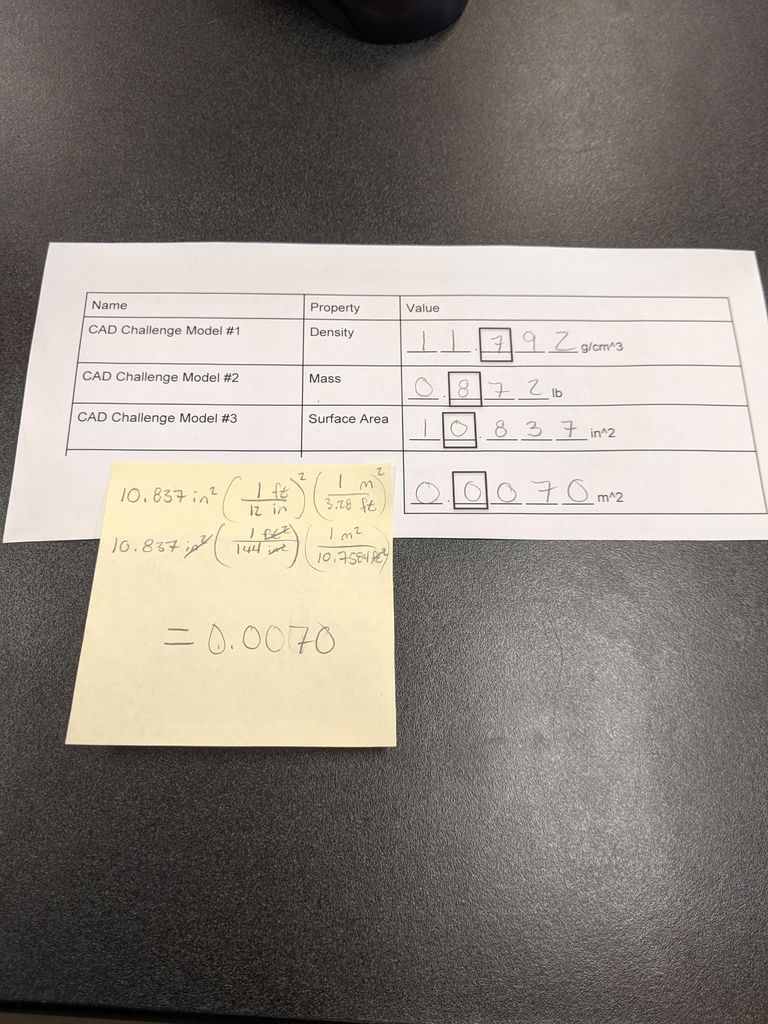
The students would need to figure out they need to create the parts from the multiviews in the CAD software, which for us is Autodesk Inventor. Once a part is modeled they need to open the iProperties command and record the needed material property value in the correct unit onto the form. After all of the correct values of the material properties are in the form the numbers with boxes around them will give the students a number sequence that they will use on a combination lock that will unlock a pair of scissors. They can use the scissors to cut the "chain" (paper ring) around the doorknob to be able to enter our shop area where the next challenge awaits.
Example
Students will have to use this multiveiw to model this object in Inventor.

To do so they will need to correctly read the multiview drawing and produce the part in Autodesk Inventor. They will then need to open the iProperties menu.


In this menu the group will need to locate the material property value I am asking them to find, for example the surface area of the model. They will then write down that number in their Combination Lock Data Form.
To have the students practice and review unit conversions, I have them record the surface area in square inches in one space and then they have to convert that value into square meters to get the last number for the combination lock. To make sure they actually practice the unit conversion, not just Google it, I make them show me their conversion calculation work before they are allowed to try their number sequence on the lock.

I've attached the Combination Lock Data Form and the multiviews in several file formats. Feel free to use and edit these documents as needed.
Scissors unlocked, time to cut the chain, and move onto challenge three.

Attachments
Step 4: Challenge 3 - Area Calculations
After cutting the "chain" students will enter our workshop and see this.

Once in the shop students will find a "map".

The students will have to decipher this map of the work tables and figure out how to find the correct key. Each table will have portions "blacked out" that will represent negative space.

The students will have to use a tape measure or steel rule and take measurements from the table and then use their area formulas and calculate for the positive space for each table.
Along with showing the negative space each table is numbered on the map. The number will be associated with a key to one of the cabinets at that work table.They will not know what key they need until they solve for the positive area of each table. The tool cabinet in the shop will already be unlocked. The students will need to figure out they need to get into the tool cabinet to find a ruler/tape measure and a calculator so that they can start calculating for the positive area of each table.
If they record their measurements in inches they will have to use their unit conversion skills again to convert their answers into square feet to find the correct table.
In the future I could add an additional challenge/puzzle at the start of this section that the students need to solve for them to get the key to our tool cabinet.I want to be sure most, if not all, of the groups get to finish this game in one 90 minute class period so I decided against adding that extra challenge in for this first time doing this activity in class.
I will have the keys to the cabinets and the students will need to show me their area calculations and then ask for the key they think they need. If they choose the correct table they will find the fourth and final challenge, a cryptex and a riddle.

If they don't get the correct area and open the incorrect cabinet they will find a piece of paper with this printed on it in the cabinet

Most of the students won't get the reference but it makes me laugh and that's whats important. If they choose poorly, they will need to go back and rework their area calculations and ask for a new key when they are finished.
Step 5: Challenge 4 - Cryptex
In CAD this method you have employed
Makes your work like a slinky deployed
One number can transform big to small
A pinball into a wrecking ball
That is the riddle my students will have to solve to unlock the cryptex. The answer is one of our vocabulary words from the year. Inside the cryptex is the key to the "Faraday Box" where the phone is locked away.
Throughout the course the students keep an engineering notebook, which they have been allowed to use during this game. If they can start narrowing down the meaning of the riddle they should be able to find the vocab word somewhere in their notebook.
Once they've got the word figured out they need to input that into the cryptex and release the final key that will unlock the Golden Faraday Box and win the game!

This game gave me a great excuse to make a cryptex, there are a lot of great Instructables on how to make one. I chose to make Instructable member Da3da1u5's cryptex, which can be found here, because it looks awesome and impressive. It also gives my students a great example of what is possible with our laser cutter.
Once the students have the key from inside the cryptex they can head back into the classroom where the box with the phone is located.
Step 6: FREEEEEEEEDOOOOMMMMMMMM!

With the key in hand the group can unlock the box with the phone in it and get that sweet, sweet release of text messages, Instagram stories, and YouTubes. Success!

Hopefully my students will get a lot of good review in for our PLTW final exam as well as a fun, different classroom experience than we normally have.
If any of my students are reading this and thought they could outsmart me by finding this ahead of class time, how foolish! I do not show any of the correct solutions throughout this Instructable so just have some fun during class and try to solve these challenges with your group.
Other teachers if you are wanting to recreate this in your own classroom and plan to use one of these exact challenges, message me and I can provide you with the answer key.
If any teachers have done escape room games in their classroom or end up doing one let me know how it goes down in the comments.
Also, If you have any questions about or improvements for my escape room game I would love to hear them down in the comments.
Good luck and have fun!

Second Prize in the
Teacher Contest


