Introduction: Fixing/Redecorating a "creepy Closet"


I have this sort of "creepy closet" in my room. It's a 30" by 28" outlet in the wall that is mostly used for storage, but it doesn't really have a door. It's covered by an unstably mounted piece of plywood that is held on by magnets. The plywood door abruptly falls sometimes. So, currently, this "creepy closet" is an ugly, splintery, insecure haphazard.
In this instructable, I will show the transformation of my "creepy closet" into a decent-looking storage compartment.
Step 1: Materials

Instead of a wobbly magnet-held door, I decided to replace it with a hinged door. It would be more secure and allow for an easier access to storage since I wouldn't need to lift the plywood off and then put it back on.
Hinged door:
- - Hinges (I used 2 in Everbilt tee hinges which come with screws)
- - Sandpaper
- - Paint: The rest of my room is white so painting the door would make it less conspicuous
- - Hand saw
- - Scrap wood
Decorating:
- Copper tape
https://www.amazon.com/Bullet-Face-Double-Sided-Co...
- Scissors
- Scotch Tape
- Paper trimmer
Step 2: Remove the Old Door

The plywood is only held on by magnets, so I just unscrewed the magnets from the plywood and where it was mounted.
Step 3: Sanding

I sanded the plywood to make it more smooth and less splintery with 100 and 150 grit sandpaper and an electric sander. Use safety glasses!
Step 4: Painting


Then, I painted it with leftover white house paint and let it dry for three hours before painting the second coat.
Make sure you paint it in a well-ventilated area. I painted the plywood outside with a piece of cardboard underneath to prevent spills and make clean-up easier.
1. Open the paint can with a paint can opener or a screwdriver
2. Stir the paint. Paint separates into layers over time.
3. Use a paintbrush or roller to paint in one direction.
Step 5: Mounting the Door


I sawed a piece of scrap wood with a hand saw. The plywood need to be flush with the place I would mount the other side of the hinge in order for it to swing properly.
I screwed the one of the handles back on the plywood, lined the hinges, and screwed them on too. Then, I screwed the other side of the hinge on the scrap wood.
Voila! A hinged door.
Step 6: Decorating

I wanted to put a design on the door to make it look prettier. My room isn't really decorated yet. It just has blank white walls. I decided to make a geometric tree with copper tape.
1. Unscrew the hinge on the scrap wood
2. Use "Rasterbator" to enlarge the image on 4 sheets of letter paper, print it and trim the margins with a scissor. Then, use tape to piece the sheets together.
Step 7: Decorating: Tracing the Image on the Wood


Trace the image on the wood: Shade the back of design on the back of the paper. Then, flip it the paper back over and trace the image. The graphite will mark the wood.
Tape the image on the door.
Step 8: Cutting Copper Tape


The copper tape I had was too wide for the design I was making. So, I decided to cut the tape in half. The bottom "branches" would be the thickest and they would gradually get thinner near the top.
I used scissors and a paper trimmer to cut the copper tape ( https://www.amazon.com/Bullet-Face-Double-Sided-Co... )
(You can use some scotch tape to hold the copper tape in place on the paper trimmer)
Step 9: Applying the Design


The copper tape has a backing on one side. It's basically a sticker that's also reflective and conductive. Peel the white backing off and carefully apply the tape on the pencil marks.
This was a fairly slow process but it was very rewarding in the end!
Step 10: :)


When you're done, screw the door back on.
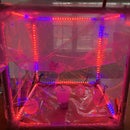
I added some fairy lights too.

Participated in the
Fix It! Contest


