Introduction: Hand Made Arduino Night Light

Hey! I am shiraha!! This is my first time publishing my work on Instructables. Since English is not my first language, if there are any grammar mistakes, I really apologize!!
In this page, I'm going to teach you guys how to make Arduino Night Light. You can use your imaginations and creativity to do this thing!! You don't have to follow all the instructions that I had given, and I will talk about how can you do it.
There are several things that you can learn on this site:
- The basic LED light usage of Arduino
- How to write basic variable programs
- How to connect a basic circuit of Arduino
- How to make a gorgeous artwork on your own!
In this project, you DON'T have to prepare ANY EXPENSIVE materials to do it. So you can be assured for making.
Before explaining the details, you can click the URLs to follow or subscribe my YouTube channel!!
I have uploaded and shared a lot of computer graphics and drawings. It is now all in Chinese, I will plan to have English captions in the future!!
NOW!! Let's start to make the amazing Night Light!!
Step 1: Prepare Your Materials

First of all, you have to prepare all of the things for making this Night Light! This is the list:
- 1 Arduino Leonardo (Arduino UNO is also feasible)
- Arduino R3 (coding system)
- 1 breadboard
- Two different colors of the LED light
- 4 common with mother's plugs (one side is common, and the other side is mother's)
- 6 wires
- 2 82 ohms resistance
- Lots of cardboard
- Super Glue
- Knife
- Scissor
- Ruler
- Cotton
- Other decorations
Make sure you have the right kinds of LED lights, wires, and the resistance since it will affect your making!!
Step 2: Make the Foundation
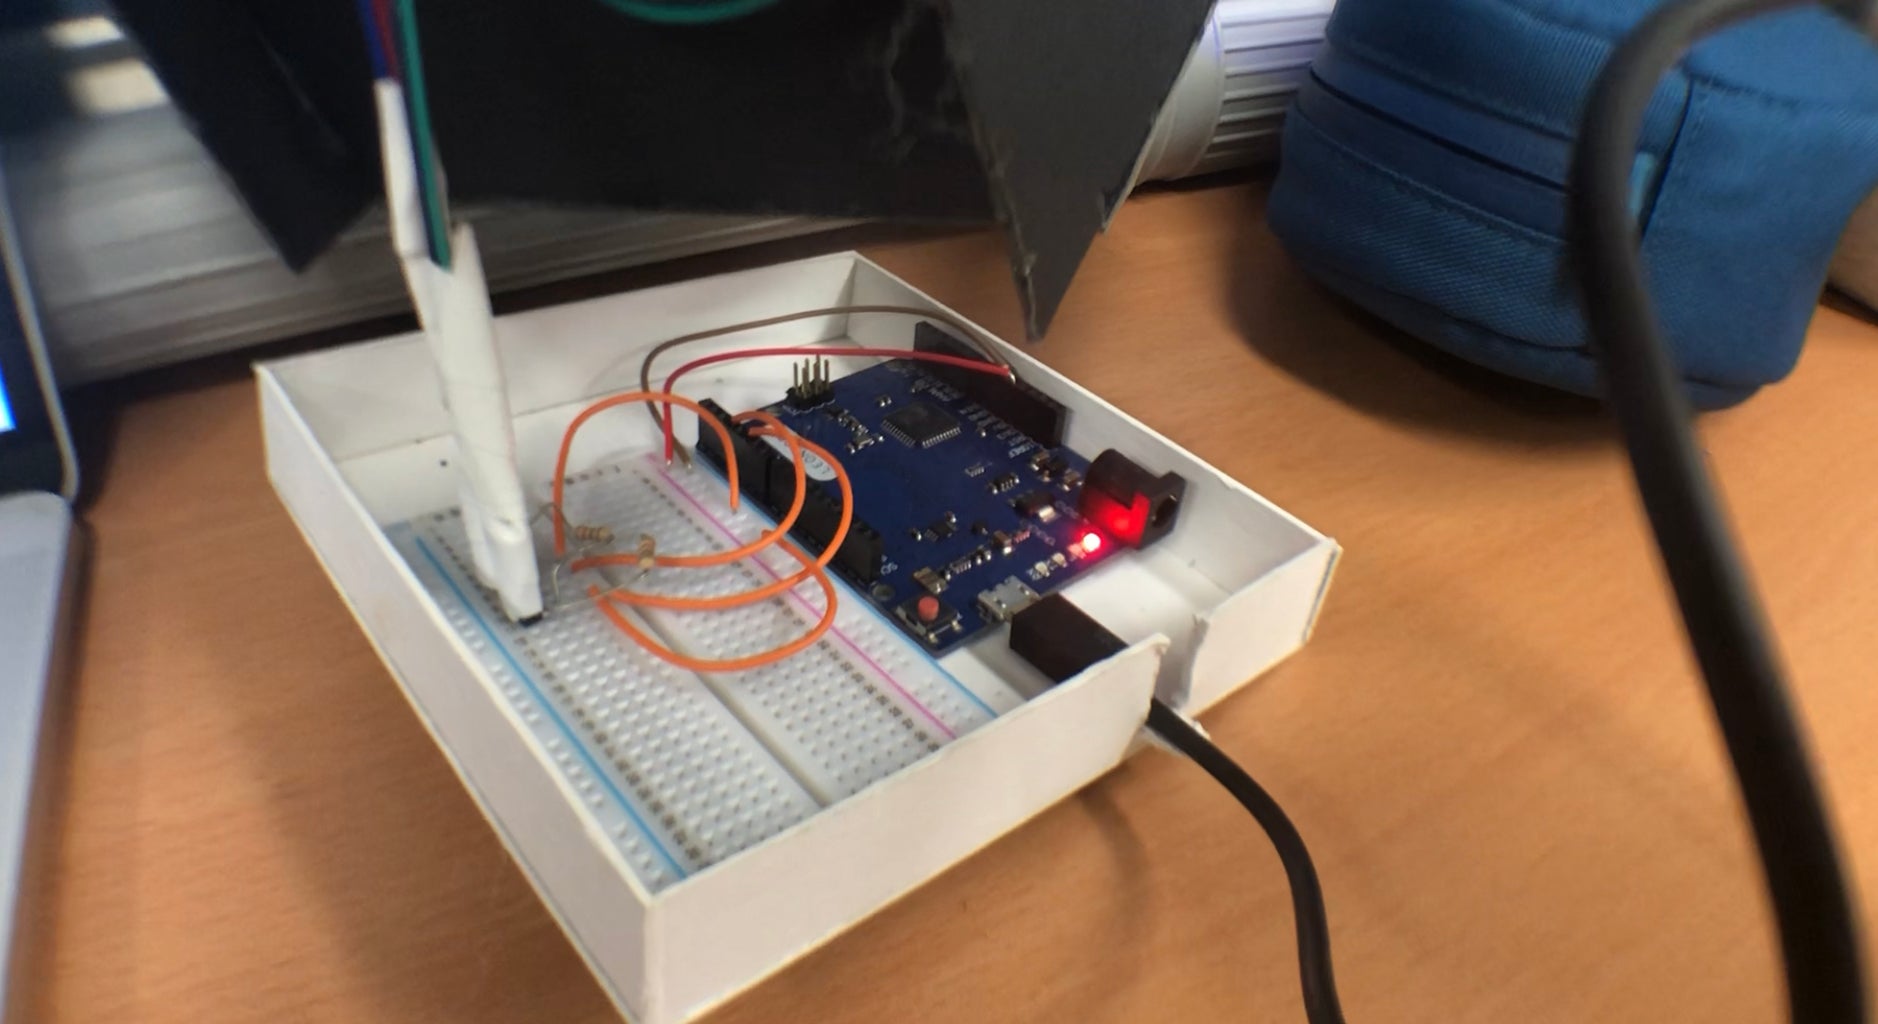

The FOUNDATION of the Night Light is where the Arduino board and the breadboard was. It is the main part to control your light.
- Use your cardboard to cut down a 12cmx12cm of a square and a four 2cmx12cm of rectangles for the sides for your box.
- Use your Super Glue to stick the 4 sides on the square (Stick it on the square NOT sides of it)
- Set your Arduino board and the breadboard in the box by sticking. (Arduino board at the front and the breadboard at the back)
- Use the knife cut down a small hole on the side behind your connection whole (So you are able to connect your Arduino board by your USB wires)
Step 3: Build Your Display Box


The "Display Box" is where you are going to decorate afterward! Now let's make the framework of the Night Light!
There are several steps on this stage:
- Use your knife to cut down 2 pieces of 12cm x12cm squares and 5 pieces of 18cm x 12 cm rectangles from the cardboard.
- Take one of your rectangles and measure the thickness of your cardboard. Cut down the extra part of each side. (Because we are going to stick it in the box as a partition plate) And now we call this rectangle as "Special R"
- Stick the left and the right-hand sides rectangle cardboard on your 2 pieces of squares. (The side that 12cm on the rectangle stick on the side that 12cm on the square)
- Then, dig 4 holes through the center of your "Special R" cardboard. (These 4 holes are used for setting up the LED lights) and stick your "Special R" in your back of the box, remember to leave 2cm of an extra corner to give a place for the wires to connect.
- Now you have made your framework of the display box!!
Step 4: Set Up the Wires


Now we are going to set up the wires!
- Use one wire to connect the positive electrode (The red + on the breadboard) to the "5V" on the other side of the Arduino board.
- Use one wire to connect the Negative electrode (The black - on the breadboard) to the "GND" on the other side of the Arduino board.
- Use one wire to connect digital pin ~3 to the other side of the breadboard.
- Use one wire to connect digital pin ~5 to the other side of the breadboard. (You have to make sure your pin have "~")
- Take one of your LED and use the longer leg to connect it with one of the digital pins.
- Take one of your resistance and connect with the shorter leg of the LED light.
- Use one wire to connect the other side of the resistance and the negative electrode.
- Do again step 5~7 at the digital pin ~5.
- Extend the LED to set up the lights on the display box:
- Set up your LED through the holes of the "Special R" cardboard
Use the common with mother's plugs to extend your LED light
Suggestion: stick the extend wire on the back of the "special R" cardboard so it will not fall off.
Use your another 18cm x 12 cm cardboard to cover the back of the "Special R" cardboard. (Do not show your wires, Arduino board, and the breadboard.)
Then you connect your foundation with the display box successfully!!
Step 5: Write the Program!

We made the framework of the Night Light and also set up the wires! Now we are going to let the LED work!
This code that I'm going to explain and teach you guys is a kind of "Breathing Lights" which is like the video above. (Actually, it is the final work :) and it seems more beautiful by look directly from the naked eye)
The reason why I chose to use yellow and blue LED light is that I discovered when yellow and blue light shines together will become a special type of purple. (I don't know why it works like this XD) So I suggest you guys choose your LED color wisely, you might find more unique colors!!!
There is a codec pack at the bottom of this step! Download and import to your Arduino R3 and check!
Let's learn how to write this program!
First, we have to understand what is the "variable" in Arduino.
Basically, the code of the variable in Arduino is a kind of Algebra. We set a name and set its corresponding number. In the codec pack that I give you guys, you can see the first part, which is the "setup". I set up a variable named "brightness" and set the value as none "0".
Next, we have to write about how the LED show up. In Arduino, the largest number for value is 255. So we set 255 times of loops to let the light turn on gradually. Each turn adds 1 value and goes 255 times to achieve the largest point to let the LED fully open.
On the other hand, to turn off the LED, just turn the + to -.
Lastly, you can change the deletions and the pins on your own!!
Attachments

Step 6: Start to Decorate Your Night Light!!

The most representative of my work is cotton. The cotton fully demonstrates the hierarchy, making this night light more unique.
Because of this reason, I suggest you guys also use cotton as your background! It will look really gorgeous, trust me!! This is the steps:
- Fell some cotton around your display corner
- Decorate your own character or objects by using black cardboards as a shadow.
- use your Super glue to stick them on the cotton!
- Remember to combine your foundation and the display box together by using the Super Glue.
- Lastly, use a transparent plastic board to cover the front of the display corner.
YOU MADE IT !!!
Step 7: Look at the Video for Visual Informations!!
Thanks for viewing my page!! Hope you have made it successfully~ Remember to send feedbacks and comments!!


