Introduction: Hands-free Door Handle Turn
This Instructable details a 3D printed foot pedal device that allows you to turn a door knob or door handle without touching it with your hands. This design was developed in response to the Covid-19 pandemic. Any opportunity to avoid touching shared surfaces with your hands in public spaces is an opportunity to prevent the spread of the disease. I decided at the beginning of the design process that this hands-free door unlatching device should not require mechanical modifications to the door (i.e. no drilling holes in the door) and should be easily adaptable to any door knob and handle geometry. If you have a 3D printer, this device can be made and installed on any door for less than $5.
It is possible to operate a door hands-free when this device is used in combination with the Hands-free Forearm Door Pull.
A hose clamp is used at the door knob to fit any size of door knob or handle diameter. If connecting to a door handle, a smaller diameter hose clamp could be used. I put the clamp strap in a 1/2in diameter vinyl tube to prevent the strap from scratching the door handle and to protect the user from sharp edges in the event that they need to turn the handle to open the door. The rope is tied around the hose clamp screw using a square knot.
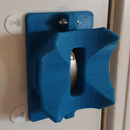
The foot pedal assembly consists of two 3D printed parts - the foot pedal and the rail plate. The foot pedal slides up and down the rail plate during operation. Three adhesive picture frame strips are used to attach the rail plate to the door. The rope is tied to the loop feature of the foot pedal using a square knot. A petroleum jelly lubricant was applied to the contact surfaces between the foot pedal and rail plate to reduce friction and prevent binding.
I included a 0.25mm clearance between the foot pedal and rail plate slide feature in the 3D model. This ensured that the foot pedal would slide on the rail plate without much friction.
The parts printed in less than six hours at 0.2mm layer height, 30% infill, and 0.6mm wall thickness. No support material is required.
Supplies
- 3D printer capable of printing a part of size 120x75x80mm (LxWxH)
- 1m of rope, 6mm diameter or less
- one hose clamp of the diameter required to fit your door knob or handle
- vinyl tubing of the diameter and length to fit around the pipe clamp
- three large 19x92.7mm (WxL) damage-free wall hanging adhesive strips, rated to hold 5lb
- petroleum jelly
Step 1: 3D Print the Foot Pedal and Rail Plate
STL files for 3D printing the foot pedal and rail plate are attached to this step. Use 0.2mm layer height, 30% infill, and 0.6mm wall thickness printing parameters. No support material is required if the parts are oriented on the print bed according to the images of this step. Total print time is just under six hours.
Step 2: Door Knob or Handle Assembly
Unscrew the hose clamp until the strap is open. Then slide the vinyl tubing over the hose clamp and reconnect the strap. The vinyl tubing protects the door knob or handle from the sharp corners of the hose clamp. Next, lightly tighten the hose clamp around the door knob. Use a square knot to tie the rope around the hose clamp screw as shown. Reposition the hose clamp around the knob so that the door unlatches with the shortest downward pull on the rope. Now fully tighten the hose clamp.
Step 3: Foot Pedal Assembly
Use a knife to deburr any sharp edges on the 3D printed parts. Install the foot pedal on the rail plate. If there is excessive friction between the two components consider sanding the faces that rub against each other during operation. Then as an extra measure to reduce friction between the two parts, use petroleum jelly to lubricate the foot pedal connection to the rail plate.
Next, attached three of the command strips to the back of the rail plate (equally spaced as shown). Position the foot pedal assembly below the door knob assembly and close to the bottom of the door. It should be close enough to the bottom so you do not have to lift your foot up very much to push down on it. Slide the foot pedal to the top of the rail plate (the position of the foot pedal when the door is latched) and tie the rope to the foot pedal loop using a square knot. Before securing the assembly to the door, pull on the string and ensure that the assembly is in the correct location. It make take a few tries to find the right spot. Finally, use the adhesive strips to secure the foot pedal assembly to the door.
Step 4: Hands-free Door Unlatching Achieved!!
Never open the door with your hands again!

Participated in the
3D Printed Contest


