

Introduction: Primitive Headphone and Phone Holder


Hello! This guide will provide you with the part files necessary to print out a headphone holder. If you want to make modifications to the design of it, use Fusion 360 to edit the part files attached within Step 2 of this instructable. I recommend you read the entire thing before starting any of the steps.
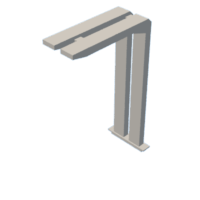
This assembly includes an arm to hold most lightweight headphones, a phone holder that has slits to fit a charging cable, and a place to store any extra length of wires and other objects.
The thought process for making this product:
After I am done gaming, I always hung headphones on my monitor, which was extremely dusty, making my headphones dirty before use. Additionally, I always left my phone sitting on the desk space, and when combined with a charging cable the wire management was a complete mess. As a result, I made this headphone holder that fixes those problems.
Supplies
Supplies include:
-3D printer
-About 3/4ths of a spool of filament
-Normal phone charging cable
-The STL files provided in the step below
-(optional) The Fusion 360 files in step 3 in case you want to edit the design.
-(optional) Sanding tool and construction/hot glue
The printer I used was Makerbot's Replicator+.
Step 1: Download Files

Download the attached STL files and process it through your 3D printer's program. If you have a bigger printer, I recommend that you try to orient it differently to find the lowest amount of filament usage.
The program we used, MakerBot Print, in the screenshot above displays the base. There are a ton of supports because of the phone holder. After the program ran a simulation of the printing process, we were able to export the base as a .makerbot file and then load it into our printer.


Step 2: Printing Pieces


Simply queue up the processed parts into your 3D printer. If you want to make any modifications to our design, then the Fusion 360 part files are included below.
Warning: the base piece consumes about 1/3rd of a spool of filament. Make sure you have enough filament loaded.


Step 3: Assemble


Assemble the base together by plugging in the headphone holder arm into the base piece's slits near the back and slide the tray into the open area.
If the arm is unstable or wobbles when inserted, then I recommend you use construction or hot glue to keep it in place. Or if either the tray or arm is too big to be inserted, we suggest sanding it down.
Step 4: Finishing Touches


Using the wide slit located in the rear wall, you can route a cable into the tray area and up the hole in the phone holder. You may need to take out the tray to route the cable. Using the tray room, you can store any extra cable length, USBs, and other small items.
At this point, the headphone holder is finished. I hope you enjoyed making this product!

This is an entry in the
Remake It - Autodesk Design & Make - Student Contest


