

Introduction: How to Flash a Bootloader and Update Marlin on the Ender 5


The information about flashing a bootloader and updating the firmware on this printer seems to be scattered all over the place. This guide should be all you need!
NOTE: I have no info on other revision of the motherboard. This guide is written using V1.1.4. If you have more info on this, please share and I will update the guide.
NOTE 2: This guide is written for and using an Ender 5 but this might as well work with other Creality Ender printers. I cannot test this. For this you need to copy the correct files from the Marlin examples folder and set PlatformIO to the correct environment. I do not have the value for this on hand. Might update later.
NOTE 3: This guide is not fully finished so expect some improvements.
Supplies
- A computer
- Arduino
- Arduino IDE (Downloaded from here)
- 5 Dupont female to female cables
- 1 Dupont female to male cable
- USB A to USB B cable
- USB A to Mini USB cable
- Empty USB port on the computer
- Visual Studio Code
Step 1: Connect the Arduino to the Printer Board

Connect the Arduino to the printer board according to this guide.
NOTE: Connect the reset pin of the printer board to pin 10 on the Arduino using the female to male cable.
Step 2: Getting the Arduino IDE Up and Running


Download the Arduino IDE from the link in the supplies section. For this guide I will be using the IDE 2 (version 2.0.3 at the moment of writing).
Install the program or extract the zip and launch the program. Let it install the drivers and update the libraries when asked for.
Step 3: Upload the SPI Sketch to the Arduino


Connect the Arduino to the computer using the USB cable.
In the Arduino IDE select the correct board and COM port in the "Tools" menu and the programmer to "Arduino as ISP".
Click on "File" and navigate to "Examples". Select option 11 ("ArduinoISP") and click on the sketch. A new window will open.
Upload the sketch to the Arduino using the upload button.
Step 4: Add the Necessary Board to the Arduino IDE

In order to burn the bootloader to the printer board the correct board needs to be added (in my case the board was not present in the options).
In the boards manager search for "Sanguino" and add the library.
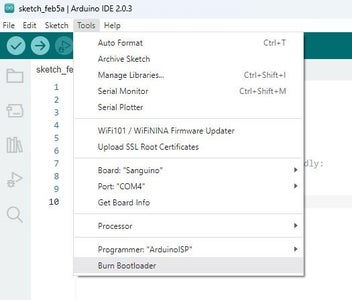
Step 5: Burn the Bootloader
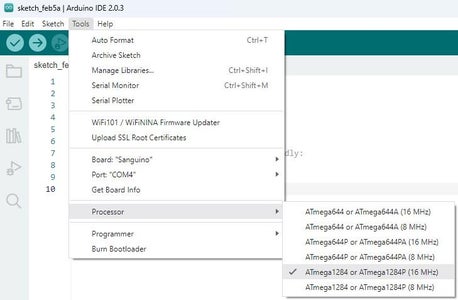
Under the boards option in the "Tools" menu there is now an option for "Sanguino" select this option and for the processor select "ATmega1284 or ATmega1284P (16 MHz)".
Make sure "Arduino as ISP" is selected as programmer.
Now press "Burn bootloader" in the "Tools" menu.
Step 6: Installing the CH340 Drivers


Remove the Arduino and connect the printer directly using the USB A to Mini USB cable.
Download the drivers here and unpack them.
These drivers are necessary to "talk" to the CH340 chip on the printer board. Right click the Windows button and select "Device Manager". There is probably a device with a yellow exclamation mark. Right click this device and select "Update Driver".
A new window pops up and press the option "Browse my computer for drivers". In the next window select the "Browse" option and navigate to the folder where the unpacked drivers are. Click on "Next" and wait for the drivers to install. When they are finished close device manager.
Step 7: Getting VSCode Setup


Download the newest release of Marlin here. (Apparantly 1.x.x is recommended for this board but I will be running 2.x.x)
Unpack the file.
Visit the Marlin Github page and select the release you downloaded. Download the ZIP file with the contents.
Unpack the ZIP file on the computer.
Navigate to the "config" folder and in the "examples" folder navigate to the "Ender 5 option". Do not forget to read the readme and navigate to the folder of the motherboard (in this case the "Creality V1" option).
Copy all the files to the root of the Marlin folder. Agree to the overwrite of the files.
Download Visual Studio Code here and install it.
Start Visual Studio Code and add the Marlin folder by clicking on "File" and "Add Folder to Workspace". Select the root of the Marlin folder by navigating to it and selecting "Add".
Visual Studio Code will recommend you to install Auto Build Marlin. Click the button to install it.
If it does not prompt this, Auto Build Marlin can be installed manually. Navigate to the extensions in the sidebar and search for "Auto Build Marlin" and install it.
Step 8: Configure and Flash Marlin


Navigate to the platformio.ini file in the explorer and under default_envs enter "melzi".
Creality upgraded the Z axis leadscrew to prevent the bed from lowering when the printer is not powered. This requires the Z axis steps to be doubled. Navigate to the "Configuration.h" file in the "Marlin" folder in the explorer and scroll down to the
DEFAULT_AXIS_STEPS_PER_UNIT
line and change the values from
DEFAULT_AXIS_STEPS_PER_UNIT { 80, 80, 400, 93 }
to
DEFAULT_AXIS_STEPS_PER_UNIT { 80, 80, 800, 93 }
In the sidebar select the Auto Build Marlin option and click the show panel option.
Select the correct COM port by clicking the small button on the right of the bottom pane.
Here the build options are listed. I recommend using the optimized version. Press upload to build and upload it.
For me the melzi_optimized option did not work but the melzi_optiboot_optimized did. YMMV.
Step 9: Happy Printing
Check if all heaters, axis, sensors and fans work.
Make some test prints or fiddle some more in the firmware. It is up to you! Keep in mind that the RAM of this board is limited.
Enjoy your updated printer.


![Tim's Mechanical Spider Leg [LU9685-20CU]](https://content.instructables.com/FFB/5R4I/LVKZ6G6R/FFB5R4ILVKZ6G6R.png?auto=webp&crop=1.2%3A1&frame=1&width=306)


