Introduction: Lightweight Arduino GSM Mobile Phone


Hello Friends.
Welcome. In this post, I will introduce you my Lightweight Arduino GSM Mobile phone. The lightweight mobile is capable of the following National/International features:
- Make Calls
- Receive Calls
- Send SMS
- Receive SMS
In this project, I used the GSM SIM900A module to connect to the mobile network. It is an adorable all-in-one cellular module that lets you add voice, SMS and data to your projects. It works on frequencies 900/1800MHz and comes with the friendly RS232 which can be easily interfaced with any MCUs, the baud rate is adjustable from 9600 – 115200 through AT Commands.
I also used a display to visualize GUI interfaces, I selected an LCD touch display by Nextion, trust me it is really an awesome display. Nextion adopts a new and easy way to interface any of your projects through UART. Its easy-to-use configuration software (Nextion Editor) allows you to design your own interfaces using GUI commands and makes the pieces of your development effortless, in turn you can save lots of program space in your MCUs. Thanks to Nextion!,
On its own, the GSM module and the Nextion touch display can’t do anything. It requires a microcontroller to drive it. At the heart is an Arduino Uno to drive the lightweight GSM Mobile phone, which can send and receive commands over its RX/TX pins.
If you are interested making yours, this guide will show you how to build and upload the source codes to get your project up and running. This is a fairly straightforward project, but an intermediate one especially when you take into account the complexity of the codes.
This project is also a great example of how to use Arduino especially for string & character handling, as well as for you to get acquainted with the new Nextion TFT Intelligent LCD Touch Display and using AT commands for the GSM module. Hope you will enjoy and find my post interesting. Now let us make it.
Step 1: Parts Required:

- Arduino Uno.
- SIM900A GSM module.
- Nextion TFT Intelligent LCD Touch display.
- SIM Card.
- Connecting Wires.
There’s also some optional accessories.
- External Mic & Speaker.
- Stylus.
Step 2: Wiring:

Connect the GSM module and the Nextion Display to your Arduino by following the appropriate steps below
- Nextion +5V to Arduino VDD_5v.
- Nextion RX to Arduino pin 11
- Nextion Tx to Arduino pin 10
- Nextion GND to Arduino GND_0v.
- GSM Rx to Arduino pin 1
- GSM TX to Arduino pin 0
- GSM GND to Arduino GND_0v.
NOTE: If your SIM card is locked with a PIN code. You can either disable the PIN or enter the PIN via the ‘AT+CPIN’ command just before you can connect the network. Example: “AT+CPIN=1234”.
Step 3: Setup:


Next, I will show you how to prepare the .HMI (Human Machine Interface) for the Nextion display, without forgetting the Arduino sketch.
Step 4: Tools Required:
- Nextion Editor.
- Paint.net.
- Arduino IDE.
Step 5: Program the Nextion Display:


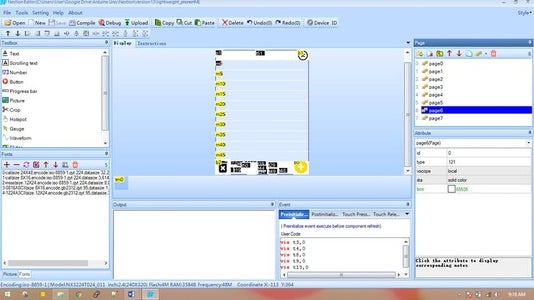


In this project, I used 8 pages to make the interactive GUI. Most of the icons which I used for the implementation are the freely available Android Icons and can be downloaded from this [https://material.io/resources/icons/?style=baselin...]. I used paint.net (Open Source editor) to edit/resize all the pictures and to create the invert of the icons, to give the feeling of touch when components like buttons are pressed. Touch events like (Press & Release) are also included when components are touched. If you are interested to acquire more about Nextion Instruction Set you can visit the wiki page here[https://nextion.tech/instruction-set/]
SEE ALL THE IMAGES FOR BETTER UNDERSTANDING.
Programming the Nextion display is just as easy as abc but a time consuming process especially when implementing complex features like numpad & keyboards. However, I wish to mention that at the end you will really enjoy the outcomes, the end results are enormously awesome.
Steps:
- Load the .HMI file into the editor.
- Scroll down to find my GitHub repository section of this page.Compile the .HMI file (just under the menu bar).
- Go to file > Open build folder > copy the .tft file > paste into SD card. Note: make sure the SD card is formatted to FAT32.
- Once copied, insert the SD card into the Nextion and then power_on.
- Wait for the .tft to upload.
- Power_off the Nextion, securely remove the SD card and then again power_on.Voila, you should see your new interfaces on the Nextion Display.
Step 6: Simulation

Nexiton also provide a handy simulator to test/debug the .HMI files well beforehand you connect your display to your MCUs. The “Instruction Input Area”, allows you to insert commands such as change page, hide/show picture, enable/disable button, enable/disable/insert text & much more to the Nextion display. On the other side, the “Simulator Return Data” gives you the responses from touch events when components on the Nextion display are pressed or even for the commands triggered to the Nextion.
Step 7: Program the Arduino:


The Ardiuno Uno is the brain of the whole mobile system, the Arduino acts as a middle-ware which interfaces the GSM Module and the Nextion display.
For this project, I did not used any Nextion libraries, as it seems difficult to understand and lack documentations and also my sketches does not compiled when using Nextion libraries, hope to get improvements soon. As such, I decided to move on without the use of libraries, seems to be difficult right? Believe me it’s not.
To get the complete code, simply scroll down to find my GitHub repository section of this page. Copy the code, and paste it into a new sketch in the Arduino IDE. Save it, upload it to your Arduino.
That’s all for the software part! Compile the code. If there are no errors, congratulations your devices is now configured to automatically connect to the cellular Network through the GSM module. Open the Serial monitor, you should see the AT command logs for each events triggered from the Nextion Display.
Step 8: Source Codes:
You can download the complete code of this project from my GitHub by clicking this[https://github.com/ssrijantanwar/Lightweight-Arduino-GSM-Mobile]
Step 9: Demonstration
Step 10: BONUS

By default, the GSM module has an SMS buffer size of 20. Unfortunately, we cannot display all the 20 SMS at once on the Nextion display, getting buffer overflow while compiling Nextion code. As such, I have programmed the Nextion display in such a way to present only 10 SMS.
If 10 or more SMS are present on the GSM buffer, the Low memory warning icon will be displayed on the Nextion display, warning you to delete previous SMS to view the new SMS in an incremental way.
I hope you like my post and hope this tutorial helps you find a way to implement your own Arduino GSM mobile and yes, please share any of your innovations.
Have Fun. Cheers. Thanks for reading and sharing.

Participated in the
Arduino Contest 2020


