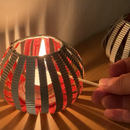
Introduction: Make Square Shaped Soda Cans
It’s hip to be square …. Huey Lewis and the News …. Is it hip to make square soda cans? The answer is definitely YES if you have a look at the picture of the hand lantern above. The main structure of this lantern is made from a square shaped soda can. This Instructable will show you how to make this square shaped soda can from regular round shaped soda cans. The hand lantern will be presented in the next project.
Step 1: Parts List
To finish this project you need the following items:
- Soda can
- Two angle brackets
- Two flat plate brackets
- Screws
- Knife
- Screwdriver
- Old credit card
- Piece of scrap wood
- Oven
Step 2: Ink Removal of Soda Can
The outside surface of the soda can is much more attractive if you remove the color first. So before you start, remove the ink from the soda can. I already posted an Instructable that demonstrates an easy method for ink removal from soda cans. You can find the Instructable here: Ink removal from soda cans.
As we are going to place the soda cans in the oven later on, removing the ink does also prevent any kind of odors in your oven.
Step 3: Separate Top and Bottom of the Soda Can
Clean the emptied soda can by rinsing twice with water and then let it dry. Use a knife to mark a groove around the can. Hold the knife on a piece of wood at a level plane and then rotate the can around. It is not necessary to cut through the aluminum. Apply some pressure with an old credit card near the groove to separate the top and the bottom part (see video).
Step 4: Clamping of the Cans
To bring the soda cans into the desired square shaped form you need two angle brackets and two flat plate brackets. You can find them in a regular hardware store. Choose the width of the angle bracket in the same size as one side of your future square formed soda can. The length of the angle bracket should be about twice the length of your soda can.
Place the two angle brackets onto each other and then fix them loosely with the two flat plate brackets. Use screws in-between the angle brackets as distance holders (see video). Then put the soda can where you have removed the top and the bottom over the angle brackets. Now place also the screws in-between the upper part of the angle brackets. Press the angle brackets slowly apart by tightening the screws that serve as spacers. The more you press the angle brackets apart the more the soda can get into a square shaped form.
Step 5: Fix the Form in the Oven
In order that the soda can keeps the square shaped form after separating from the angle brackets they have to be heated in an oven. A temperature of 200° Celsius for one hour is enough. After this treatment you have to cool down the construction by placing it under cold water.
Step 6: Unpacking
Dry the construction with some paper towels. Thereafter unscrew the flat plate brackets and carefully remove the square shaped soda can.


