

Introduction: Portal Bookend (less Than €10)

My books kept falling over, it was clear that I needed a bookend. However all the bookends I could find where either too expensive or were not to my liking. So when I saw the books and bookshelves contest I decided to just make my own.
So without further ado, here is how to make a portal bookend.
Supplies


1.A small bookend (you can also use an L bracket or bend a piece of acrylic) (Here is where I got mine)
2.Book cover PNG in the image above (you can get this printed for fairly cheap (make sure to use a 12x8 inch or 30x20 cm photo size)) (you can also make your own using a photo editor. I used paint.net)
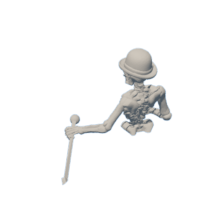
3.The skeleton in the stl below (If you like you can also make your own figure on Titancraft and then cut it at the waist. for this I used Autodesk fusion 360). (you will need a 3d printer to print it, if you don't have one you can use a 3d printing service like the one here) Please note that I used a 0.2mm nozzle for print details.
4.Some wood. (preferably a 19mm thick one and a 3.2mm thick one) I used mdf because this will not be seen from outside
5.Pages JPG from the photos above (you can print this normally)
6.Some cardboard (I found using a doubled up cereal box works best but if you are using a different thickness of wood or a different bookend you will need to find something else)
7.Tools eg. saw, screws, glue, ruler etc.
Attachments
Step 1: Cut the Wood


You need to measure and cut the wood to size like the animations above (I can't give dimensions because different print shops will crop the image differently). For the top of the cut out square (see second animation) I used a craft knife a few times and then snapped it. If you are not using mdf you will need another way to cut that square
Step 2: Glue the Wood Together

As the title suggests in this step you have to glue the pieces of wood together. (I used unibond no more nails due to its fast drying time but you can use any glue that sticks to wood) Also at this point I glued the cardboard in place to make sure the bookend would be flush to the surface of the wood. P.S Make sure your wood is properly aligned before gluing or you will have a lot of sanding to do!
Step 3: Add the Bookend


To add the bookend to the wood I used some small screws because glue would stick to the cardboard and could come off. I drilled some holes in the acrylic prior to screwing them in because I did not want it to potentially break. Please note the wood is on the inside of the bookend. This is important for stability. P.S. It is important that the screw goes perfectly straight into the wood or else you will have a bump where the screw is.
Step 4: Glue the Page Top On

In this step you glue the page tops on to the wood (try to use a glue stick so that the paper doesn't appear wet) make sure that you leave a little bit of overhang on the front and back of the image so that you can glue it easer with no seams.
Step 5: Glue the Book Cover On


This was for me the most difficult part of the project. First center the spine of the book and then fold the sides down taking extra care to make sure it is straight. Then you can glue the sides making sure again that it is straight and also that the front of the book is facing outwards (for the glue, scrapbooking glue is best but I used a glue stick and it worked fine)
Step 6: Glue the Skeleton Model

First of all congratulations for making it all the way down here, this is the final step yay!
Now, after Step 5, this one is a walk in the park. All you have to do is glue the skeleton model to the book cover over the portal (I used Bostik multi purpose clear glue because super glue is likely to snap). Feel free to play around a bit with the orientation until it is to your liking.
And that's it, you are done. So sit back, relax and enjoy your new bookend

Participated in the
Books and Bookshelves Contest


