Introduction: RC Tank
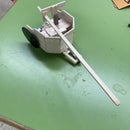
Purpose: This is my submission for the 2022-2023 Butwin Elias Award by the Adam Iseman Foundation. My submission is a RC Car which uses a Remote Control board and an Arduino board to create a tank which can move, aim, and make sound.
Four years I have done this competition. First year, I did a Raspberry Pi weather station with a partner. Second year, I did Chariots using simple circuitry. Last year, I did a coding project, that being Pong in C# Visual Studios. I hope this project shows the process, not just for the RC Tank, but the whole of my high school career doing this competition, combining single board computers, scale model vehicles, coding, and my newest skill: 3D Printing.
I hope this project shows the passion I have for the Best Award, and I hope it stands as a guide for those who compete after me. Good Luck.
Supplies
- Resources
- Filament
- Overture PLA
- GreenGate3D PETG
- Arduino Uno Kit
- Arduino Uno Board
- Tiny Breadboard
- 9V Battery
- 9V Battery Connector
- Active Buzzer
- Arduino Wires
- Solder
- Hot Glue
- 4x Bearings
- 3x Motors
- 2x Rubber Bands
- RC Transmitter and Receiver
- Electrical Tape
- Tools
- Soldering Iron
- Hot Glue Gun
- Ender 3 V2 3D Printer
Step 1: STEM Application
How does this project show an application in STEM?
Science
This projects shows an application in Science through electronics, with transmitters and receivers, batteries, and general circuitry.
Technology
This project shoes an application in Technology through 3D Printing, CAD (Computer-Aided Design), and coding. I designed all the parts in Onshape, a cloud-based modeling software, everything was printed using Cura Slicer software, and the Arduino Uno board was coded using Arduino IDE.
Engineering
This project shows an application in Engineering through design. All parts were designed with 3D Printing in mind, including tolerance (which for 3D Printing, is about +/- .2/3mm) and ease of printing, keeping the amount of support material as minimal as possible.
Mathematics
This project shows an application in Mathematics through its use of geometry. Again as previously stated, the parts were designed with 3D Printing in mind. Printers struggle with any geometry that hangs lower than 45 degrees, so all parts (Excluding the top of the tank, which could of been designed with 45 degrees in mind, but to keep with a similarity to tanks, was given a steeper angle) were designed to stay within 45, so most of the parts can be printed without the need for support material.
Step 2: 3D Printing
Download all the attached STL Files (there are 9 in total, however 1 is the full assembly of the tank) and 3D print them. Overture PLA prints similarly to the Generic PLA settings on Cura, so there is no need to change any settings.
However, I used two different types of material for this project; PLA for most of the components, and PETG for the barrel. This is because PETG is a much stronger material, and with it being a thin part that gets bashed around a lot, I wanted it to survive as long as possible. I utilized GreenGate3D PETG for this. I will disclose that they gave me the filament for free, however from my experience, it is the easiest PETG to print with that I've worked with so far, and is incredibly strong, being able to printed up to 290 C. It's also recycled filament.
For printing the barrel, have it vertical with the heat dispersal section at the top. Slow down the speed to about 30mm/s, and print with a brim.
You will need:
- 1x ChassisPrint Final
- 1x Top Final
- 1x Turret Final
- 2x Lock Block Final
- 1x Barrel Final
- 2x Bearing Wheels Final
- 2x Motor Wheels Final
- 2x Tension Wheels Final
Attachments
Step 3: Preparing Motors
The motors in their current form do not come with wires, so we must make our own connections.
- Take 4 Male-to-Male Connector wires and 3 Motors
- Cut the wires in half so you have 8 Male wires
- Solder the wires to the motors
- On two of them motors, keep the polarities the same, but on one flip it. This will be for the Turret
Step 4: Assembling the Wheels
- Take the 4 bearings, the 2 Tension Wheels, the 2 Bearing Wheels and your drive motors.
- Slide the bearings onto the shafts of the wheels.
- Using your soldering iron, melt down, and push out the top of the shaft, so it mushrooms around the bearing, similarly to a rivet.
- With your two motor wheels, you'll notice that they have a slot in the shaft, slide the motor shaft into that hole.
Step 5: Top Assembly
- Take your "Top" print, "Barrel" print, "Turret Print", the 2 "Lock Block" prints, and your Turret Motor
- Hot Glue the Barrel into the Turret
- Hot Glue the Lock Blocks into the Top in the two slots
- Glue the Motor so the shaft sticks out the hole on the "Top" print. Hot glue in place
- Flip it over, and slide on the Turret Assembly.
Step 6: Chassis Assembly
- Take your "ChassisPrint" part, your wheel assemblies, the Tiny Breadboard, Arduino Uno, and the RC Board
- Slide the Bearing Wheels into the front most holes the on the Chassis, hot glue in place
- Place the Tension Wheels on the half circles, hot glue in place
- For this project, take the Arduino Uno board and place it to the top right hand side of the chassis, using the two holes on the board and two holes on the chassis to line it up. Hot Glue in place
- Using the guide on the chassis, hot glue your RC Board into place
- Take the paper off the back of the breadboard and stick it down onto its place
- Take your two motors and slide them into their positions. Hot glue in place
Step 7: Wiring the Motors
On the RC Receiver Board, there are 10 wires. The top two are for power (which we will get to later) and the bottom 8 are your channels. Now, when you receive your RC Board (if you get the same one I do) you will notice it has wires, and not Female Connectors. I modified my board early on when I first got it, however you can simply either solder the motor wires to those connections, use electrical tape, or add the Female Connectors like I did.
- With your Right Motor, connect the positive to the Left Most Connection (as indicated by Orange) and the negative to the one right next to that (as indicated by Yellow)
- With your Turret Motor, connect the positive to the 4th connection (As indicated by Purple) and the negative to the one to the left of that (as indicated by Blue)
- With your Left Motor, connect the positive to the 6th connection (as indicated by Green) and the negative to the one to the left of that (as indicated by Yellow)
Step 8: Sound
For this Step, we will add an Active Buzzer from the Arduino Kit to mimic a firing noise for the tank, and use one of our open channels from the RC Board to activate it. We will also plug in the RC Board so it has power
- Plug the Positive Cord from the RC Board into the 5V slot on the Arduino Board.
- Plug the Negative Cord from the RC Board into the GROUND slot on the Arduino Board.
- Put the Active Buzzer (positive away from the Arduino Board) into the small Breadboard.
- Putting a wire with the positive, place the other end into slot 3 on the Arduino Board.
- Put a wire with the negative, hook it into the opposite side of the breadboard.
- Take one of your last remaining channels from the RC Board and put in a wire, put the other end of that into slot 2 on the Arduino Board.
- Take the other channel and lead put it in the same row as the negative of the Active Buzzer
- Place another wire into that same row, and put it into a GROUND slot on the Arduino Board.
- Wiring is now done!
Step 9: Coding
In this step we will be coding with the Arduino Uno board. Open up Arduino IDE, plug in your Arduino Uno Board, and open a new sketch
const int buttonPin = 2;
const int buzzerPin = 3;


void setup()
{
  pinMode(buttonPin, INPUT_PULLUP);
  pinMode(buzzerPin, OUTPUT);
}


void loop()
{
  if (digitalRead(buttonPin) == LOW)
  {
    for (int i = 0; i < 3; i++)
    {
      digitalWrite(buzzerPin, HIGH);
      delay(500);
      digitalWrite(buzzerPin, LOW);
      delay(500);
    }

    for (int i = 0; i < 3; i++)
    {
      digitalWrite(buzzerPin, HIGH);
      delay(250);
      digitalWrite(buzzerPin, LOW);
      delay(250);
    }

    digitalWrite(buzzerPin, HIGH);
    delay(1000);
    digitalWrite(buzzerPin, LOW);
  }
}
Copy the above code into the sketch, and click Upload (the arrow in the top left of the screen)
What this code will do, is when the signal is received from the RC Board, it will short buzzes, faster buzzes, and then finish off with a long buzz, sort of replicating the turret heating up before firing.
Step 10: Final Step
- Plug in your 9V so the Arduino Uno and RC Board both have power
- Hit the power switch on the RC Board if not already done so
- Put the rubber bands around the wheels, making sure to also put it under the Tension Wheel
- Put the Top Part on top of the Chassis
- You're done! You now have a rocking and rolling 3D Printed Tank with sound!


![Tim's Mechanical Spider Leg [LU9685-20CU]](https://content.instructables.com/FFB/5R4I/LVKZ6G6R/FFB5R4ILVKZ6G6R.png?auto=webp&crop=1.2%3A1&frame=1&width=306)


