Introduction: Rudolph and Bluedolph in Santa's Shop


2018 will be the third year that Santa's Shop (an animated Christmas display window provided free of charge for public viewing) is operational. We are adding a 3d printed monorail featuring Rudolph (red nosed reindeer) and Bluedolph (blue nosed reindeer) in action. This animated, story telling art installation is available for public viewing in the window of Brightway Insurance Agency from 5:30 P.M. to 9 P.M. daily during December of 2018 at 9127 SW 52nd Ave, Gainesville, FL 32608.
The display operates 3 1/2 hours each evening and is battery powered, so that creates a bit of a challenge. To solve this, power is provided by two (parallel) sets of AA batteries. The power is routed through a normally closed magnetic reed switch. When power is applied to the display, a magnet moves away from Bluedolph, allowing the reindeer to operate. When the display shuts down in the evening, the magnet falls back into place and the power to Rudolph/Bluedolph is interrupted and they stop until the next evening.
Step 1: Parts
Materials needed include:
(52) 3mm x 8 screws
(2) 3mm x 12 screws
(2) AA x 2 battery holder
Servo connector cables
Red led
Blue led
100 ohm resistor
Boost converter for blue led (must accept 2 volt input)
3d printed parts--files here
Attachments
 Bluedolph.f3d
- Bluedolph.stl
- body top.f3d
- body top.stl
- car body.f3d
- car body.stl
- connect curve.f3d
- connect curve.stl
- connect straight.f3d
- connect straight.stl
- curve track.stl
- end capa.f3d
- end capa.stl
- gear drive 10-5.f3d
- gear drive 10-5.stl
- motor aug6.f3d
- motor aug6.stl
- nut.f3d
- nut.stl
- peripheral carriage.f3d
- peripheral carriage.stl
- Reindeer hole nose.stl
- rudolph sign.f3d
- rudolph sign.stl
- straight track.stl
- track piece.f3d
- track piece.stl
- wheel w hub.f3d
- wheel w hub.stl


Step 2:

First, I printed the motor carrier, then gently file the inside channel until it moves freely on the track. 3d printed parts were printed using PLA at .2mm layer height and 30% fill.
Step 3:

Add the wheels using 3mm x 8mm screws. The wheels should turn freely, but not wobble.
Step 4:

The gear should be printed at 10.5% of the original size. After inserting the motor from the top, press fit the gear onto the shaft (note the flat notch to hold the gear in place).
Step 5:

The motor assembly should look like this.
Step 6:

Place wheels on the carriage assembly.
Step 7:

Place the body (large hole end) over the carriage assembly shaft.
Step 8:

Thread the printed nut onto the carriage shaft so that the body can move freely.
Step 9:

Repeat for the other carriage. Attach the two carriages to the motor using the 3mm x 12mm screws. This should allow the cars to move freely. Note that the cars are tilted slightly toward the motor so that the weight of the cars will press down on the motor and hold it in contact with the track.
Step 10:

Electrical connections should be made according to this schematic diagram.
Step 11:

I glued the reindeer atop the cars and attached wires between cars using servo motor cables.
Step 12:

If you don't happen to have "old toy monorail" track, you'll need to print your own. I provided the track for people who choose to make everything themselves. The track connectors are somewhat crude--you'll have to use a 3/32" drill bit and make holes to thread the 3mm x 8mm screws through the connector into the track.
Step 13:

I created a very short piece of the geared track (called "track piece") that has a few teeth. In Tinkercad I duplicated this several times and combined the duplicate pieces to make the straight track. For the curved track, I duplicated the original piece (then moved it to the right and aligned the teeth). Next I rotated the duplicate piece three degrees. I did this fifteen times (45 degrees) and that makes a "curved" piece.
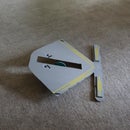
The undecorated train looks like this.
Step 14:
Operating on the printed track, Rudolph and Bluedolph look like this.

Participated in the
Holiday Decor


