Introduction: The Ultimate Cat Condo


It's a Catio! It's a Cat Condo! It's the Ultimate Cat Condo with scratch pads, hiding spots and litter box storage! More importantly it's Stegosaurus (the cat) approved! Check out this monster DIY pet project and then make sure you head over to https://lazyguydiy.com for more DIY builds and plans!
Supplies
Tools Used:
- Miter Saw (or circular saw)
- Table Saw (for ripping plywood and cedar planks)
- Drill Driver
- Brad Gun
- Pocket Hole Jig (if using pocket hole joinery)
- Clamps
- Jig Saw
- Counter Sink
Materials Needed:
- 4 x 4 x 8 (I did not use pressure treated)
- 3/4″ Plywood2 x 4 x 8 (I did not use pressure treated)
- Cedar Fence Pickets (you can substitute hardy board)
- 2’x4′ Sheet Of Underlayment
- 1 x 2 x 8 board
- Twine/Sisal
- (2) 10″x 18″x 1.5″ Corrugated Scratch Pad
- (1) Test Cat
- 1-1/4” Self Tapping Screws
- 2-1/2” Self Tapping Screws
Cut List:
- (4) 48” 4×4’s
- (6) 20” 2×4’s
- (6) 52” 2×4’s
- (4) 10” 2×4’s
- (2) 20” 2×4’s
- (4) 42” 2×4’s (see step 13 for Roof Truss 45 degree Miters)
- (6) 19” 1×2’s
- (4) 20” 1×2’s
- (4) 11” 1×2’s
- (4) 32” 1×2’s
- (4) 18.25” 1×3¾” 20” x 52” sheet of plywood (read notes on step 3)
- (1) 11.50” x 10” of ¾” plywood
- (1) 11.50” x 11.50” of ¾” plywood
- (2) 11.75” x 21.50” sheet of 1/8” underlayment (buy a 2’x4’ piece)
- (8) 20” of 5.50” cedar plank
- (4) 52” of 5.50” cedar plank
- (12) 17.50” of 5.50” cedar plank
- (14) 24” of 5.50 cedar plank
- (8) 10” of 5.50” cedar plank (can use cut offs)
- (4) 13” of 5.50” cedar plank
Step 1: Cat Condo Supports

Cut (four) 4×4’s to 48″ for the support legs. In my build I cut 1/2″ dados using a sliding miter sawfor where my 2×4 supports would join, but honestly… skip it and just butt join them with pocket holes. In the build plans I’ll be giving you measurements for assembly without the dados.
I used 4×4’s here only because I knew I wanted them specifically for wrapping them in sisal (twine) for a vertical scratching post. You can absolutely substitute 2×4’s instead and adjust your measurements.
Step 2: Cat Condo Frame

Cut six (6) 2×4’s to 20″ for the end supports and six (6) 2×4’s to 52″ for the side supports for the three levels. Pre-drill 1-1/2″ pocket holes to both ends of the 2×4’s on what will be the downward facing side.
Grab two (2) of the 20″ 2×4 end supports and two (2) of the 52″ 2×4 side supports. Then attach to the 4×4 leg supports 3″ from the bottom with 2-1/2″ self tapping screws. Remember to attach the supports with the pocket holes facing downward so they are not visible from the top.
Step 3: Litter Box Storage Floor

With the frame in place, cut the 3/4″ plywood to 20″ x 52″ for the floor. Secure with 3/4″ pocket holes and 1-1/4″ pocket screws from below or use a ledger board to secure.
Because I was using scrap plywood, I broke the floor up into three sections and attached 2 scrap pieces of plywood as lateral supports. I attached those with 1-1/2″ pocket holes and then flush installed the 3/4″ plywood with 3/4″ pocket holes from underneath. Going this route gives a sturdier floor, but also leaves gaps that liter can get trapped in.
Step 4: Litter Box Frame

Grab two (2) of the 20″ 2×4 end supports and two (2) of the 52″ 2×4 side supports. Then attach to the 4×4 leg supports 23.50″ from the bottom with 2-1/2″ self tapping screws. Remember to attach the supports with the pocket holes facing downward so they are not visible from the top.
Step 5: Attach Ledger Boards

Cut six (6) 1×2’s to 19″ for ledger boards to attach the cedar planks. Pre-drill and counter sink the sides to all six boards and attach to the back opening an sides of the litter box. Use a scrap piece of cedar board for a spacer so the 1×2’s are inset to allow them to sit flush with the frame when attached from the outside.
Step 6: Install Scratch Pad Box


Cut 2 (two) 2×4’s to 10″ and pre-drill 1-1/2″ pocket holes into both ends. Attach both with 2-1/2″ self tapping screws on the second tier 5″ from center creating a 10″ wide box.
Cut a piece of underlayment to 11.75″ x 21.50″ and attach with brad nails and wood glue to create the bottom of the box.
Step 7: Attach Second Tier Ledger Boards

Cut four (4) pieces of 1×2 to 20″. Pre-drill and counter sink. Attach to the end and scratch pad box supports using the same method to inset with a scrap piece of cedar plank.
Step 8: Attach Top Supports

Using the remaining pre-cut 2×4’s, attach the 20″ end and 52″ side supports to the top of the structure. Make sure they are attached flush with the top.
Step 9: Optional Scratching Surface


Cut two (2) 2×4’s to 20″ and pre-drill 1-1/2″ pocket holes to both ends. Then attach at 10″ between the second and top tier surfaces. You can leave this as is or wrap with sisal (twine) as a horizontal scratching surface.
If you do end up adding the sisal (twine), make sure you account for it in your final measurements for the space. I… did not, which is why in the final photos you see the sides wrapped on one side only. To attach, I started at the bottom, tacked on an end with a stapler and wrapped up adding 2-3 more staples to hold.
Step 10: Attach Top Scratch Pad Box

Exactly the same as Step 7. Just attach to the top tier on center. Then attach the underlayment for the bottom. Cut four pieces of 1×2″ to 11″ and then counter sink on the side and install inside the open boxes as a top tier ledger board with an inset for the cedar planks. You won’t be cutting the full 20″ to allow a gap for the cats to reach the top tier with either a ramp or hopping up through the hole.
Step 11: Prime & Paint
Before you start installing the cedar planking, this is the perfect time to prime (if necessary) and paint all visible surfaces of the Cat Condo. That is if you’re adding paint. Cedar soaks up accidental spills so I don’t recommend trying to carefully paint around it later.
Step 12: Install Cedar Planking


You installed all of that inset 1×2 for a reason, now start cutting cedar planks! I used cedar fence pickets from Home Depot because you get almost 6 feet per board and they’re great for projects other than fences. You might notice I already showed these installed for the build plans above, but you’ll want to add these after painting.
For the litter box back you’ll need four (4) pieces cut to 52″ and then eight (8) pieces cut to 20″ for the two sides. From each side, you will need to rip one of those pre-cut boards down to around 3.50″ to fit with the other three 5.5″ wide planks. Install horizontally with wood glue and brad nails.
For the second and third tiers, cut eight (8) pieces of cedar plank to 17.50″. For two of the boards on the second tier you’ll need to rip down to 3.50″ wide. Install the same way with wood glue and brad nails.
On the third tier, you will only attach two 17.50″ planks to the 1×2 ledger boards leaving an opening around 9″ for the cat to access the top tier.
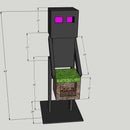
Step 13: Build Roof Trusses


Math here… because we only want to make 45 degree angle cuts, we’re going to use our old friend Pythagorean Theorem to solve for c. A squared + B squared = C squared right? With the width of our platform being 59″ wide, we know we’ve got two lengths of 29.5″, which means we’re cutting four of the 2×4 trusses at 41.72″ (or close enough) to make a 90 degree angle when connected. You follow?
The two easiest ways to join your 45 degree miters is to pre-drill a 1-1/2″ pocket hole at the miter joint and drive a 2-1/2″ self tapping screw in a location where it won’t punch through. Or you can just pre-drill and counter sink a visible hole on the spine above the joint. Plus a little wood glue.
With the two mitered trusses connected, cut four (4) pieces of 1×2″ to 32″. Pre-drill and counter sink and then attach to the inside edge of the trusses once again inset to allow the cedar planks to attach flush with the top. Now’s a good time to paint and prime these as well.
Step 14: Attach Roof Trusses

With the paint dry (or not) attach the trusses to the top platform so that the bottom edges of the triangle are flush. I pre-drilled (before assembly in step 13) a 1-1/2″ pocket hole on the back facing side of both trusses. Then I attached with wood glue and 2-1/2″ self tapping screws. It was surprisingly sturdy, so I didn’t feel the need to counter sink through the spine. The structure will also become more secure once you add the planks.
Step 15: Cut & Attach Roofing Planks


Cut fourteen (14) cedar planks to 24″. Starting from the top, attach to the 1×2 ledger board using wood glue and brad nails. I left a tiny gap at the top and then a several inch gap at the bottom as a structural detail. Or let’s be honest… I didn’t want to rip anymore cedar for a perfect fit.
Step 16: Build a Box or Add a Ramp?


This is where debate occurred in our house. You can stop here and just run a cut to length cedar plank from the top tier to the second tier as a ramp. You can build a peek out box like I did with a scratch pad inside.
Or you can build the box and then add a shorter ramp from the box to the top tier like my original plans call for.
Step 17: Build a Box…


I used scrap 1×3 from another project, but you can just as easily use scrap 1×2. Cut four pieces to 18.75″. Then add 3/4″ pocket holes to one end of all four. Then one 3/4″ pocket hole to the middle of only two of the 18.75″ boards.
Then cut one piece of 3/4″ plywood to 11.50″ x 11.50″ for the removable front and one piece to 11.50″ x 10″ for the stationary back. Using a jig saw or a hand saw, notch a 1.50″ x .75″ rectangle out of the bottom of the removable front. For the cut out, I traced a bucket lid and free hand cut the circle out with the jig saw. I then used my router and a round-over bit to smooth the edges, but it’s not necessary. For the 11.50″ x 10″ stationary piece, I added a single 3/4″ pocket hole to the back side aiming downward. With both plywood pieces cut, I painted these while working on other parts of the box.
Attach the four (4) 18.25″ 1×3’s to to four corners of the plywood back using 1-1/4″ self tapping screws. Make sure the two pieces with the pocket hole in the middle are attached on the bottom portion with the pocket hole facing downward.
Pre-cut eight (8) pieces of cedar plank to 10″ for the box sides. Two of these will need to be ripped down to 3.25″ wide. Attach with wood glue and a brad gun to the sides leaving a .75″ overlay on the front. The front piece with the hole cut out is going to fit into the overlapping cedar.
Cut four (4) pieces to 13″ for the top. Rip one of the pieces down to 3.25″ wide and then attach with wood glue and brad nails. Unless you have a low profile drill driver, I would recommend attaching this to the Cat Condo prior to attaching the roof of the box.
Step 18: Final Notes

You’re done! This thing is not small. I’m 6’4″-6’5″ and it’s as tall as I am. The good thing is that it’s actually not ridiculous heavy. I was able to maneuver it around myself without help in the shop and needed a little help putting it on the back porch…
Which speaking of… if you followed my Instagram Stories (go follow me) you’ll know I had “issues” getting this onto the porch. I ended up having to pull off the screens on the porch and make a few “adjustments” to the build. Which is why in the final pics there’s only one side with the sisal twine for the scratch post. Otherwise, the cats (jerks that they are) seem to like it.
Like pet projects? Check out the Bailey Chair for Dogs!

Second Prize in the
Pets Challenge


