Introduction: Trees From Scraps - 4 Ways


I love making holiday displays, and as you can probably tell by the Instructables I post, I love to upcycle junk! Here, I've made trees from old string (a spool I've had since the 80s), dried pasta, an old magazine, and old plastic spoons. I hope you give one, or all of them, a try! :)
Step 1: String Tree: Materials Needed


This spool of green string had been in our family cupboard since I was 4 years old. It needed some use. Since the tree is so small, I used sugar sprinkles as ornaments. Awwww! ;)
- piece of paper
- tape
- scissors
- plastic wrap
- petroleum jelly
- white glue
- water
- string
- sugar sprinkles
- craft adhesive (like E6000)
Step 2: String Tree: Making the Base


Roll the paper into a cone.
Tape up the sides so it won't unravel, then cut the base of the cone so it will stand up straight.
Wrap the cone with a layer of plastic wrap, tucking the excess up into the base of the cone.
Cover plastic wrapped cone with a light layer of petroleum jelly.
Step 3: String Tree: How to String It


In a bowl, dilute some glue with a bit of water and mix well.
Begin soaking the string in the glue mixture several inches at a time.
Starting at the top of the cone, wrap the string around several times, keeping the end of the string tucked under.
Continue soaking more string and wrapping it up and down around the cone randomly.
When you're happy with how much you've wrapped it, cut the string and tuck it under another piece. Leave it to dry overnight somewhere rather warm.
Step 4: String Tree: Finishing Touches


Untuck the plastic wrap from under the cone, then carefully remove the paper.
Gently remove the plastic wrap.
To add the ornaments, dab some dots of craft glue onto the tree, then add sugar sprinkles on top.
When dry, carefully remove any strings of glue from the tree.
Step 5: Pasta Tree: Materials Needed


I'm not a food waster, believe me! Oh, do I love my food! However, I had decided to try going gluten-free to see if it solved some health issues, and this open bag of pasta was staring at me, wanting a home outside of my tummy. I went with gold spray paint on the outside and red acrylic paint on the inside. Kind of reminds me of leaky arteries. I'm special that way. :D Anyway, you can use whatever colours you like.
- 1 foam cone, 8" in height or taller
- 1 cup dry penne pasta
- gold spray paint
- red acrylic paint
- paintbrush
- 1 piece of farfalle pasta
- craft adhesive
Step 6: Pasta Tree: Making the Base


Start by firmly poking the penne into the bottom of the cone at a very slight slight downward angle.
Keep making rows above them, staggering the pasta.
Build your way to the top, but don't crowd the top section because there is less foam to work with. You don't want the cone to break into bits.
Step 7: Pasta Tree: Painting It


Spray paint the tree in two coats. Let dry.
Paint all the front sections of the pasta openings with a bit of red.
Paint the farfalle pasta red. Let dry. Use craft adhesive to attach to the top of the tree.
Step 8: Magazine Tree: Materials Needed


This is one of the easier trees, but packs a great visual punch. You only need a few materials. :)
- 1 magazine
- spray paint
- stickers
Step 9: Magazine Tree: Folding the Tree


Starting from the back of the magazine, grab the last two pages.
Fold the two pages downward, making sure the top is a perfect, crisp point.
Fold the bottom right angle upwards.
Continue with the rest of the magazine, two pages for each folded section, until you do the entire magazine.
Go back to the first fold and bring the right edge into the spine of the magazine, but do not fold. Keep in a cylindrical shape.
Continue with the rest of the pages.
When you get to the end, fluff up each page cylinder from the bottom with your fingers. You might need to glue the magazine cover page to the back cover, but with a hard press of the pages, it should stay in place.
Step 10: Magazine Tree: Painting and Decorating


Spray paint the tree with one coat and let dry.
Paint on a second coat, let dry.
Place stickers around the tree to decorate.
Step 11: Plastic Spoon Tree: Materials Needed


This is the tallest tree of them all, and would look elegant with any colour plastic spoons you use. My parents used to cater food to donate to the community back when they were a bit younger. I found a massive box of those leftover plastic spoons in their storage. When I made this tree using them, it made my parents have fond memories of those days! :)
- plastic spoons
- wire cutters
- large and sturdy piece of paper
- tape
- hot glue gun with glue
- spray paint (optional)
*Keep the handles of the spoons after you cut them off. Use them for stirring, or in future crafts. :)
Step 12: Plastic Spoon Tree: Making the Base


I used a large thick piece of paper that came with the packaging to some floor mats I bought. Make a large cone by rolling your piece of paper into itself diagonally.
Tape the seams of the paper cone shut.
Fold the base of the cone inwards into itself to keep it even when it's standing up.
Step 13: Plastic Spoon Tree: Adding the Spoons


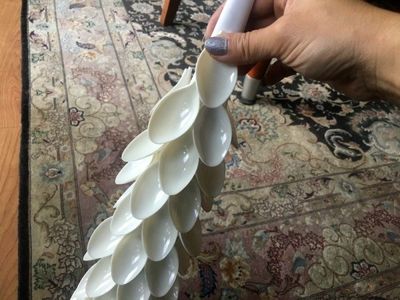

Cut the handles off the spoons using wire cutters.
Add hot glue to the most protruding part of the back of a spoon.
Starting from the base of the cone, start gluing the spoons to it, going all the way around.
Work your way up the cone by alternating the spoon placement so they overlap nicely.
Flip the very top spoon up the other way around to give the tree a nice point.

Second Prize in the
Holiday Decor


