

Introduction: Turn Your Old PC Into a Home Server

Have you ever thought about having a personal “Google Drive”? You can do this and more using CasaOS, your old PC, and a pendrive.
It opens on anything with a browser :D
Supplies
Materials:
- Old Computer
- 4Gb Pendrive
System Requirements: For this, you only need a computer that runs Debian 11, Ubuntu Server 20.04, or Raspbian. For more information, visit the compatibility wiki.
Hardware Used: At my house, I use an M11W Prime with the following specifications:
- RAM: 4Gb
- Processor: Intel Celeron N4020
- SSD: 64Gb
Memory Recommendation: If you are going to use it as cloud storage, I recommend having at least 520Gb of memory.
Step 1:

Download the Ubuntu Server file from the official website. After that, download Balena Etcher from the official website.
Step 2:


The installation is very simple, you can only use the keyboard to move through the HUD
Select the language
[IMG 1]
Select the keyboard layout
[IMG 2]
Select which installation you want, I recommend the Ubuntu Server minimized to avoid unnecessary files
[IMG 3]
Configure your network, as in my case it is connected to the network by cable I did not need to configure
[IMG 4]
As we are only going to use it for CasaOS, we can delete everything and install only the system
[IMG 5]
The installer will confirm the data you provided, just confirm and continue, it will make a 2-step confirmation.
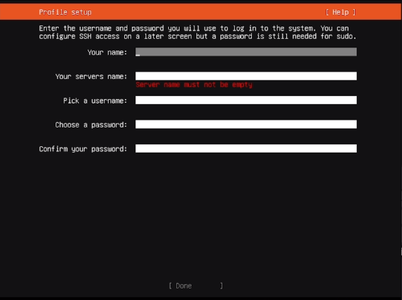
As only those who are connected to your network will be able to access your data, configure your name, the server name, username, and password for CasaOS
[IMG 6]
You don't need to select anything from this list, during the installation CasaOS will download everything necessary
[IMG 7]
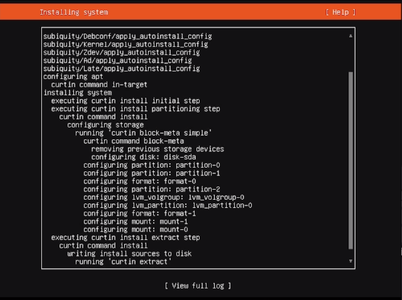
After that just wait, it will install and update what is available, you just need to wait and confirm the restart.
[IMG 8]
If there is a static screen with several commands just type “su” and fail the login, then Ctrl + C"
Step 3:


After logging in, go to the official CasaOS website and type curl -fsSL https://get.casaos.io | sudo bash in your terminal, enter your password and wait.
After the installation, an IP will appear. Just put it in your browser. It will ask you to create a login and password. I recommend creating an easy one so you don’t lose her login. And your home server is ready. You can access it from any device that has a browser.
Step 4:
As an extra, I will exemplify some uses that I have with it, such as an adblock for the entire network using Pi-hole, e-book reader using Calibre-web, HoloPlay as a music player, MySpeed to record the data of my network, Stremio as a general media player, and finally EspHome for my automations.
I hope it is useful for you guys :)

This is an entry in the
For the Home Contest


![Tim's Mechanical Spider Leg [LU9685-20CU]](https://content.instructables.com/FFB/5R4I/LVKZ6G6R/FFB5R4ILVKZ6G6R.png?auto=webp&crop=1.2%3A1&frame=1&width=306)


