

Introduction: Wanna-Be Little Debbie's Oatmeal Cream Cookie Sandwiches


Thanks to Instructables, I have been persuaded to divulge a long-guarded family recipe! Long before the internet came along, there were Little Debbie's Oatmeal Creme Pies and long before the world wide web offered a plethora of copy-cat recipes, my sisters-in-laws (all six of them) were plotting and planning devious schemes for wrangling this home-honed recipe from ye old recipe box.
A recipe with one or two "you-have-got-to-be-kidding-me? Really?" ingredients, it actually does classify as a secret recipe. It's not a demanding recipe. Whoever Little Debbie was, I believe she was a forgiving little gal. These are perfect for the beginner in the kitchen or for the shy souls who excel at just faithfully doing what the recipe tells them to do. No futzing, tweaking or over-thinking necessary! Although I spend most of my waking hours coloring outside of the box and keeping up after a lively crowd of people who expend their energy doing like-wise, sometimes a break is great. Then it's comforting to know that mock Little Debbie won't disappoint. Just a plain and simple, love it as it is, unpretentious, old fashioned kind of a recipe which never fails to please everyone, every time.
Please watch out though, your sisters-in-laws may not be able to handle your awesomeness either......
Supplies
1 cup brown sugar
1 cup white sugar
1/3 cup peanut, sunflower or mild nut or vegetable oil (butter, lard or coconut don't do well)
3 Tablespoons molasses
---------------------------------------------------
2 eggs
---------------------------------------------------
1 3/4 cups all purpose flour
1/2 teaspoon salt
1 teaspoon baking soda
1 teaspoon baking powder
1 teaspoon vanilla
1/8 teaspoon cinnamon
1/8 teaspoon ginger
-----------------------------------------------------
3/4 cup quick cooking oats
Step 1: Just Throw Them Together
1. In the bowl of a standing mixer or a hand held mixer, put the first four ingredients: either light or dark brown sugar, regular white granulated sugar, a liquid, neutral tasting nut, seed or vegetable oil, and whatever molasses.
Mix a minute or two. Even if the molasses don't blend in perfectly now, don't worry, it will next. Just mix until everything is all oiled up.
2. Add the 2 eggs. Cold/room temp, medium/large, chicken/duck, farm fresh/not; it doesn't make much never mind. Mix again kinda low or medium ish. Scrape the sides and bottom. Mix a few seconds til all wet and silky. Don't get all crazy and whip them to death.
3. Add the dry powdery ingredients. Mix gently again just til everything's all incorporated. Scrape it all in once and mix quick.
4. Add the quick oats. Mix or stir just til that's all joined in all happy throughout.
So there's your dough. Don't park it in the fridge. Keep it in good company out in the open til you have the baking sheets ready. Watch out for snitchers; it's one of those wildly addictive raw doughs.....
Step 2: Stop, Drop and Roll........

Pre-heat the oven to 350.
Or not. My preference is convection bake at 333F... But then again, my oven tends to run hot.
------------------------------------------------------------
Prepare the sheets.
Whenever I hear someone say they hate making cookies I ask two questions: do you use aluminum sheets and do you use parchment paper? Without those two things, I don't blame you-- your cookie baking moments are bleak.
So line 2 aluminum (Nordic Ware or Air Bake) baking sheets with parchment paper.
Step 3: Place

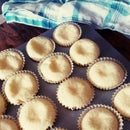
Using a largish scoop, roll 24-28 balls of dough.
If you're a good judge of size then you don't need to get all persnickety with actual dough scoopers or a scale. You want golf ball ish sized balls of dough. They need to be uniform because you will be pairing them up. Here, roundness is desirable. The trials I've made on making mini versions don't really turn out a tender cookie.
Place the balls of dough.
Make sure to give them more space than you think they'll need. They're gonna spread and flatten right out.
Step 4: Bake


Place in the oven. After 3 minutes, if they're not flattening out, go ahead and press them super flat with a spatula or bottom of a drinking glass or the like. They'll take 8-12 minutes. You are not looking for firmness. They'll puff up at first, then spread (or be flattened), then they'll crack and dome up a smidge. They'll be about 3 inches across.
Remove.
Leave on baking sheets for 2 minutes. Then slide the sheets off onto the counter. In ten minutes, loosen from the parchment. These should be entirely cooled and become somewhat crisp as they dry and firm up. Don't worry; they'll do their melt-in-your-mouth tender thing later when they meet up with the frosting. In fact, don't hurry to frost them before they are completely crisped.DO NOT put them in an airtight container yet.
Now is when I like find them each a matching partner. (Life is way sweeter this way!) It's much easier to do now than when they're frosted. Two together should surely be less than an inch thick. Just pair them up now for peace of mind and set aside (out of reach....) Try not to over think their imperfections lest you be tempted to cull the "misfits" while they await their sweet bonding cream...
Step 5: The Frosting


For the frosting you will need:
8 oz. cream cheese (room temperature)
1 cup powdered sugar
2 3/4 cups heavy cream (cold)
1 tsp. vanilla flavoring
-----------------------------------------------------------
Place the cream cheese and powdered sugar in a large bowl and beat on medium speed until smooth.
Turn the mixer down to medium-low speed. Pour the heavy cream down the side of the bowl in a very slow and steady stream, stopping every now and then to scrape the bottom and sides of the bowl with a silicone spatula.
When all the cream has been added, turn the mixer up to medium-high and whip until the frosting holds stiff peaks.
Fold in the vanilla extract.
----------------------------------------------------------------------
Put about a tablespoon of frosting on the flat, baked, underside of only one cookie from each pair of cookies. Don't spread it all the way to the edge or over load with frosting; just do a nice little plop in the center of the cookie as shown in the picture above. Take the matching bare cookie and evenly set it, underside to the cream, and gently press. Now, be sure to place them in a very shallow airtight container or wrap individually in plastic wrap or sandwich zip bag. (Stacking will cause them to stick and also to press their filling out later.) After about 2 hours, the cream will lend it's moisture to the cookies and they will be oh so ooey gooey like the real things. Keeping them in the fridge is recommended due to the cream.
Finally, show the sisters-in-law no hard feelings as you serve them these picture-perfect cookies!
Yields 12-14 complete sandwiches

Participated in the
Sandwich Speed Challenge


