Wood Coasters

133,611

769

54

Introduction: Wood Coasters

About: Build.Share.Destroy.Repeat. Follow me and try a few of my projects for yourself!

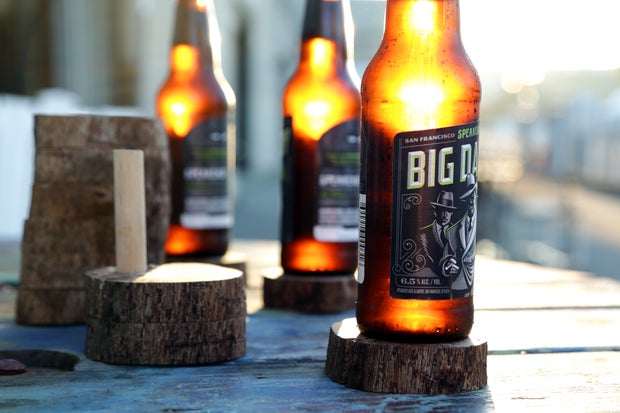
Rustic wood coasters made from a fallen tree, when stacked together look like a tree limb. Simple, tidy, and fun!

Instead of burning that old tree in the backyard, reuse it and make it into something awesome! These stackable coasters align on a spindle attached to the bottom coaster and are a great way to protect your table top. Making your own is super easy, and a great way to give an old tree a new life.

Ready? Let's make!

Step 1: Tree Limb

There was a an oak tree in my neighbourhood that had a few dead limbs. Because the tree was near power lines the city came by to trim the dead branches. I happened to be nearby when they were working and asked to keep a few of the larger sections of branch arms.

The tree limbs had been dead a long time, so the wood was already dry. You’ll need wood with a moisture content of about 10% or less to avoid the wood splitting after you work with it (ideally 6-8%). You can check the moisture content of wood by using a moisture meter. If you have 'greener' wood here's a great Instructable for drying wood at home.

Using a handsaw I chopped the oak branches down into a manageable length and then brought it into the workshopshop. To make these rustic coasters we'll need a tree branch that has a diameter larger than beer bottle, that way it can accommodate all types of drink containers, like wide mason jars.

Step 2: Measure

I wanted thick coasters so that when they are stacked it looks like a big section of wood. I roughly measured out that each coaster would be about 1 ½”.

Step 3: Cut Branches

Setting up a stop block on the chop saw that matched the thickness of the coasters I carefully cut the branch into 1 ½” pucks.

Step 4: Drill Dowel Opening

In order to line up the coasters when they are stacked a matching reference hole is drilled into each piece which will have a dowel in it. The bottom coaster will have an opening drilled only halfway through, which will house the dowel to align all stacked coasters on top.

I used a forsner drill bit that was slightly larger than the ½” diameter dowel I was using so the coasters could easily slide off. After drilling the first hole in the top puck, stack and align the next piece and carefully mark the opening. This will allow your pice to line up perfectly when stacked.

On the bottom coaster I used a matching ½” forsner bit, and only drilled halfway through, so that the dowel would fit tightly. Drill carefully and not too close to the edge so that the wood pucks don't break.

Step 5: Glue Dowel

After drilling the dowel can be glued into the bottom coaster. This coaster will be the spindle that the other coasters will stack on top of.

Step 6: Stack Coasters

After the glue has dried on the dowel in bottom coaster stack the remaining pucks in order on top. We'll need to trim the dowel flush at the top coaster.

Step 7: Flush Cut

Using a flush cutting saw I trimmed the dowel to match the top coaster, careful not to gauge the top coaster with the sawing action.

If desired you can sand the surface of the coasters. My coasters were in good shape from the chop saw and didn't require any additional sanding.

Step 8: Finish

I coated each coaster with Danish Oil, which really brought out the grain and helped seal the wood against the moisture they would inevitably come in contact with. I applied 2 coasts of oil, allowing about 30 minutes between coats, excess oil was wiped clean.

Step 9: Stack and Serve

Stacked together, these coasters look like a branch, lift one off and you're ready to serve up a cold one. Whether stacked or separated, these attractive coasters would be a great additional to your rustic cabin or maybe just in your urban hideaway.

Have you made your own rustic wood coasters? I want to see it!

Happy making :)

5 People Made This Project!

Recommendations

  • Big and Small Contest

    Big and Small Contest
  • Game Design: Student Design Challenge

    Game Design: Student Design Challenge
  • For the Home Contest

    For the Home Contest

54 Comments

0
PeterJ166
PeterJ166

1 year ago

Could you make a cutting board using the small coaster idea

0
donniedabsolute1
donniedabsolute1

3 years ago on Step 9

Im new to this reclaimed barnwood idea but I'm very interested. I have two extremely old barns probably early 1900's and I'm pulling pieces as I can and searching for ideas on what to do with it. I happen to grab a couple support post that turned out to be Cedar so i gave it a try. I would really love to have a 3 month subscription so can learn more ideas and possibly market this...Thanks again
Donnie Davis

20190713_020108_Burst01.jpg20190713_020300.jpgcedarpost.jpg
0
mypassionbb
mypassionbb

Reply 3 years ago

Donnie D - the color u've gotten from ur BARN wood is beautiful. And the pieces of what u have for ur next projects (& what cant be seen) OMG!! 1 Jealous Woman Here LOL Those are some GORGEOUS pieces of Barn Wood!
Keep on Creating ~ Mo

0
baltarmarina
baltarmarina

5 years ago

Hi Mike

The coasters are beautiful! I'm trying to transfer photos to the wood and then use them as coasters. I've just had a fail as the finished I use has marked with my cold glass of water. Ops.

So I need something to make them waterproof and heatproof. Any ideas??

Thank you so much :)

0
mikeasaurus
mikeasaurus

Reply 5 years ago

You could seal each coaster with an epoxy resin, which would be a shiny and thick coating like this. It's durable and water resistant, though it may not stand up to heat as well. Always make a test piece before committing, you can work out lots of kinks along the way :) Good luck!

0
darnskippy
darnskippy

5 years ago

You may try tung oil. Pulls out the colors of the wood, then a polyurethane coat to preserve. I do this with all my carvings.

0
Ninzerbean
Ninzerbean

6 years ago

I was looking around for wood ideas because of Hurricane Matthew's leftovers and found your ible - stupid me I cut coasters for the 'survivors' with my chainsaw, covered them with Elmer's glue on both sides to prevent cracking, but they are too thin now to sand off the glue, I am going to go find another fallen tree - I know just the one - a long leaf pine, which is a hardwood - and do this your way. Will post when done. Thanks for sharing your ideas. All the time.

BTW when working with green wood, or wanting to eventually, always seal the wicking ends (the sides without the bark) with Elmer's glue so moisture can evaporate slowly, preventing checking or cracks.

0
mikeasaurus
mikeasaurus

Reply 6 years ago

Sealing the ends is an excellent tip! Thanks for sharing, Nina.

Looking forward to seeing your wooden coasters, they're going to be even better with a story attached to them :)

0
boone288
boone288

7 years ago

Here's the ones I made I left the bark on

15, 1:19 AM.jpg
0
skotek
skotek

Reply 6 years ago

First off, this look fantastic! I have slices from a willow tree that have that saw-tooth outer edge of bark just like this. I've been searching for a good sealant, or method, to provide extra strength for holding these saw-teeth on. Any suggestions!?

0
boone288
boone288

Reply 6 years ago

what about I used about three coats of outdoor polyurethane over the bar and that seem to keep it up keep it attached

0
Yonatan24
Yonatan24

Reply 6 years ago

Great job! Did you laser engrave those?

0
boone288
boone288

Reply 6 years ago

no I used a wood burner

0
mikeasaurus
mikeasaurus

Reply 7 years ago

Those look great, and I love them with the bark on.

Thanks for sharing your version of my project, enjoy the Pro Membership!

0
NicoleL55
NicoleL55

6 years ago

I have my wood cut, fresh off an apricot tree, should I dry the wood before vanishing it? Someone suggested doing it in an oven

0
mikeasaurus
mikeasaurus

Reply 6 years ago

Wood that has not been dried termed "green", meaning it may shrink and crack as it fries out. Thinner sections of wood (like the coasters you cut) could be dried in the oven at low temperatures over the course of a few hours. Alternatively you can let them air dry, but that can take months (years for larger/thicker pieces of wood).

0
McCraic
McCraic

7 years ago on Introduction

I love the stacking idea. I made started this last year and planning on doing it again this year. I collected the stumps of family members Christmas trees and let them dry over the year in my garage. Then I sliced them up to make coasters and ornaments. I sealed with clear poly because I was afraid the moisture from glasses would cause the wood to split but apparently that is not the case from what I hear. The ends that got too close to my hand to make any more cuts with I made into simple candle holders which my mother-in-law loves and has on her table all year long. I'm loving the dowel idea and will 100% be adding this to this year's batch which has grown. I have 6 stumps drying in my garage this year as well as a few I harvested from neighbors trees when they put them out at the curb after the holiday.

IMG_3426.JPGIMG_3383.JPGIMG_3382.JPGIMG_3461.JPG
0
mikeasaurus
mikeasaurus

Reply 7 years ago on Introduction

Reusing old holiday trees is a great idea. Your designs are nice, I hope you can make a few new projects from last years trees. Please share pictures of your completed tree projects when you are done.

Thanks for sharing the pictures, enjoy the Pro Membership!

0
jmc75
jmc75

7 years ago

Always like a good coaster set. I used a dowel to help align these plywood coasters: https://www.instructables.com/id/Plywood-coaster-loaf
Enjoy your work!

0
mikeasaurus
mikeasaurus

Reply 7 years ago on Introduction

The small dowel is a good idea to keep things aligned in your plywood coasters.

I like how similar ideas using dowels and coasters can come out entirely different. :)