

Introduction: Aromatherapy Fart: Laughter Is the Best Medicine


Recently an animation colleague of mine was diagnosed with lymphoma and began receiving chemo treatments. When he revealed the news to all of us via Facebook, he requested that we joke about it; that we keep him laughing through the pain with silly drawings, made up names for his cancer, wig recommendations, and anything else that would help "make [his] chemo farts more tolerable".
So in the spirit of his request, I decided to make him a squeezable hand held chemo fart with an aromatherapy component.
Aromatherapy is clinically recognized to help relieve headaches, stress, nausea, and anxiety. My mother is a Clinical Certified Aromatherapist and has also had excellent results helping her clients relieve symptoms related to cancer treatment. Plus, these Farts will make you laugh, which may be the best medicine of all! Read on for a quick and easy aromatherapy plush guide sure keep your friends smiling.
Step 1: You Will Need...


For the Plush:
Medium Brown Polar Fleece
Pink Felt
Tracing Paper
(2) Safety Eyes (black or your color choice)
Pink and Brown Thread
Needle and Pins
Approx 2 Fistfuls Poly Fill
Fabric Scissors
Marking Pen (Sharpie or gel pen)
For the Aromatherapy Component:
Dried Herbs of your choice. I used Lavender because it is well suited to the goals of this project, being both potent and well known for use in relaxation and calming. Mint is another soothing smell good for anti-nausea, though you may find dried mint to be a more subtle scent than you'd think. Here's a nice list of practical herbs you can peruse and see what might work for you. The author describes culinary and medicinal uses, which herbs are best dried, and what qualities/ effects you can expect from them.
*Note: Do not use essential oils to scent your plush!They're great, but not for this project. They would dry up over time and leave you with little to no scent, plus some EOs can be irritating to the skin or are not child/ pet safe. For example, peppermint oil is not recommended for use on very young children or in close proximity to cats.
Step 2: Pattern Pieces


So what does a cute little fart look like?
I had a design in my head, and I think the best way to relate it would be a simple cloud puff shape. For you Adventure Time fans, you might think of Lumpy Space Princess, but with fewer lumps for easy sewing.
Sketch your main "body" piece on your tracing paper. Remember: simple=cute! Fewer large lumps will translate better to plush than lots of little lumps. When it comes to size, consider your recipient. My gift was for a guy, so I kept this hand held size. He'll have something to squeeze while he gets biopsies, but he won't feel like he's bringing a "stuffed animal" to the dr. If your gift recipient is a fan of plushes, try doing this at a larger, huggable size!!
When you are satisfied with your shape, cut out with scissors.
Next, sketch a little heart for him. This will go near the center of the body shape. You can size the heart up or down, just make sure large hearts stay within 1/2 inch of your body shape border all the way around (so it won't get cut off by your stitching).
If you're like me and are terrible with symmetry, cut out one half of your heart, fold in half and trace the edge again to get 2 matching halves.
Step 3: Fabric Pieces


Pin your body pattern piece to your brown fleece. Be mindful of which side of the fleece you would like to be the outside. I like the nubbier grain for plush toys (let's call this the "good" side), so I'm doing all my tracing on the smoother back side.
Trace all the way around with a marking pen, leaving an extra 1/4 inch for seam allowance.
Cut out your shape.
Now, pin your fabric shape to the fleece again, good side up.
Trace all the way around, this time right up against the edge of the fabric piece. Your seam allowance is built in, so you don't have to leave space a second time.
Cut out the second shape.
You will now have two mirror image body shapes.
For the Heart:
Trace your template piece into your pink felt and cut it out.
Cutting tip-- You may get a cleaner shape by cutting a rough chunk around the heart to separate it from the larger felt sheet, then going back and doing more precise cuts on your line.
Step 4: Eyes


Grab your 2 plastic safety eyes and start moving them around on your body shape. Lay all the pieces out and decide which end of your fart cloud you like for the "head". Move the eyes farther apart, or up and down. Different arrangements will evoke a different personality for your cloud, so play until you have a configuration that amuses you.Just remember to keep everything away from your edges. I liked mine best when the little eyes were close together and heart was centered right where the chest would be.
When you have decided where your eyes will go, lift them up one by one and make a small mark indicating their placement.
Snip a small hole at each mark, using just the tip of your scissors.
For those who haven't used safety eyes before---
Insert the stalk of one safety eye through the front of a hole.
Flip fabric over so you're looking at the back side.
Take one of the plastic discs that came with your safety eyes, and fit it onto the stalk. Be mindful of the direction of the plastic so the disc locks the eye in place properly.
Press down until the disc moves over the ribbing of the stalk and fits snugly against your fleece.
Repeat with second eye.
Step 5: Mouth


Load a needle with your pink thread. I suggest doubling your thread to get bold line work in fewer stitches.
Below your eyes, stitch a simple little V shape. Start from the back side to hide the knot at the end of your thread. I only needed to go over each side of the V twice before I was happy with clarity of the shape.
Pull your thread gently but snugly to ensure there won't be any lumps in your mouth stitching.
Knot off the end of the thread on the back side and clip.
Step 6: Heart Applique


Secure the felt heart in place with a pin.
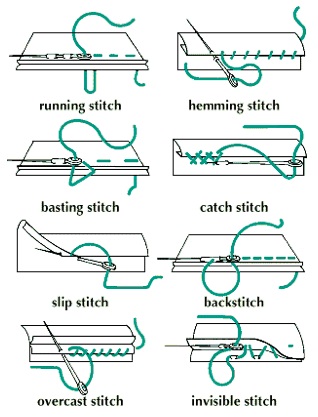
Using your pink thread, secure it to the body shape using a running stitch. This is one of the easiest stitches for beginners and gives your project a cute handmade look. No need to double your thread here --single will do fine.
Go all the way around the heart and knot on the back side when you are finished.
Step 7: Sewing the Body


Sandwich your good sides together and pin all the way around.
You can machine sew the border if you are comfortable with sewing around curves. Sew 1/4 inch in from the edge since that was the allowance we made in our patterning. I set my thread tension to a 2 since the polar fleece is a bit thick.
Your thread will not be very visible but I used a matching brown just to be extra polished looking.
If you do not have a sewing machine or are not comfortable working with tight curves, you can hand stitch the border with a running stitch. I hand sew most of my plush projects for maximum control.
Leave a 1 1/2 inch gap open at the end! You'll need to leave a small opening to turn the form right side out.
Remember to clip your curves. Using the tips of your fabric scissors, make small notches in your seam allowance area all the way around. This will help your shape stay smooth and round when all those inside bits fold in together, rather than looking chunky/ bulky.
Step 8: Stuffing


Turn your form right side out, being gentle with the stitching at the mouth of your opening. You may employ a capped pen to help you round out all his lumps rather than trying to jam your hand in there.
Take a large pinch of poly fill. Insert through the opening and gently push into the far end of the body.
Repeat the stuffing process, filling the parts farthest from the opening first and working towards yourself. Squish the filling around to distribute evenly. Level of firmness is up to you.
If you'll be including a portion of dried lavender (or other scenting component), stop when he has a little bit of slack left in him.
Take a portion of your dried lavender. I started with a generous pinch that I'd say is approximately 1 TBPS.
Stuff the lavender into the opening, working it toward the center of the body, beneath the heart. Don't worry if little bits get stuck in the stuffing along the way. All will be hidden and will still contribute to your lovely scent. Having the lavender generally under the heart is just a good way for your Fart recipient to know where the bulk of the aromatherapy component can be found fr most effective use.
Give the heart a test sniff. If you think he needs more lavender, add another pinch of the same size. I bought my lavender here and it was super potent. No more than 2 pinches needed!
Step 9: Closing Up


Use another pinch or two of poly fill to complete stuffing. You want him to be full bodied, with all "limbs" filled out.
Roll the edges of your gap together and secure with pins.
Using brown thread, close the gap with a hemming stitch. It should be nearly invisible.
Securely knot off and clip excess thread.
Step 10: DONE!


I bet you never thought a fart could be so cute!
The gift was well received by my friend...and tons of his FB friends, it seems. It may look like a simple stuffed toy, but it delivers a threefold attack on his illness. Now he'll have something to squeeze like a stress ball when things get rough, something pleasant to smell when he's feeling nauseated, and something to look at and laugh, and know he has friends who really care!
I hope I've inspired you to make a funny aromatherapy plush for yourself or someone you know. I keep one around for when I have migraines (huffing some lavender is soothing and often leads to a nap so I can sleep it off!). If you liked this Ible, consider tossing in a vote for the Home Remedies challenge :)
You can find my organic dried lavender stuffed Aromatherapy Farts on Etsy.

First Prize in the
Home Remedies Challenge


