

Introduction: Articulated Rotary Tool Stand (ARTS)


As far as I know, this is mostly original the only inspiration was a desk lamp, and a desire for a better holder for my Dremel when using the flex shaft. I built my first Articulated Rotary Tool Stand about 8 months ago, and it has worked well, but I felt I could build it better, and with a pile of maple flooring from my alma mater's gym, I figured why not upgrade, it's the perfect opportunity!
If you want to build your own, you don't have to use scraps, but really, you don't need much wood, so why not use scraps? Also, this is a very easy project, and you get to learn from my mistakes.
Materials:
- for this design, I used two 24" lengths of maple flooring ripped to 4 3/4" square stock, plus a little bit extra flooring for the pivot and hook holder.
- less than a square foot of 3/8" plywood
- 8 1/4" x 3" bolts
- 8 1/4" wing nuts
- 32 1/4" wingnuts
- 1 3/8" x 4" carriage bolt (a regular bolt would be fine)
- 2 3/8" washers
- 1 3/8" wing nut
- wood glue
- 4 1/2" screws
- 5 screw eyes, bent open
- 6" of 1/4" steel rod
- mini bungee cords
- Tools:
- Table saw
- Jointer
- Belt/disc Sander
- Hammer
- Drill press
- Hand drill
- Hand saw
- bandsaw
- marking knife
- square
- marking gauge
- scissors
- dremel with cut off wheel
- some other ones that I forget now, but will be clear later.
Step 1: Inspiration and Design


As I mentioned my inspiration came from a desk lamp. I've got a couple of pictures of it up there.
I assumed that I could simply measure all the pivot points, as well as the bar lengths, divide all those numbers by the thickness of the limbs, and I would have a ratio, with which to enbiggin the whole thing!
It didn't work out, but I got all the measurements. The upper limb was 14", the lower limb was 18" and the limb thickness was 3/8". I planned on plugging 3/4" into a ratio and using the result, but the lower limb ended up 36" long. so, I threw all that work out, and made both upper and the lower limbs 24".
Attachments

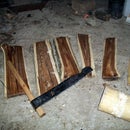
Step 2: Limb Prep and Cutting


Super easy peasy step, all you have to do is take a board and rip out 4 24" 3/4x3/4 pieces of wood.
However, since I'm working with old gym floor, and it still has all the nails in it. . . I pulled nails and removed the plywood subflooring, I have a nifty trick for getting the pesky nails out, be sure to check the images.
After pulling nails, I used my chop saw to cut off the ends of the boards because the tongue and groove gets in the way. It is not ideal to cut the limbs to length at this moment.
After chopping the ends, I jointed the groove side of the board, as it was the least damaged from it's previous encounter with someone else's saw. After jointing, I ripped off the gnarly edge, cut the board to 24" and ripped out the 3/4" peices; I was able to get two 3/4"x3/4"x24" per floor board.
After initial ripping, I turned the boards on their sides, and passed them through the saw to bring them closer to square.
Step 3: Laying Out and Cutting the Joints, and Drilling the Pivot Holes


The first set of joints I fabricated using my ratio system, and they weren't quite right, I ended up not being able to use the 3/8" subfloor ply, and had to grab a small piece of ply out of my scrap in order to recut them
The reason I had to remake them was that the arms wouldn't close up very tightly, after the redesign, they still wouldn't lay flat, but were close enough to make me happy.
I glued the templates to the plywood, and used carpet tape to hold two pieces together. I band sawed the joints, then center punched the pivot points, and marked and center punched the pivots on the limbs. Two of the limbs get a 1/4" hole in the middle as well.
I double checked the alignment on my drill press, and then drilled all the holes. On the limbs I also chamfered the holes with my countersink to get rid of tearout.
Step 4: Assembling the Skeleton.


Almost done, wow, that was fast right?
Any way, I cut out some 1/4 mild steel rod, 2 1" pieces and 2 2" pieces. I rounded the ends over by chucking the rod into my drill and power filing it, if you do this, be sure to move the file while doing it otherwise you'll wear out the file. I then cut a small groove on one end of the 1 inch pieces, and on both ends of the 2 inch pieces.
The 2 inch pieces went into the limbs with holes in the middle, and the 1 inch pieces went into the pivot base, I hammered in the limb posts using dog holes on my bench, and I used a little C-clamp to press fit the posts on the pivot base.
I also cut two small pieces of wood to fit between the triangle end and the pivot base, glued them in place, and on the pivot base I reinforced it with screws, I also drilled the 3/8" base pivot hole and hammered in a carriage bolt.
Up next, adding some tension to the situation
Step 5: Ligaments of Rubber


At first, I tried springs, I dropped 20 bucks on springs to try it. I just couldn't get metal springs to work, so I bought twenty mini bungee cords from door-store, no Window Warehouse, no, ah! Walmart, I bought them at Walmart.
through experimentation I found I needed 3 on each side for the bottom limbs. However, I had to shorten the bungees about an inch, or else they would fall off when loose. To neating the appearance, I modified some of the hooks so I could pass three bungees through one hook, and hold everything in place with zip ties.
The upper limb only took 2 on each side, and didn't have to be shortened, I used one hook two bungees for each side.
I then drilled for and screwed in some hooks to route the power cord through and that was it.
I already had the pivot mounted to the wall and it is working well, but If enough interest is expressed I'll make a new pivot and add a step here.
If you have questions, feel free to ask I will do my best to answer them

Participated in the
Reclaimed Wood Contest 2016


