

Introduction: COI - Light the LED


More by the author:


About: ABOUT FCFI FCFI is a community oriented public workshop where people can meet and work on their projects. We provide a facility that is open 10 AM to 10 PM, 6 days a week (with plans to eventually be open 24/7…
Hardware:
- Seeed Touch Sensor
- Seeed LED
- Intel Edison
- Computer
- 2 Mini usb cords
- 2 jumpers
- static mat
Setup:
- Plug in Grove base shield into your Edison(doesn't have to be an Intel Edison, it can be an Arduino board )
- Plug jumper cable into port D3 (Make sure that ground is in the ground part)
- Plug the same jumper cable into the Grove-button (again make sure its plugged into write)
- Plug a new jumper into D6
- Plug the new jumper into Grove-LED
- Download code at end of page
- Upload code into Arduino IDE
- Upload code to Edison and push the button
Software:
Open the Arduino Edison IDE and use the following code:
const<br>int pinButton = 3;
const
int pinLed = 7;
void
setup()
{pinMode(pinButton, INPUT);
pinMode(pinLed, OUTPUT);
}
void
loop()
{if(digitalRead(pinButton))
{digitalWrite(pinLed,HIGH);
}
else
{digitalWrite(pinLed,LOW);
}
delay(10);
}
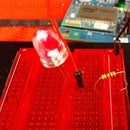
Result:
The finished product is a Morse code machine (of sorts). The LED lights as the button is pushed, sending information about the location of the enemy, SOS, answers to questions ... . Learn Morse code and tap out fun messages to your friends and family. We will be working to develop this circuit into a more refined Morse Code generator.
Experience:
You should be careful when trying to do this. Always be sure to use the static mat or the machine can malfunction. It may also shock you so be careful.
Be sure the ports are secured or the code may not activate the responding port.


