

Introduction: DIY Weight and Barbell Storage Rack


I got tired of stuff laying all over the place so I decided to make a rack for all of it. Its very sturdy, I weigh almost 200lbs and can sit on the top tray without any movement. The way the bottom trough is setup it should hold as much weight as you can fit in there.
The silver bar in that picture is not an olympic size bar, its a little stubby thing. The distance between sleeves on my olympic bar is more than wide enough to fit on there and sit pretty.
I used almost an entire 1# box of 3" wood screws to make this, if I were to make it for personal use I'd use lag bolts just to make it look a little beefier.
This is a very cost effective way to make a rack for weights and bars compared to commercial options. I'd say lumber and screws total I have $30-35 invested, you could buy cheaper 2x4's and save a few bucks. Add in the quart of paint and a paint brush and you're looking at $45-50.
This is my first How-To, so please let me know if theres a way I could streamline this process and make it easier to understand.
Step 1: Tools and Materials
1 pound box of #8 x 3" wood screws
(If I were going to make this for home use, and wanted it to look beefy, I would have used lag bolts)
(1x) 2"x8"x8'
(7x) 2"x4"x8'
Circular saw
Jig saw
2" hole saw
1/8" Drill bit (if you like drilling pilot holes for the screws)
Drill
Step 2: Cut Lumber
(2) 2x4's @ 46"
(2) 2x4's @ 43"
(7) 2x4's @ 40"
(2) 2x4's @ 20"
(2) 2x4's @ 14"
(2) 2x8's @ 26"
Step 3: Assemble the Bottom Section.


Please excuse my scribbles not being to any sort of scale, hopefully they help.
It won't matter what order you do this in, but heres where all the pieces go.
- The base is comprised of (2) of the 40" 2x4's as the long side-to-side bits. Those should be attached to the outer front-to-back 2x4's which are 20" in length. Make sure the inside width on the 40" pieces is 10", making the outside width 13", which ever is easier for you to envision.
- I didn't have the plates at home when I made this, I knew they were 17.7" OD. I sketched one out on the floor of the garage and eyeballed the width I would need for the trough. 10" inside width ended up working well for the Olympic size plates, the smaller diameter plates also fit nicely.
- The (2) 2"x8"x26" will be used for the main uprights. They get mounted OUTBOARD of the 20" front-to-back 2x4's.
- Its not a square number to measure off both sides of the 2x8 to the end of 2x4 to get it centered, you'll just have to play with it to get it centered up.
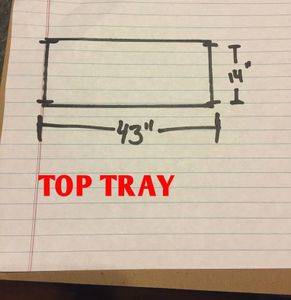
- For the upper tray I built the outside frame first, then stuffed the inner boards in. The outside frame consists of the (2) 43" 2x4's and (2) 14" 2x4's.
- The outer frame will be assembled UPRIGHT/ON END, not on their side, refer to the picture of the actual stand to see what I mean. These will make a small lip once the base is put in to keep stuff from sliding/rolling off.
- Once the outer frame is assembled, the inside width should be 40"x14", this is where (4) of the remaining (5) 40" boards will be put. Lay/hammer/beat them in there, side-by-side, and screw them in from the ends, through the 14" 2x4 ends.
Step 4: Bar Holders/Uprights


This part feels tricky for me to put into words, so I did some doodling to try and help you sift it out.
The uprights are where you'll use the last 40" board and the (2) 46" boards.
- Take the 46" boards, measure up 22.5", mark there, go up to 26" and mark there.. Then cut in 1.5" as seen in pictures 1,2 and 3. You can also see how they're supposed to fit in the overall finished picture.
- From the TOP of the 1.5"x3.5" notch, measure up 5", 10" and 15". Mark the center of the board, aka, 1.75" from either side.
- Those marks at 5, 10 and 15" and centered in the board will be where you drill a 2" hole with the hole saw drill bit.
- Drill those holes.
- Once you have your holes drilled its time to notch it out to hold the bars.
- Take a framing square and mark 45* to where it'll intersect the top-right and bottom-left of your holes.
- MAKE SURE YOU CUT TOWARDS THE LOWER NOTCH YOU CUT IN STEP #2
- Get out a sander if you care to make it pretty and clean up what you can.
- Attach the base of above 46" pieces INSIDE the front-to-back legs on the base, it should fit up in the corner the side-to-side and front-to-back pieces.
- Put a few screws through the area with the notch and into the upper tray.
- Take the remaining 40" piece and put it across the top, connecting the uprights to add a little rigidity.


