

Introduction: Female Mandalorian Armor Kit


Being the huge nerd that I am, several years ago I decided I wanted to make a full custom Mandalorian armor kit, and I started making it out of things I already had. While the materials I've used aren't exactly high quality, they are cost effective, as many of the pieces are made out of things you can find around your house, or are incredibly inexpensive. The total cost for this build was around $86 (not bad for a complete kit), and I learned a lot, and had a lot of fun while making it. This Instructable is long and incredibly picture-heavy, but I hope it will be worth reading to y'all.
A side note: Many of the pictures have further explanations on them that clarify the instructions.
Materials:
Body armor
-Corrugated and thin cardboard
-Foam (Medium thick EVA is best, mine was some random packing foam I salvaged)
-Duck Tape (multiple colors)
-Hot glue gun and sticks
-Painter's tape
-Scissors/Xacto knife
-Elastic and Buckles
-Velcro
Gunbelt
-Leather/fake leather (I used the ripped fake leather off some old barstools, not the best choice but it cost me nothing)
-Rivets and Rivet tools or pliers
-Belt buckle
-Thin cardboard
Fabric parts
-2 yds of Broadcloth
-Sewing materials
Helmet
-Stiff cardboard
-Hot glue
Miscellaneous
-Paint
-Shirt, pants, gloves and boots
-Some kind of sealer, I used Mod Podge but it didn't work very well
-Used gift cards
-Thick paperclip
-Large glow stick connectors
-Toothpaste caps and other random plastic bits
Resources:
How to make a Cardboard Costume Helmet-Honus (For the helmet templates, super helpful, thank you Honus!)
Eitanya's Sabine Wren templates (I used these for the shins)
Step 1: Upper Body Armor


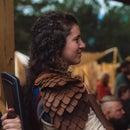
I drew a quick mockup of the kit, and chose a color scheme and what style armor I was going to make. Reference images from the internet were super helpful for figuring out the final look, as was the Mandalorian Mercs website which has many resources for all the parts of a kit. I started by snugly wrapping my torso in painter's tape, and drawing the chest armor on in front of a mirror (Be sure so stand up straight while doing this!). I didn't use cling wrap first or use a t-shirt I didn't care about so I had to peel the tape off the shirt while keeping its shape. I then cut out each of the armor shapes, and started hot gluing small pieces of foam on the back of each tape template to give them some bulk (I made the collar and shoulders afterwords, see templates). The foam I used was 1/4'' open-cell packing foam, which means it does not have a smooth surface and looks like it's made from many small bubbles. Because it doesn't have a very smooth surface I didn't want to use it as the outside surface of the armor, and it's not the kind of foam that can be heat shaped, so for the two chest pieces and the shoulder bells I glued small pieces on at a time so the tape wouldn't flatten out. For the collar and the lovely mustache looking piece which is actually a gut plate, I used one large section of foam for each. For the back piece I didn't use a painter's tape form, I just got a large square of foam and had my sister help me draw on the pattern.
I needed something to color all the plates and give them a smooth surface, and Duck Tape was the best option for accomplishing both at the same time, so I covered each piece in black tape, using large sections so it would look as smooth as possible. For the rounded plates I cut darts into the strips of tape so it would be smooth over the curves. When I covered the back and collar plates, I put strips of tape on the backside of both, sticking one end of the tape to where they meet at the shoulder and pulling the tape tight to make the plate curve a little.
Then came the fun part, adding the designs. The silver and purple were a simple matter of following my drawing, but for the red claw marks I drew on strips of Duck tape with a pen, then cut the designs out and carefully stuck them to the armor. The designs on the shoulder bells were done with acrylic craft paint.
All the plates are attached to the shirt with strong velcro that is glued to the back of all of them.
Congratulations on making it through that essay! Now on to the next...

Step 2: Legs


My leg armor is comprised of three kinds of pieces, thighs, knees, and shins. I started with the shins, using eitanya's Sabine Wren shin armor. I pieced the template sheets together using the x and dot marks, and made sure they fit before tracing it twice on a sheet of corrugated cardboard. I then covered them with black duck tape, using strips slightly longer than the cardboard so no ends would show on the front. I added the designs the same way as the chest plates. The braided elastic straps and buckles are from Hobby Lobby, which I hot glued to the cardboard and ran through the buckles. The elastic is glued back to itself which does take away the stretch of that section so don't make the end you glue down too long.
Using a picture I found on the Mandalorian Mercs website for reference, I cut out two foam shapes for the thighs. I covered them in tape, and made them curve a little by sticking tape to one side of the back of each and pulling it tight before sticking it down. Both are reinforced with a piece of thin cardboard taped to the back. The straps are wider braided elastic and are hot glued as well. I may end up sticking some velcro to the back of each plate to help hold them up.
The knees are based off eitanya's templates, but I modified them to be a little longer and narrower at the top (see my templates). I cut two knees out of corrugated cardboard, and after sticking tape to the back of each to hold the darts together, I covered them in tape. I held one knee plate in the proper position on my leg, and using the same wider elastic as I did for the thighs, I stuck one end of the elastic under the armor plate and measured around the back of my knee. Then I cut off two identical lengths of elastic, and hot glued them to each plate (no buckles for comfort).
Step 3: Arms and Hands


For the vambraces, I started but cutting out two pieces of thin cardboard roughly 2/3 the length of my forearm, and wide enough to meet around my arm. They are narrower toward the wrist and wider towards the elbow. I then hot glued foam pieces about 2'' narrower to the inside of each vambrace to act as padding, centering them on the cardboard. Using images of Sabine Wren's vambraces for reference, I built up the boxes on each vambrace using thing cardboard and hot glue. The blaster barrels are two large glow stick connectors painted black and glued in place, and all the little buttons are cardboard. The three darts on the left vambrace and the point of the grappling line I made out of Instamorph, a thermoplastic that is soft when heated, they were originally white but I painted them silver. The 'knife' blade is a piece of sturdy plastic cut to the right shape and painted silver, and to make a spot for it I cut a hole in the cardboard box shape with an xacto knife. I attached two sets of buckles to each with small duck tape straps that are hot glued down.
To finish it off, I got a pair of light running gloves from Wish.
Step 4: Gunbelt


The gunbelt is loosely based off Sabine Wren's belt, and my blasters are Westar 35s, just like hers. I made the guns first, and using reference images from I internet I cut out shapes on thin cardboard for each side and piece. Then I hot glued the pieces together, putting scotch tape over each outside seam to strengthen them, and glued on the raised panels on the sides of each gun. I used acrylic craft paint for the base colors and sharpie paint pen for the silver details, and sealed them with Mod Podge (I would not recommend using Mod Podge, they stick to the inside of my holsters). The guns are hollow inside, and not very sturdy, so if I make them again I will glue pieces inside to brace them. I didn't use a template, but I found one on the Mandalorian Mercs website that is pretty good although thinner than the actual guns and without a barrel.
The belt is a long long strip of fake leather that's the circumference of my waist. The curved parts that attach the holsters are each roughly a 4th of a circle, and are attached to each other by a rectangular spacer. Next came the holsters, I made a template out of paper and measured it on one of the blasters, and traced it onto my fake leather twice. I hot glued it together, and though I doubted it would be strong enough, it's done great so far. The holsters are riveted to the middle of each spacer with two rivets.
The little pouches are all made from thin cardboard (see templates) and have fake leather glued on. The flaps are held down with velcro, and all the pouches are riveted onto the main belt, the smaller with one rivet and the larger with two. Also they're all functional which is pretty fun.
Step 5: Fabric Parts


Alrighty so the fabric parts have some kind of tricky measuring, so I'll do my best to explain everything.
I made the flare armbands first, starting with the flares themselves. Using sheets of thin cardboard, I cut out 24 dime-sized circles and 12 rectangles that are 3 and 3/8'' long and 2 and 1/2'' wide. I rolled each of the rectangles into a tube the width of each circle, and secured them with tape before hot gluing the circles to each end. I hot glued toothpaste caps to the end of each, and plastic rolls from floss dispensers to the other ends (yep, really.) Cutting out narrow strips of cardboard I glued them on to add detail and painted all the flares silver, weathering them with watered-down black paint.
The armband itself it two pieces of 14'' long and 3 and 1/4'' wide fabric, sewn back to back and flipped inside out (I made two of these so four pieces) to create nice seams. The overlay is two pieces, one for each band, which are hemmed on each long side. I laid out the armbands and spaced the six flares on each (mine are about 1 flare's width apart), and laid the overlay piece on top of all of them, almost tucking it under each flare before pinning it so they would be secure. I sewed the overlay down in between all the flares, and attached three snaps to each end, one set on top and one on the underside. They should be tight enough that they stay up but not tight enough to cut off circulation.
Next I made a Kama, which is sort of like a ceremonial skirt (see pattern). Using one piece of broadcloth, I folded it in half (so each side would be equal) and cut it to make a point. From the remaining material I cut out two long strips to be the tails that hang down in the front. Each piece can be hemmed or duplicated and sewn together for more weight and durability. Right now I just tuck both the Kama and the tails under the gunboat to hold them up, but eventually I'm going to make a girth belt and attach them to it via snaps.
Step 6: Helmet

Can't be a Mandalorian without a brain bucket, but I ran out of time to make one. Whoops.
I made a trashy paper version using the Boba Fett helmet templates from Honus (Thank you!) that ended up a little small because I downsized the back pieces, but otherwise looked good, so I might make one from some sturdy cardboard sometime in the future. Another option is buying one, the Rubie's deluxe Jango Fett helmet is inexpensive and easy to repaint, and while it would need a new visor, they're easy to get for around 20 dollars.
Step 7: Celebrate!


Congratulations, you made it to the end! Grab a friend to take way too many pictures of your fabulous armor.
I'll probably make a fabric girth belt and flak vest at some point, but right now my sewing machine is broken, and they would take far too long to hand sew. So for now, my kit is complete. Thank you for reading, I hope you enjoyed it! Comment with any suggestions because I certainly need them, and if you really, really liked it, please consider giving this instructable your vote.
Vor'e, and happy Star Wars Day!

Second Prize in the
Tape Contest


