

Introduction: Carbon Composite Hydrofoil From Free Junk!


Here's how to shape a carbon fiber hydrofoil wing from a chunk of broken yacht mast.
The same techniques work for making centerboards, surfboard fins, or any other carbon thing you might want. Even propellers and windmill blades if you make templates to account for twist.
Here's the side view of the new hydrofoil blade I just made. It's a front wing for a Hydrothopter.
Carbon fiber costs way too much these days. Fortunately the free stuff is still free.
Step 1: Scavenge Carbon
Why is carbon fiber so expensive now? Stealth aircraft, superyachts, and even new civilian airplanes are using it up, and they didn't include "supply chain management" in their huge plans. So there's a shortage and a bidding war drives the price up.
The good news, you can get more of it for free than ever before, if you look in or near the right dumpsters. At the boatyard near me they have to pay people to cut the stuff up and throw it away.
Usually it's in the form of pre-cured composite structures such as broken masts.
There is more of this anywhere carbon gets made, fixed, or used. If it's fiberglass blanks you want, say for surfboard fins that have a little more flex, free fiberglass is also abundant. This same boatyard cuts up fiberglass yachts and packs the pieces into dumpsters to haul away. Those slabs of fiberglass are really amazing, seen on edge. You could make some great fins out of that.
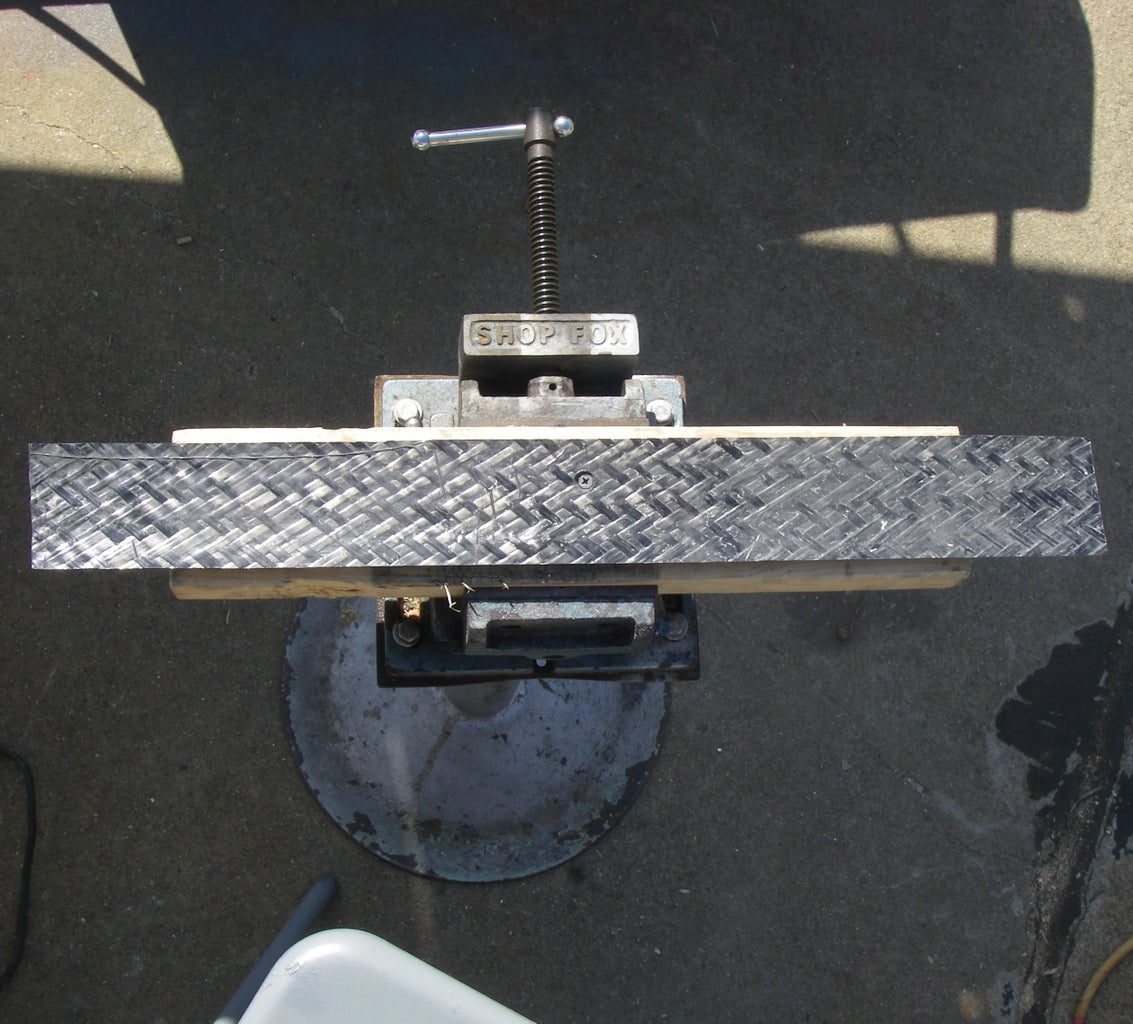
Get your carbon and mark the outline for your blank. These chunks are a little shorter than the original wing, so I laid out a wider wing with slightly less wing loading.
Step 2: Cut Out Your Blank

Learn from my mistakes. Wear gloves, glasses, and full-coverage clothing.
I was in a hurry so I just wore glasses and a dust mask. It wasn't enough.
I used a circle saw to cut out my first wing blank. It cuts fast, but it puts a lot of flying crap everywhere.
This is a magnesium-framed left-handed circle saw. I can see the blade clearly, which means it can shoot tons of crap right into my face. Cutting the carbon with a carbide-tipped blade throws some sparks. I didn't know that would happen.
I spent the rest of the day using duct-tape to clean the prickly fibers out of my skin. I cut the next blank with a sawzall. There wasn't as much of a snowstorm, but I still got all itchy. It got in my sandals and made my feet prickly too.
Step 3: Edge the Blank


This belt sander has a dust-collection system, but it still kicks a lot of fibers out the back. I've gotten smarter, now I'm wearing gloves duct-taped to my longsleeved shirt.
The 50-grit belt on this sander really cuts fast.
I check the blank's edge with a ruler to make sure it's straight.
Step 4: Pick a Foil, Any Foil

The original front wing foil was approximately a "Clark Y".
So that's the foil section I'll shape onto this foil. Thickness is approximately 12% of chord, which is a hair thicker than this plot.
Notice that the bottom of this foil is mostly flat. Except for the leading edge area, the top of the foil has a gentle curve that's almost a circular arc. The existing outer surface of the blank nearly matches the top curve.
For a good time browse the UIUC foil section catalog.
Whatever odd piece of carbon you start with, you may find a foil section that matches it well.
Step 5: Shaping Stand
I drilled and countersunk the mounting hole that will bolt this foil onto the Hydrothopter. I screwed the blank to a chunk of 2x4 and clamped it in a vise.
I drank some coffee and started shaping the bottom of the foil.
Step 6: Shape the Tail

Using long even strokes, I belt sanded the bottom portion of the trailing edge thin.
It takes a lot of concentration to get the strokes even and at the right angle.
Foil shaping on wood using a planer is a lot easier than this. In that situation you draw the foil sections on the endgrain and plane down to it using full length strokes. It's pretty easy to shape the whole length the same way. Unfortunately the belt sander isn't a planer.
Step 7: Check and Recheck


You've heard "measure twice, cut once?"
For freehand foil shaping it's more like "measure 20 times, cut 19 times".
I checked my work many times between strokes with a ruler to make sure it was flat and planar.
I checked it with a caliper to make sure it was the right thickness.
I rubbed it on some flat pavement to verify that it was planar. I found out that truly flat pavement is a rarity.
Step 8: Leading Edge Marking

That was easy. Most of the foil is already shaped, thanks to the flat bottom of the Clark Y section. The blank wasn't quite thick enough, so there's some cloth weave that never got sanded.
I'll fill that in later with bondo. If I needed the strength of full carbon, I would have laminated two blanks together for thickness.
Now I'll shape the leading edge. I'm painting the leading edge with white correction fluid to make the guidelines easier to see.
Step 9: Scribe a Guideline

All the deep cuts are totally flat cuts. That's important. A flat facet is easy to measure and check that it's correct. So we cut down to the curve of the foil as a series of flat facets.
I use my calipers as a scribe to mark a guideline on the leading edge.
Step 10: Grind Down to the Guideline

I carve a flat facet down to approximate the leading edge shape.
Step 11: Top Surface Shaping

I grind another facet on the top surface, then I round the facets into the final curve.
The dangerous work is over. I switch to hand sanding with blocks, then hand-sanding with finer grits of sandpaper.
The foil is shaped.
Step 12: Mix Bondo

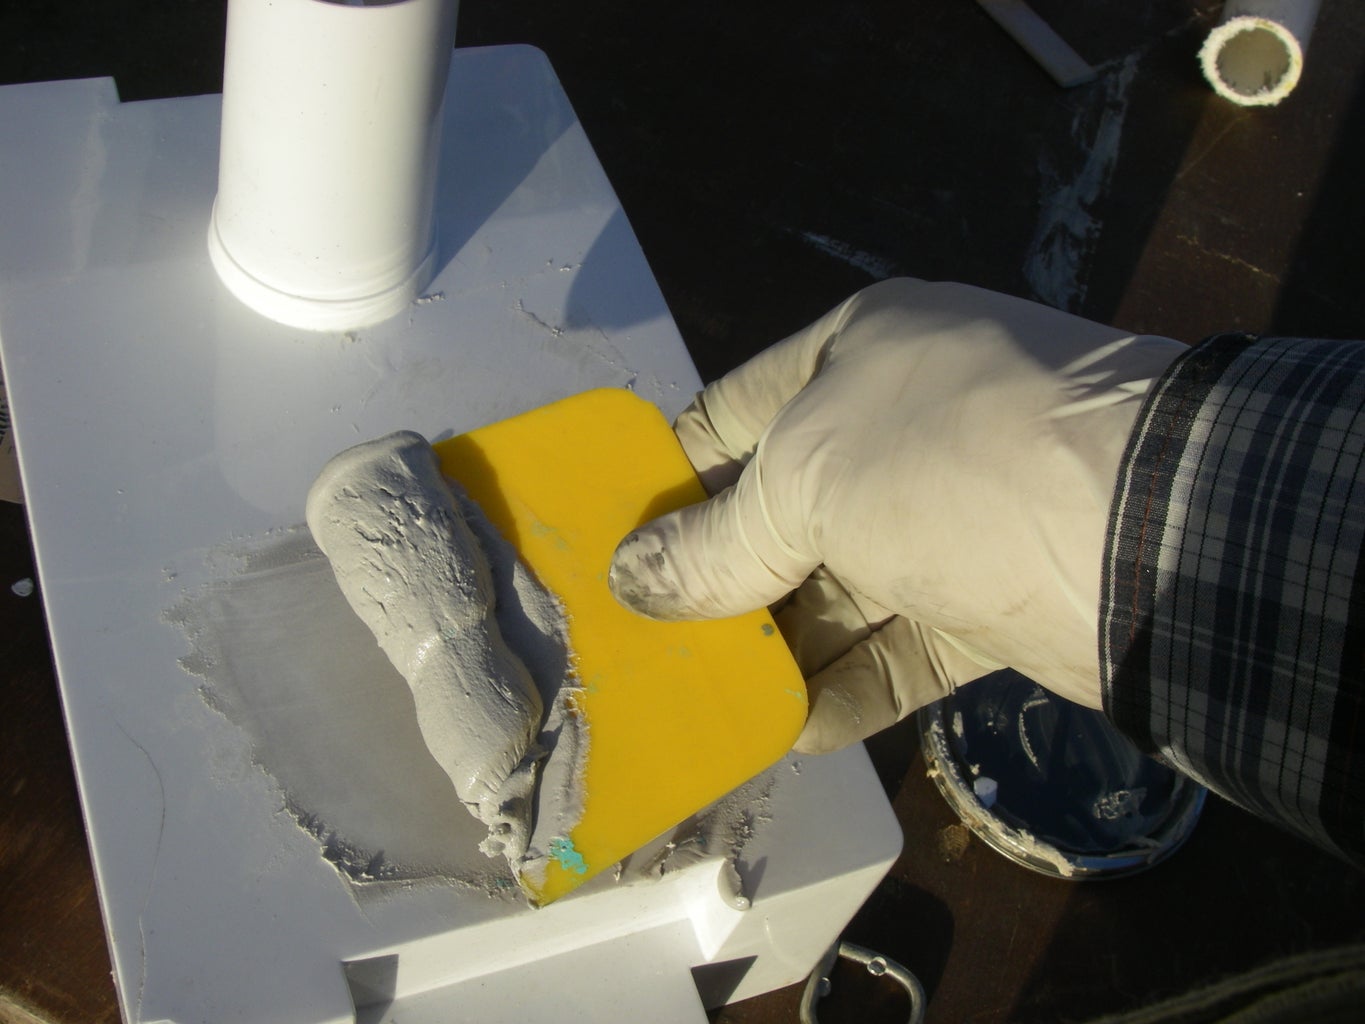
Warning!: MEKP catalyst is very dangerous to your eyes. Wear eye protection. In industrial arts class they told us it would destroy our optic nerves. Don't breathe it either.
Bondo or "body putty" is a mixture of polyester resin and fine glass beads. Boat shops call it "Fairing Compound" and use hollow glass microspheres instead of the heavier glass beads. Follow the directions. Add the right amount of MEKP catalyst to make it set up. More catalyst makes it set quicker, for small jobs you can use a lot because you don't need as much working time. Catalyst comes in clear and pigmented versions. The pigmented kind is easier to mix fully, but I'm out of that.
Bondo is cheap. Do a test first to see if you guessed right about how much catalyst to add.
Bondo is free for me because I rescue it from toxic dropoff reuse piles.
Step 13: Spread Bondo

Bondo is cheap. Spread it thick. Polyester curing is an anaerobic reaction. The stuff on the surface doesn't cure as well. Work it into the pinholes of the layup.
Step 14: Fair the Foil

The bondo stops flowing before it gets fully hard. You can start carving it when it's still like cheese. That's one reason panel beaters like it so much. They'll use a "surform" tool like a cheese grater on the soft stuff.
I did the rough work with that bondo rasp. I used the wire brush to clean the rasp's teeth. When the bondo was hard enough I switched to the sanding block, then hand sandpaper of finer grits.
Use your hand to check for smoothness. Your hand can detect microscopic features that your eye won't notice.
But It doesn't have to be perfect, because next there's...
Step 15: Spot Putty!


Also called "glazing putty", it's made of nitrocellulose!! A.K.A celluloid, just like:
ping pong balls
old movies
smokeless gunpowder
aircraft dope
It's dissolved in some brain-killing solvent. Wear your carbon mask and leave if you smell it.
This stuff sets up faster than bondo and is much smoother. It's even easier to sand. Use it to fill in the small imperfections left from the bondo. Sand the hell out of it with your various sanding blocks and grades of sandpaper. There's no such thing as a permanent mistake anymore. You have entered the "java virtual machine" of bodywork.
Step 16: Faired!
There it is!
It looks like cancer, but it feels amazing. It's also the proper foil shape.
Next comes paint. In a body shop they'd use three different primers.
Sealer primer: to cap the pinholes in the bondo and keep it from drinking paint.
Filler primer: a high build primer for more smoothing, sanding between coats.
Some other primer: I don't know, these dudes worship Buddha and he gets mad if it's not perfect.
Step 17: Paint!


I used "quick drying fast build blah blah primer" to paint mine. "quick drying" is important, because it's going in the water today. Then I worried about losing it, so I painted a coat of dayglo orange over that.
And then it's off to the dock for...
Step 18: Testing!


The new wing works great!
I rode across to the public dock, explained what I was doing to a toddler there, and rode back.
Thanks to Star for great photos!
Participated in the
Epilog Challenge


