

Introduction: Hidden Door Table (Reclaimed Wood) - UPDATED


99% of of all my wood I used is thrown away pallet wood from my company. Perfectly good wood, just needs some TLC. The table top portion was left over from an old computer desk I saved the boards after de-assembling.
After seeing some other collapsable workspace tables on Youtube I concocted my own version. My shed (aka The Time Machine) has limited space. So I have to make do with with what I have. So designing this collapsable / hideaway door table made a lot of sense to me. And was fairly easy to accomplish. Using the scraps I had laying around the shop. And thats the whole point of Reclaiming, making do with what you have laying around. Probably why I rarely throw anything away.
Step 1: Step 1: Design.


Taking some measurements of my door frame both interior space width and frame width and height from the center of the door. Then I measured out from the door how far I wanted the table to come. From that distance I roughly measure how long I would need the legs to be.
Step 2: Step 2: Assemble Table Portion.

I had some old particle board panels from a computer desk that I no longer needed but had saved. One of the pieces was almost a perfect width. I had to trim a few inches off with my skill saw. I created a 2"x4" "U" Frame for the underneath side with a small half inch lip. Drilling pilot holes and then anchoring top with exterior wood screws. to "U" shaped frame. So instead of a box, one long side open.
Step 3: Step 3: Attach Legs to Table

With the table made I took another set of measurements to double check how long my support legs would need to be. Once this was verified I cut 2"x4"s to length and then rounded the ends on each of them. Finding the center of the each rounded leg. I drilled a hole for the long bolts I would be using to hold legs to table. Then drilled holes thru and into the table frame with each leg being mounted on the inside of the frame. I added washers between the 2"x4" and frame to help the legs move easier. Also once I had the holes drilled for bolts, I drilled the holes in the physical legs just a drill bit size bigger again to allow for freer movement.
Step 4: Step 4: Attach Table to Door

Literally the only thing I bought to do this was a full hinge that ran the width of the door. I first screw the hinge to the table itself. Then propping up the table temporally into position attached the hinge to the door. Now if you do this right, the legs will be folded up into the underside of the table and hang down easily clearing the floor in the closed position.
Step 5: Step 5: Test Foldability and Add Table Locks


With the weight of the table I had to devise a locking system to keep the door in closed position. (see video) A simple long wood screw into door frame attaching to "L" shaped wood pieces that pivot. Again add a washer between the wood bracket and frame. Door should easily fold up and latch at the top. You'll notice the individual legs will be kind of clumsy folding down by themselves.
Step 6: Step 6: Add Leg Cross Support and Extra Leg/Door Stablizer


I added a cross support 2"x4" to keep legs together when opening and closing. Plus this adds extra stability to the table to keep it from torquing when open. I also added a custom notched angle support from the bottom of the door frame itself to the leg cross support. This isn't necessary but I found it gave me some extra piece of mind for when I use a heavier piece of work equipment on the table. I went back and notched out a hand grip in the leg cross support to help me to grab pull open or to close.
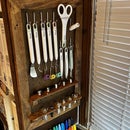
Step 7: Step 7: Multi-Purpose Use and Extra Features.


I then added an old extension cord to the mix by screwing in two old ladder hooks I had to each side of the legs and then wrapped the cord around. This works great. So now when I'm out working I only have to uncoil however much I need to power my needed tools. Having this table has proven very useful. I use my miter saw on it, my belt sander, grinder, etc. Especially when I don't want to fill my shed with sawdust. (I still have a improvised dust collection, but having it outside helps immensely with clean up). And when I'm done: Flip closed and hidden away. It really doesn't take up much space on the interior side of the shed. No more than the thickness of the 2"x4" and .5" table. Totally worth the effort.
Step 8: Added Feature


Hi All, its been a few years since I posted this (one of my first Instructables) and I came up with a way to make the table usable inside as well as outside. I measured the height the legs would need to be indoors for the table to be level. I removed them and then cut down the legs. I added hinges on the outsides. Then put eye hooks to hold the unneeded portions out of the way.
For stability when used outside I did the same thing with eye hooks. It's proven to be quite helpful when working inside for an extra work surface.

Participated in the
Outdoor Structures

Participated in the
Reclaimed Contest 2017

Participated in the
Hiding Places Contest 2017


