

Introduction: Hide-A-Key in a Sprinkler!


One of the most annoying things in my world is walking home from school to find that nobody is home and the doors are all locked. I have a bad tendency to forget my house keys everywhere, mostly on my desk in my house where they're not helping anyone. Long story short, I saw a sprinkler-shaped hide-a-key in a catalog and it hit me that it was a genius idea! Oddly enough, it cost close to $8, while a "real" sprinkler with all the mechanics inside often costs far less than that. I found an unused sprinkler in the shed and got to work... I present to you: the Sprinkler Hide-A-Key!
Waterproof, inexpensive, inconspicuous, and quick to build - let's go!
Step 1: Stuff You'll Need


Okay, brace yourselves, here's the parts list:
-A sprinkler*
-A dime. Yes. A dime.
you'll also need a hot glue gun, but that's it!
*This might seem obvious, but it's generally good practice to find a sprinkler that your keys will fit inside of. If possible, open up the sprinkler you plan to purchase/use to see if your keys will fit. If you have a car with a large key fob, you might have a harder time finding the appropriate sprinkler.
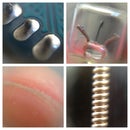
Step 2: Disassembly


This is about as simple as it gets. It may vary from sprinkler to sprinkler, but for mine, these are the steps to follow:
1) Unscrew the black plastic ring
2) Pull out the entire sprinkling (?) mechanism
3) Unscrew the brass nozzle
4) Slide off the white rubber gasket.
The parts you'll need to keep are the black plastic ring, brass nozzle, rubber gasket, and body of the sprinkler. If you come up with something useful to do with the spring, lemme know in the comments!
Step 3: Reassembly


Now it's time to reassemble them empty sprinkler. The whole idea here is that it looks just like a regular, functional sprinkler in order to conceal its true identity. All of this will be done with hot glue. You could use silicone or something similar, but hot glue seems to have sufficient waterproofing abilities for this application.
1) Glue the brass nozzle back into place in the white rubber gasket. Make sure it's centered as not to draw attention to scrutinizing eyes.
2) Glue the nozzle-gasket assembly back into the black plastic ring. When you do this, take care to not leave any glue on the threads of the ring, as you'll need to thread it back on to the body in a bit.
3) Dime time! Push your dime into place on the bottom of the sprinkler to cover the hole, then fill it over with plenty of hot glue.
Step 4: Final Steps


Well, you did it! It was a long, hard struggle for sure but now you're pretty much done. Go ahead and screw the cap back onto the body to make sure it all still fits together and to clear the threads of any hot glue. The final step here is to 'plant' it in your garden somewhere logical. For example, it's probably not the wisest idea to plant it in a flower pot next to your front door, nor is it a great idea to plant it 2 feet from a real sprinkler. Use your head and come up with a clever spot!
An addition to this build that might be worth looking into is adding some vertical fins to the body of the sprinkler, as I found that if the cap is put on as tightly as it should be, the entire sprinkler has a tendency to spin in its hole. this could be as simple as epoxying some scrap plastic to the sides, and probably doesn't need to be any more complicated.
I hope you've enjoyed making this; please comment and rate!


