

Introduction: How to CORRECTLY Braze (SILVER SOLDER) a Copper Pipe


So, today I’ll be explaining to you how to correctly braze a copper joint. There are 3 easy steps to getting this accomplished.
The first step is to prepare the joint. Skipping this step may result in an improperly brazed joint.
Step 2 is the actual brazing process which I’ll get to in just a minute.
And step 3, finishing off the joint.
Step 1: BRAZING VS SOLDERING


Brazing is a metal-joining process in which two or more metal items are joined together by melting and flowing a material into the joint, the filler material having a lower melting point than the adjoining metal.
The difference between brazing and soldering is the temperature necessary to melt that filler metal. That temperature is defined to be 842ºF/450ºC by the American Welding Society (AWS) but is often rounded to 840ºF. If the filler metal melts below 840ºF the process being performed is soldering.
Brazed joints are used for refrigeration, high-pressure air lines and HVAC where maximum joint strength is a must, and soldered joints are used in low-pressure applications such as potable water lines and some heating systems.
Step 2: TOOLS/MATERIALS FOR THE PROJECT


The tools and type of filler materials vary from a soldered joint to a brazed joint, so let’s go thru both of them together.
When soldering potable water lines, you’ll be using this type of solder which is called 95/5. This type of solder can’t be used when brazing so, you’re gonna be needing a filler material. There are many types of filler materials on the market and you’ll need to choose the right one depending on the type of job you are doing. In case of any doubts, Harris products does supply a very clear chart on what type of brazing rod to use for various types of materials being joined. For this demonstration, I’ll be using a Stay-silv 15 which contains 80% copper, 15% silver and 5% phosphorus. You’ll wanna get a rod that contains phosphorus as they’re self-fluxing, removing the need to apply any flux on the pipe.
Seeing silver solder melts at a much higher temperature, you’ll be needing more heat than your typical soldered joint.
Brazing smaller pipes is possible with a small propane torch, but larger pipes such as 1” and up require more heat, therefore, it’s recommended to use an oxy/acetylene system with an appropriate torch seeing silver solder melts at a higher temperature than normal solder. Oxyacetylene burns much hotter, at 3500*C or 6330*F compared to propane which burns at around 1995*C or 3620*F.
And finally, the torch. When soldering, a torch like this is used seeing only one gas is needed. Plus, propane torches don’t give out near as much heat as an oxy/acetylene torch does.
I’m using this oxy/acetylene port-a-torch kit from Harris, which is a Lincoln electric company and is great for light-duty brazing tasks such as this one. It comes in a carrying tote and there are 2 tanks, 1 for oxygen and 1 for acetylene, there’s also 2 regulators for each gas and the actual torch. You’ll also notice the torch tips that come with the kit, but we’ll talk about these later in the video. You could use a simple air/acetylene setup like this, but it’s considerably longer and doesn’t give you a clean joint like an oxy/acetylene kit does. However, they are more economical and lighter to carry around in tight spaces, so use what’s best for you.
Something else you might wanna consider is making sure your torch has flashback arrestors on the oxygen and acetylene side. Most new torches come with them built in. In the past, these were separate and needed to be installed on the hose itself. So just make sure your kit is equipped with them as they’ll stop a flame from going into your tank, which you don’t really want.
Some other things I’ll be mentioning in the video are some wire brushes, an inspection mirror, and a fire extinguisher.
Alright, so with that out of the way let’s get started
Step 3: BRAZING


If you are brazing on a refrigeration or cooling system with costly components, it’s highly recommended to purge your lines with an “inert gas” such as argon or nitrogen. During the brazing process, a lot of oxidation will occur inside the pipe, creating scale that could potentially clog these costly components and even, void a warranty. In this demonstration, I’ll be skipping this step.
So the first thing that needs to be done is to clean our pipe and fitting. For the pipe, I either use sandpaper like this or just an abrasive pad. This step is very important, as “proper wetting” is somewhat influenced by the pipe and fitting’s cleanliness. Wetting is the ability of a liquid to maintain contact with a solid surface, resulting from intermolecular interactions when the two are brought together. In other words, your filler material won’t fuse properly if they aren’t perfectly clean. Also, de-burr the inside of the pipe using either a round file or a dedicated pen reamer.
Now’s a good time to choose what tip you’ll be using for your application. Each manufacturer comes with a chart that specifies what tip you need for whatever thickness of the material you are dealing with. For this demonstration, I’ll be using a #2 tip from Harris.
If your kit comes disassembled like this one, go on and install both tank valves on their respective tanks without any thread sealants such as Teflon tape or pipe dope. Once both tanks have been filled, give them a quick purge to ensure no contaminants are going into the torch assembly. Then, connect both of your hoses and finally the torch.
Now open up both tanks and adjust both regulators to around 5Psi. Once full pressure is reached on the oxygen side, you could fully open the valve. On the acetylene side, however, it’s recommended to open the valve only a ¼” turn after the gauge reaches full pressure. This’ll allow for easy closure if an accident occurs. More pressure than this will result in an unstable flame so I recommend sticking with these numbers. Also, using the same pressure on both tanks means they’ll deplete equally which means 1 trip to refill instead of 2.
Go ahead and first open the acetylene knob about halfway and light the end of the torch with a striker like this. You’ll see a mix of soothe and smoke in the air, this is normal, just wait for both of them to clear up and slowly open up the oxygen side.
Step 4: TYPES OF FLAMES

There are 3 types of flames. One you don’t want is a carburizing flame. Here’s what a “carburizing flame” looks like, it’s easily distinguished by its 3 colors, and leads to excessive carbonization on the pipe which isn’t necessary and could compromise the joint. Secondly, is an oxidizing flame which you don’t want either. This type of flame, as the name states, will oxidize your workpiece which is unwanted. And lastly, a neutral flame. A neutral flame is what you are looking for as it doesn’t carburize nor oxidize, it has a perfect mix of oxygen and acetylene and is typically a clear blue color like this.
Step 5: MORE BRAZING


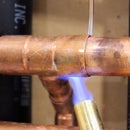
The first part you wanna to heat is the pipe, the reason being is that between the fitting and the pipe is a small gap of air. Seeing air doesn’t transfer heat very well, it has to be heated independently, in the beginning, to make sure it reaches brazing temperatures. Once the pipe has been heated, start heating the fitting’s hub, always staying in motion. Every once and a while, use your filler material to test if it’s hot enough, and once it is you’ll see it start to melt. At this point, you wanna make sure you don’t heat the actual filler material, you want the heat from “the joint” to melt it so, to make sure you do it the right way, don’t apply any concentrated heat on the actual brazing rod itself.
You may notice your pipe becoming red hot but don’t use more heat than that as to not overheat it. As I mentioned earlier, proper wetting is crucial when brazing and overheating the joint will inhibit proper capillary action. Capillary action is the ability of a liquid to flow in narrow spaces without the assistance of, or even in opposition to, external forces like gravity. A good example of capillary action is when a paintbrush or paper towel is dipped in a liquid. The liquid is absorbed without the aid of external forces. When you feel that the joint is completely filled, apply a small filet or cap where both the pipe and fitting meet. A proper filet or cap should be concave just like this.
When you’re finished brazing, slowly close the oxygen knob on the torch, followed by the acetylene knob and then close both tank valves to make sure no gases are passing thru. I always like to purge my hoses before saying I am completely done.
With your joint properly brazed, wait for it to cool down naturally. Applying water to a heated pipe as such could cause a fracture in the joint, resulting in a leaky joint.
Once the joint cooled down, get your wire brush and remove any scaling that occurred on the surface of the pipe. You wanna be able to inspect your work and make sure there aren’t any voids. If you’re in a tight spot, a mirror could help you analyze your joint to see if any adjustments may be needed.

Participated in the
Water Contest


