

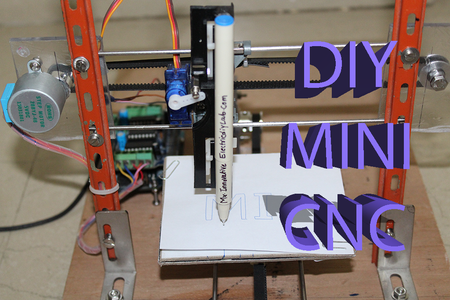
Introduction: How to Make Mini Home Made CNC Machine Arduino+28BJY-48 Stepper Motor


This is mini CNC have approx 100mm X 100mm plotting are,
I have used 28BJY-48 Stepper motor to build this machine this stepper motors drive by L293D Motor shield and arduino.
This machine is very easy to build at your own all necessary instructions are provided in post, you can try your own ideas to get something new.
I have used regularly available hardware to build this machine no need to buy any high end components just be creative.
Step 1: Video
Watch the complete video it covers all the necessary instruction to build this mini CNC machine
Step 2: Material Required (Hardware & Software) Hardware


Hardware
28BJY-48 Stepper motor :- http://amzn.to/2wCPqI0
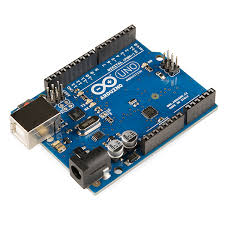
Arduino UNO :- http://amzn.to/2wsvIhB
L2938 Motor shield :- http://amzn.to/2wsvIhB
GT2 Timing belt 2meter :- http://amzn.to/2wsvIhB
GT2 Pulley 2nos. :- http://amzn.to/2vbmLJE
Idler Pulley 2nos :- http://amzn.to/2wCuykd
Bike spoke for Guide Rails approx. 3mm dia.
DVD drive slider for platform of X-axis & Y-axis
Some Acrylic Hollow tubes
Some Acrylic Sheet pieces
Slotted channel approx. 1mtr
Nut bolts as required
Software
Arduino IDE (Version 1.6.3) (https://www.arduino.cc/en/Main/Software)
Processing IDE (Version 3.0.2) (https://processing.org/download/?processing)
Inkscape (version 0.48.5) (https://inkscape.org/en/download/)
Go to link to download the particular software select software pack according to you system
**NOTE:- Inkscape version must be 0.48.5 only other wise gcode extension will not work.
Role of Hardware & Software in this Machine
It is good to know role of each component and software in CNC machine
1) ARDUINO Arduino is basically work as a brain of CNC Machine a CNC code uploded to arduino so that when Gcode stream to arduino Arduino commands motor shield to run stepper motors.
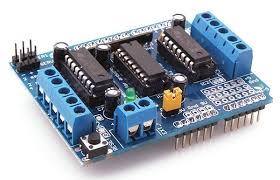
2) L293D Motor shield This is dedicated shield to control verities of motor with arduino here this shield control two stepper motor(x-axis & y-axis) and one servo motor,https://cdn-learn.adafruit.com/downloads/pdf/adafruit-motor-shield.pdf read this for detail technical knowledge.
3) Servo motor Basically this motor is used here just to UP/DOWN pen servo is connected with motor shield
4) Arduino IDET his is used to upload code to arduino
5) Processing IDE This is used to stram G-CODE to arduino
6) Inkscape This is used to make G-CODE file of any image
Step 3: Machine Assemble


Make hole in Wooden sheet to mount all necessary components.
I have used here 5mm thick wooden sheet & drill some holes to mount X-axis & Y-axis
I have mount Four Acrylic tube to fit X-axis Guide rail on it.
Bike spoke wires approx 3mm Thick metal wires are used as guide rail for axis.
To make platform i have used sliding platform of DVD drive. adjust and secure sliding arrangement in such way that they can slide very smoothly if required apply some lubrication on guide rails
Stepper motor and idler pulley are mounted on board. Stepper motor , sliding platform & idller pulley are connected with GT2 timming belt in this way installation of X-acxis is completed.
I have installed slotted channel vertically to mount Y-axis arrangment. Slottedd channels are very good for this purpose you can adjust Y-axis height wrt to X-axis as required.
Y-axis driving mechanism is installed in a same way as we installed X-axis
Slide must be friction-less and must be smooth in motion
Prepare a X-axis drawing board from cardboard pieces and glue it on X-axis platform.
Installing pen up down mechanism as a Z-axis made from some parts of DVD mechanism
Attache a mini Servo on Z-axis to make pen up and Down
Attaching pen on Z-axis,
Place a plan paper on drawing board befor plote anything you need to do wiring of motors & upload code to the machne let see how to upload those code in next step.
Step 4: Wiring Drawing

Connect X-axis at M1 & M2 Port of L293D Motor shield
Connect Y-axis at M3 & M4 Port of L293D Motor shield
Very important remove that power jumper from the L293D motor shield board Apply 9V DC 1 amps power supply to the L293D Motor shield board Place motor shield on Aruino UNO board.
Connect arduino with PC via USB cable Read next Step to know how to load code to arduino
Step 5: Programming Arduino

Now your machine is ready its time to give life to you machine
So we need to program arduino Here we are using L293D Motor shield.
so it need to add some library (AFMOTOR LIBRARY) to arduino IDE Software so first download & upload this library to Arduino IDE to know how to add library watch video
Download Adafruit motor shield Library
http://www.mediafire.com/file/333bs32xff29b68/adaf...
Then upload this CNC Code to arduino
Click to download arduino code
http://www.mediafire.com/file/ftk4f115f15zxrl/CNC_...
After successfully compiling and uploading your arduino programming part is over now move towards G-CODE
Step 6: Preparing G-CODE

G-code is the format of file which your machine can understand and work acordingly
Suppose you have to draw some text with machine so you need its Gcode so what you do
Inkscape software provides you a facility to convert image or text into G-code
how to convert file in G-code watch video
Sample G-code
sample 1
sample 2
sample 3
sample 4
Watch this video to know how to make G-code file
Watch this to know how to add G-code extension in inkscape
Click to download Makerbot unicorn G-code extension http://www.mediafire.com/file/5x2tqwcha2a7w1w/ink... How to add this extension to Inkscape
1) Unzip the file
2) Open the folder by double click
3) Copy all the sub folders & files
4) Right click to the inkscape icon from desktop
5) Go to Properties
6) Go to open file location
7) Open “SHARE” folder
5) Open “EXTENSION” folder
6) Past here all that file
7) its done
Step 7: Processing IDE
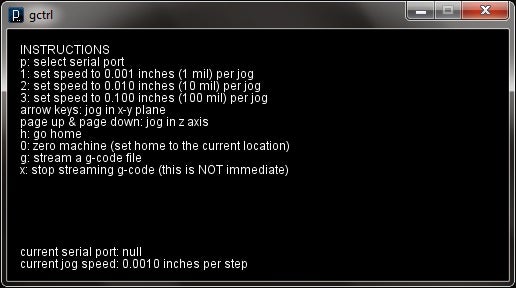
Our arduino is ready our machine is ready and our g-code is also ready to print
So we need something which can transmit g-code to Arduino, so here we have Processing GCTRL program Download GTRL Code from below link Click to download GTRL http://www.mediafire.com/file/z4wtj3rzlxhuj3i/GCT...
After downloading the GCTRL Code unzip the folder load the gctrl code to processing and press play button
a new window open from this window you can select your communication port,
By pressing “G” a browser is open select your g-code file and upload it
as soon as you upload the file Machine start drawing
Here is some ready made g-code file is attached Thanks for your attention friends
I hope i cover every point of how to make CNC machine hope you have appreciate this if you are trying to make this machine have a good luck friend
If you stuck anywhere in between feel free to contact i will surely help out my level best
If you have some new idea to improve any thing in this please most welcome you can share with us.
Thanks & bye subscribe our Youtube channel https://www.youtube.com/channel/UCsOFElmDD3e8l-RG...

Participated in the
Automation Contest 2017


